
Zodiac Mochi Crochet Amigurumi Keychain Free Pattern
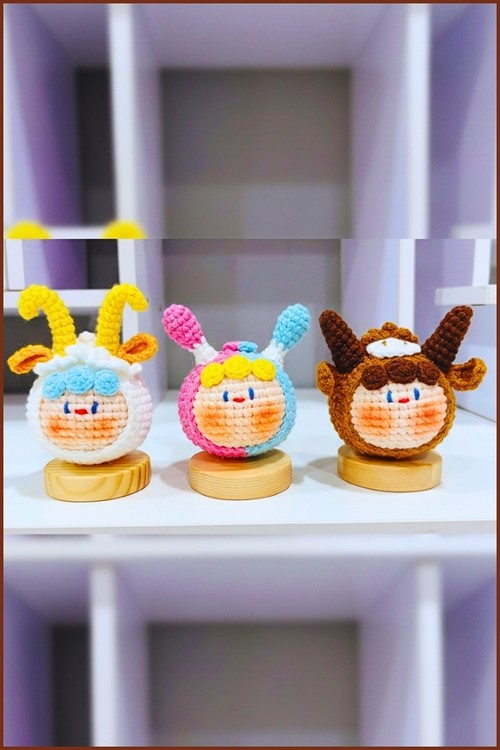
Crochet Zodiac Mochi Keychain, a sign-specific mini amigurumi that works as a handmade birthday gift or personal carry. Compact build, real personality.
A birthday gift that actually required thought. Not something pulled from a shelf, but made with the recipient's exact sign in mind the right colours, the right symbol, small enough to clip onto anything they carry daily.
Crochet Zodiac Mochi Keychain

Zodiac gifts land differently when they're personalised to that level. The mochi shape keeps the build compact, which means the character detail has to do real work in a small space. That tension is what makes finishing one feel earned.
Skill level
-
Intermediate beginner
-
Requires comfort with color changes and working with smaller hooks
Finished size
-
Approximately 3 to 4 inches tall depending on tension
-
Perfectly sized for a backpack charm or keychain
Materials
-
Baby yarn in White, Pink, Blue, and Yellow
-
2.0 mm crochet hook
-
Fiberfill or cotton stuffing
-
Yarn needle
-
Scissors
-
Keychain ring
Abbreviations
-
MR: Magic Ring
-
Sc: Single crochet
-
Inc: Increase
-
Dec: Decrease
-
Hdc: Half double crochet
-
Dc: Double crochet
-
St: Stitch
-
Sl st: Slip stitch
Helpful notes before starting
-
Use a stitch marker to keep track of the start of your rounds, especially during the split-color hood.
-
The use of "staggered" increases and decreases is vital here as it prevents the "hexagon" shape and keeps your mochi perfectly round.
-
When changing colors in the hood, pull the new color through the last two loops of the previous stitch to ensure a sharp, clean vertical line.
-
Keep your tension consistent between the inner ball and the outer hood to ensure they fit together snugly.

Construction overview
-
This project is built in two primary layers: a solid white inner mochi and a dual-toned outer hood.
-
The horns and hair tufts are worked separately and sewn onto the hood before the hood is secured to the inner ball.
-
The inner ball is stuffed firmly to provide the structural "bone" of the toy, while the hood acts as the decorative "skin."
Stitch and shaping clarity
-
Staggering means you split the even-numbered increase sets. For example, instead of (4 sc, inc), you work (2 sc, inc, 2 sc). This shifts the placement of the increases so they don't stack on top of each other.
-
The horns utilize a color change to create a distinct base and tip, with a sudden increase in the final round to create a flange for easier sewing.
-
The star accessory uses a foundation ring of half double crochets to provide a sturdy base for the points.
Inner Mochi Ball White
-
R1 Create a magic ring and work 6 single crochet
-
R2 Increase in each stitch for a total of 12 stitches
-
R3 Alternate 1 single crochet and 1 increase around for 18 stitches
-
R4 Work staggered increases using 1 single crochet, 1 increase, 1 single crochet repeated around for 24 stitches
-
R5 Work 3 single crochet and 1 increase repeated around for 30 stitches

-
R6 Work staggered increases using 2 single crochet, 1 increase, 2 single crochet repeated around for 36 stitches
-
R7 Work 5 single crochet and 1 increase repeated around for 42 stitches
-
R8 to R14 Work 42 single crochet in each round
-
R15 Work 5 single crochet and 1 decrease repeated around for 36 stitches
-
R16 Work staggered decreases using 2 single crochet, 1 decrease, 2 single crochet repeated around for 30 stitches
-
R17 Work 3 single crochet and 1 decrease repeated around for 24 stitches
-
R18 Work staggered decreases using 1 single crochet, 1 decrease, 1 single crochet repeated around for 18 stitches
-
Stuff the mochi ball firmly with fiberfill
-
R19 Work 1 single crochet and 1 decrease repeated around for 12 stitches
-
R20 Work 6 decreases, fasten off, and sew the opening closed

Outer Hood Pink and Blue
-
R1 Create a magic ring and work 6 single crochet
-
R2 Work 3 increases in Pink, change color, then work 3 increases in Blue for 12 stitches
-
R3 to R7 Continue increasing following the same mochi ball increase pattern while changing color halfway through each round
-
R8 to R16 Work 21 single crochet in Pink and 21 single crochet in Blue for each round
-
R17 Begin decreasing following the mochi ball decrease pattern while maintaining the color split
-
R18 Continue staggered decreases with color split, then fasten off
Horns Make 2 One Pink One Blue
-
R1 Create a magic ring and work 6 single crochet
-
R2 Increase in each stitch for 12 stitches
-
R3 to R4 Work 12 single crochet in each round
-
R5 Work 1 single crochet and 1 decrease repeated around for 8 stitches
-
R6 Work 8 single crochet and change to White yarn at the end
-
R7 Work 2 single crochet and 1 decrease repeated twice for 6 stitches
-
R8 Work 6 single crochet
-
R9 Increase in each stitch for 12 stitches, fasten off leaving a long tail
Accessories
-
Hair Tuft Small Work a magic ring with 10 half double crochet using 5 Blue and 5 Pink
-
Hair Tuft Medium Work a magic ring with 8 half double crochet in Yellow
-
Hair Tuft Smallest Work a magic ring with 9 single crochet in Yellow
-
Yellow Star Work a magic ring with 10 half double crochet then create 5 points by chaining 4, skipping 1 stitch, working single crochet, half double crochet, double crochet, skipping 1 stitch, and slip stitching into the next stitch
Assembly guidance
-
Slide the outer hood over the stuffed white mochi ball. The hood should cover the top and sides, leaving the bottom of the white ball slightly visible or flush depending on how tightly you decreased R18.
-
Pin the horns to the top of the hood. The Pink horn should sit on the Blue side of the hood, and the Blue horn should sit on the Pink side to create a pleasing contrast.
-
Arrange the hair tufts in the center of the head between the horns, layering the yellow tufts over the split-color tuft for volume.
-
Sew the star to the front or side of the mochi, ensuring it is anchored firmly through both the hood and the inner ball to prevent shifting.
Eye and facial feature placement
-
Position your safety eyes or embroidered eyes between rounds 10 and 11 of the outer hood.
-
Space the eyes about 7 to 8 stitches apart to maintain the "kawaii" mochi aesthetic.
-
Ensure the eyes are centered relative to the color split line of the hood.
Stuffing tips
-
The inner ball should be stuffed until it is firm and holds its shape without any visible gaps between stitches.
-
If you see the stuffing through the stitches, your hook size may be too large or your tension too loose.
-
Do not stuff the horns heavily; a small amount of fiberfill helps them stand upright, but overstuffing can make them look bulky at the base.
Finishing notes
-
Once all parts are sewn, weave in all yarn ends deeply into the center of the mochi ball to secure them.
-
Attach the keychain ring to the very top center of the hood, catching several strands of yarn to ensure it can support the weight of the toy.
Beginner notes
-
If the color changing in the hood feels difficult, practice carrying the unused yarn behind your stitches (tapestry crochet) or simply drop and pick up the yarn if you don't mind a few floats on the inside.
-
The "staggered" technique is your best friend for round shapes; if the pattern says "2 sc, inc, 2 sc," do exactly that rather than a standard "4 sc, inc."
Troubleshooting
-
If the hood is too tight to fit over the ball, check your tension. The hood needs to be slightly more relaxed than the inner ball.
-
If the color split line is leaning diagonally, you may need to add an extra stitch or shift your color change by one stitch every few rounds to keep the line vertical.
Customization ideas
-
Change the horn colors to Gold or Silver for a more mythical look.
-
Add a small pink embroidered "V" for a mouth between the eyes to give the dragon more personality.
-
Use a variegated yarn for the hair tufts to create a "galaxy" effect.