
Free Deadpool Chibi Amigurumi Crochet Pattern
Oval eye patches and the full mask make this Crochet Deadpool Amigurumi Chibi instantly readable to anyone who grew up with the comics. For the teenager who quotes the films and the adult who pretends they do not. Both of them want this on their shelf.

Belt and holster pieces add to the assembly. Intermediate construction overall. The eye shape is the one element that has to land or the character does not.
Skill level
-
This project is best suited for intermediate crocheters or confident beginners who are ready to practice frequent color changes and working with multiple strands of yarn.
Finished size
-
The final toy stands at a compact size ideal for display desks or keychains, depending on your tension and yarn weight choices.
Materials
-
Yarn in red, black, and light brown
-
Crochet hook size 4
-
Needle
-
Scissors
-
Stuffing
-
Glue
-
6 mm safety eyes painted white
Abbreviations
-
ch: chain
-
sc: single crochet
-
inc: increase
-
dec: decrease
-
sl st: slip stitch
-
BLO: back loops only
-
MR: magic ring
Helpful notes before starting
-
Use the tapestry crochet technique for the head and body to keep the yarn floats hidden inside the piece, ensuring a clean exterior.
-
When changing colors, always pull the new color through the last two loops of the previous stitch to create a seamless transition.
-
Since the eyes are painted white, ensure the paint is completely dry before inserting the safety backs to avoid staining the red yarn.
-
Marking the first stitch of every round is essential for tracking the specific color counts in the mask area.
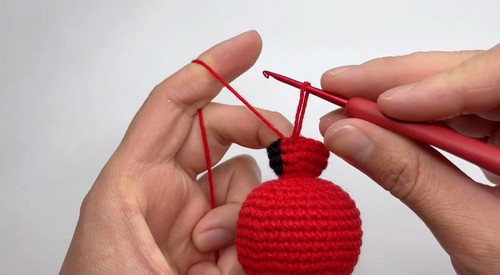
Construction overview
-
The project begins with a standard spherical head where the black mask detail is built directly into the rounds through strategic color swaps.
-
The body continues downward from the head, incorporating the belt area and chest details before splitting into two distinct legs.
-
Arms are worked separately and attached later, while the tactical accessories like the belt and swords are added last to provide dimension.
Stitch and shaping clarity
-
The mask area on the head uses specific stitch counts to create the iconic "almond" or "droplet" shape around the eyes.
-
Back loop only (BLO) rounds are utilized on the arms and legs to create sharp, structural ridges that mimic the edges of boots and gloves.
-
Increases in the body transition the narrow neck into a wider torso, giving the character a sturdy, heroic stance.
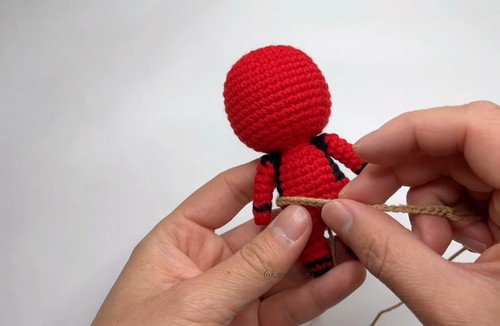
Step by step pattern instructions
Head
-
Rounds 1 to 7 work a standard head base using red yarn in closed rounds
-
Round 8 work 6 single crochet in red, change to black on the sixth stitch, 1 single crochet in black then change to red, 8 single crochet in red, 1 single crochet in black then change to red, 20 single crochet in red
-
Round 9 work 6 single crochet in red, 2 single crochet in black, 6 single crochet in red, 2 single crochet in black, 20 single crochet in red
-
Rounds 10 to 12 work 6 single crochet in red, 3 single crochet in black, 4 single crochet in red, 3 single crochet in black, 20 single crochet in red
-
Round 13 work 7 single crochet in red, 2 single crochet in black, 4 single crochet in red, 2 single crochet in black, 21 single crochet in red
-
Final rounds decrease evenly in red until the head is closed
Body
-
Round 19 work 2 single crochet then 1 increase repeated around
-
Round 20 follow color changes as worked with alternating red and black increases to reach 18 stitches
-
Rounds 21 to 22 work 1 single crochet in red, 3 single crochet in black, 6 single crochet in red, 3 single crochet in black, 5 single crochet in red
-
Round 23 work 1 single crochet in red, then single crochet and increase sequence in black, continue with red and black sections as established
-
Round 24 work 1 single crochet in red, 4 single crochet in black, 6 single crochet in red, 4 single crochet in black, 5 single crochet in red
-
Round 25 work 3 single crochet, 1 increase, 8 single crochet, 1 increase, 7 single crochet
-
Rounds 26 to 28 work single crochet evenly around
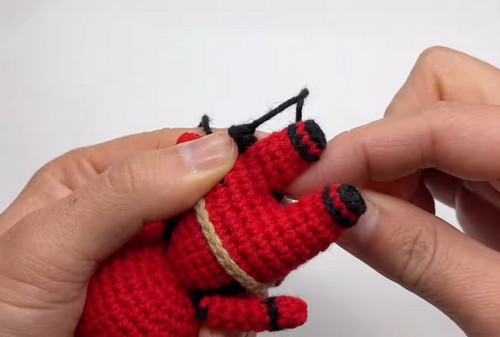
Legs Make 2
-
Round 29 using red yarn work 9 single crochet and close with a slip stitch
-
Rounds 30 to 31 work 9 single crochet
-
Round 32 work 1 single crochet, 1 decrease, 6 single crochet
-
Round 33 work 7 single crochet in black using back loops only
Arms Make 2
-
Round 1 make a magic ring with 6 single crochet in red
-
Round 2 work 6 single crochet in black
-
Round 3 work 6 single crochet in red using back loops only
-
Rounds 4 to 6 work 6 single crochet in red
-
Round 7 right arm work 1 single crochet, 1 increase, 4 single crochet changing to black on the last stitch
-
Round 7 left arm work 4 single crochet, 1 increase, 1 single crochet
-
Round 8 work 1 single crochet, 1 decrease, 4 single crochet in black
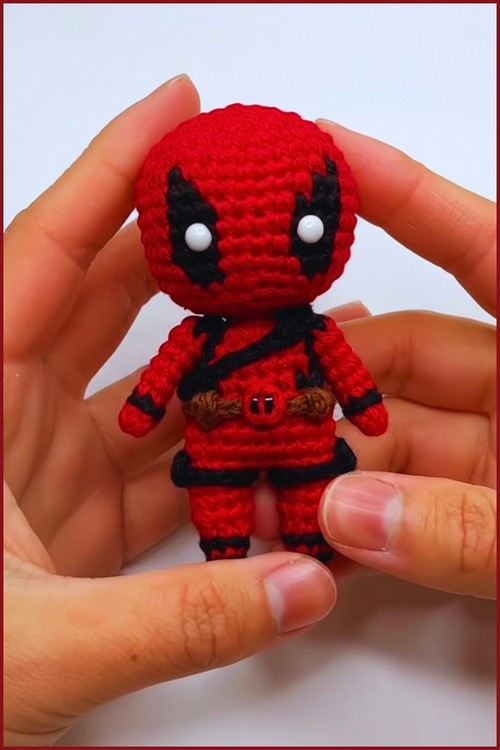
Accessories
-
Belt and holsters use light brown yarn, chain approximately 30 for the belt. For holsters chain 3 and work 2 slip stitches
-
Belt buckle make a magic ring with 5 single crochet and form the sixth stitch with a needle, embroider an X with black yarn
-
Chest strap chain 29, return with 7 slip stitches, skip 2 chains, work 6 slip stitches, 3 single crochet, and finish with 1 slip stitch
-
Swords shape galvanized wire, wrap with yarn, and secure with glue
Assembly guidance
-
Align the arms with the sides of the body so they sit just below the neck area, ensuring the color-changed "gloves" face forward.
-
The belt should be wrapped around the waist where the body meets the legs, hiding any slight transitions in the crochet fabric.
-
Attach the chest strap diagonally from the shoulder to the opposite hip to create the tactical harness look.
-
Ensure the legs are stuffed firmly before closing so the figure can stand or sit with balance.
Eye and facial feature placement
-
Place the 6 mm safety eyes within the black sections of the head, typically centered in the widest part of the black "mask" rounds (around rounds 10-11).
-
The white paint on the eyes should be centered to give the character his focused, masked expression.
Stuffing tips
-
Stuff the head firmly to maintain a round shape, which helps the black mask details stay symmetrical and prevents the stitches from stretching unevenly.
-
Use a small dowel or the back of your crochet hook to push stuffing into the narrow arms and legs to avoid lumps.

Finishing notes
-
Use the yarn needle to weave in all ends internally, especially where the red and black yarns meet, to prevent any "peeking" through.
-
If the wire swords feel loose, add a small dot of glue at the hilt to keep them secured in the character's hands or holsters.
Beginner notes
-
If the color changes feel overwhelming, try carrying the unused color loosely behind your work rather than crocheting over it to keep the fabric flexible.
-
Don't worry if the mask looks slightly asymmetrical at first; the final assembly and eye placement will help define the face.
Troubleshooting
-
If the head looks elongated, check your tension during the color-change rounds, as tight changes can sometimes compress the height of the stitches.
-
If the legs appear uneven, ensure you have the exact same number of rounds and stuffing density in both.
Customization ideas
-
You can adjust the belt color to a darker brown or grey for a more "gritty" comic book style.
-
Try using a metallic silver yarn for the swords instead of wrapping wire if you prefer a softer, child-safe toy.