
Cute Crochet Mini Owl Keychain Amigurumi Pattern
Neatly rounded edges and a compact, plush structure give this crochet chick head keychain amigurumi pattern a finished look that feels both tidy and expressive. The piece holds its shape well while remaining lightweight, making it easy to attach to everyday items like keys or bags without adding bulk.
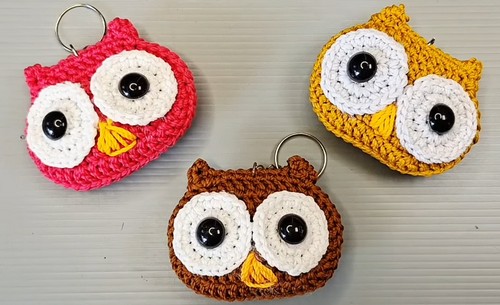
Crochet Amigurumi Owl Keychain

Its soft texture, clear stitch pattern, and simple facial details create a design that is visually appealing while still being practical, offering a balance between decorative charm and everyday usability.
Skill Level
Beginner to intermediate
Finished Size
Small palm-sized head suitable for a keychain (size will vary depending on yarn and hook choice)
Materials
- DK cotton yarn (acrylic yarn can also be used)
- 3 mm crochet hook
- Scissors
- Darning needle
- Dacron stuffing
- White yarn (for eyes)
- Yellow yarn (for beak)
- Doll eyes
- Keychain ring
- Hot glue gun

Abbreviations
- SC: Single Crochet
- DC: Double Crochet
- Increase: 2 stitches in the same stitch
- Slip Stitch
Helpful Notes Before Starting
- This piece is worked in two flat, oval rounds that are later joined together. The shaping comes from strategic increases at both ends, which form the rounded head and subtle ear bumps.
- The small ear detail is created at the end of the round using chains and slip stitches. Take your time here, as this section can feel a bit different from standard amigurumi rounds.
Construction Overview
- Two identical head panels are crocheted in the round.
- Each panel is shaped into an oval using increases.
- A small ear detail is formed before finishing each piece.
- The panels are placed back to back, sewn together, and lightly stuffed.
- Eyes, beak, and keychain are added last.
Stitch and Shaping Clarity
- The head begins with a foundation chain and is worked around both sides of the chain. This creates an oval base instead of a circle, which is what gives the chick head its slightly elongated shape.
- The increases at both ends of each round help widen the piece evenly, preventing distortion and keeping the head symmetrical.
- The ear is formed by chaining and working back into those chains. This creates a small raised point without needing separate pieces.
HEAD:
- Chain 8, then add 2 more chains.
- Work 5 double crochet (DC) into the 8th chain from the hook.
- Place 1 DC in each of the next 5 chains.
- Work 5 DC into the last chain.
- Work 1 DC in each of the next 6 stitches on the other side.
- Slip stitch into the first DC to join the round.
- Chain 2.
- Work 5 DC increases (2 DC in one stitch).
- Work 1 DC in each of the next 6 stitches.
- Work 5 DC increases.
- Work 1 DC in each of the next 6 stitches.
- Slip stitch to join the round.
- Chain 2.
- Work (1 DC, 1 DC increase) five times.
- Work 1 DC in each of the next 6 stitches.
- Work (1 DC, 1 DC increase) five times.
- Work 1 DC in each of the next 6 stitches.
- Slip stitch to join the round.
- Slip stitch into the next two stitches.
- Chain 3.
- Slip stitch into the second chain from the hook.
- Work 1 DC in the same stitch where you made the slip stitch.
- Work 1 single crochet (SC) in each of the next 8 stitches.
- Work 1 DC in the next stitch.
- Chain 1, then slip stitch into the top of the DC.
- Chain 2, then slip stitch into the same stitch where you placed the last DC.
- Cut the yarn, leaving a long tail for sewing.
- Repeat these steps to make a second piece, but this time cut the yarn with a short tail.
EYES:
- Use white yarn to create a magic ring.
- Work 8 SC into the ring.
- Slip stitch to join the round.
- Chain 1.
- Work 2 SC in each stitch (8 SC increases).
- Slip stitch to join the round.
- Chain 1.
- Work (1 SC, 1 SC increase) eight times.
- Slip stitch to join and cut the yarn.
- Weave in the loose ends on the back.
- Repeat to make a second eye piece.
Assembly Guidance
Joining the Head
- Place the two head pieces together, back to back, with the long yarn tail on one side.
- Using the long yarn tail and a needle, sew the two pieces together around the edge.
- When you reach the ear part, stuff the head with Dacron.
- Continue sewing the ear, making two stitches in the ear's base and one stitch at the tip.
- Continue sewing down the other side of the ear.
- Secure and hide the remaining yarn tail.
Eye and Facial Feature Placement
- Position the white eye circles evenly on the front panel before gluing.
- Place them slightly above the center line for a more expressive look.
- Glue the doll eyes directly in the center of the white circles to keep symmetry balanced.
Take a moment to adjust placement before gluing permanently.
Beak Placement and Shaping
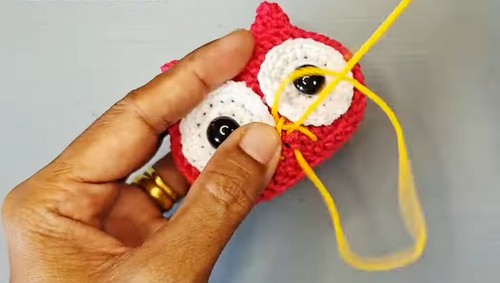
- Use yellow yarn to sew a beak onto the face, creating a triangle shape.
- Keep the stitches tight and slightly raised so the beak stands out from the surface.
- Secure the yarn on the back and hide it inside the head.

Stuffing Tips
- Add stuffing gradually rather than all at once.
- Focus on filling the center first, then gently shape toward the edges.
- Avoid overstuffing, especially near the edges, to keep the seams neat.
Finishing Notes
- Attach the keychain ring securely at the top of the head, making sure it is centered between the two ear points.
- Check all sewn and glued parts before finishing to ensure durability, especially if the piece will be used daily.

Beginner Notes
- Working around a foundation chain can feel unfamiliar at first—just remember you are crocheting along both sides to form an oval.
- Count stitches at the end of each round to maintain symmetry.
- The ear section may feel tricky, but it is simply a combination of chains and slip stitches forming a small peak.
Troubleshooting
- Head looks uneven: Check that increases are placed correctly on both ends of each round.
- Pieces don’t align when sewing: Make sure both panels have the same stitch count and orientation before joining.
- Ears look different sizes: Pay close attention to where the slip stitches and chains are placed in the ear section.
Customization Ideas
- Use pastel yarns for a softer, decorative look
- Add embroidered eyelashes or blush for more personality
- Turn it into a bag charm instead of a keychain
- Experiment with different eye sizes for varied expressions