
Crochet Strawberry Bouquet Pattern With Chenille Yarn
Nobody needs a vase for the crochet strawberry bouquet, because its chenille berries and ruffled collar stay plump long after real roses wilt. Mother's Day brunch makes a fitting moment to hand over a chenille strawberry bouquet, which lives on a dresser or bookshelf for years.
Someone shy hides inside this crochet strawberry bouquet, watching from between the berries to see who gets the flowers. That face never fully comes out, so the crochet strawberry bouquet carries a bashful streak. Give one to the friend who blushes at compliments. The crochet strawberry bouquet blushes right back.
Crochet Strawberry Bouquet
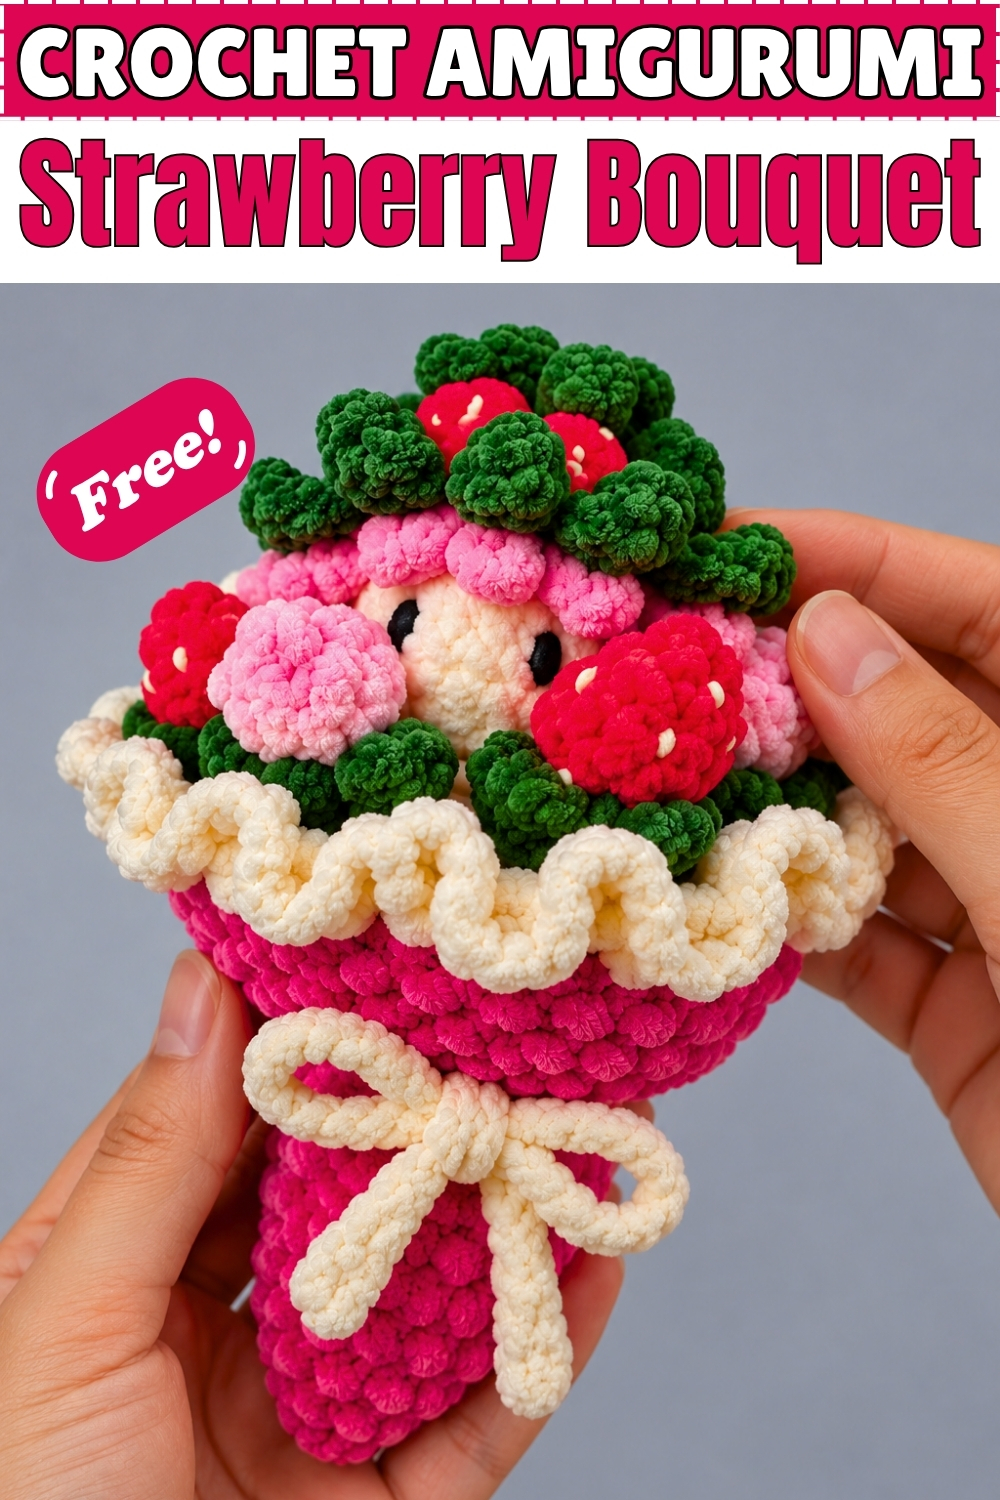
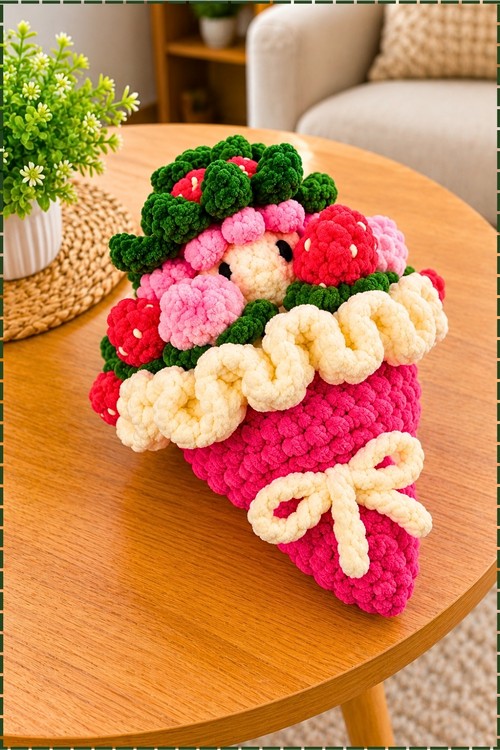
Built from a stuffed chenille cone with a ruffled collar, this crochet strawberry bouquet holds a tiny strawberry doll tucked between plump berries and leafy clusters. I worked the base in hot pink velvet yarn and finished it with a cream ruffle and a looped cream bow. Inside the cone, hot glue keeps the doll's head, the green clusters, and six berries locked in place. My version swaps the light matcha green for a deep forest shade, which makes the red berries pop. Every piece uses simple single and double crochet, so confident beginners can manage it. Expect roughly a weekend of happy stitching.
Materials and Tools
- Velvet or chenille yarn, 6 mm weight, about 100 g per roll
- Hot pink for the bouquet cone
- Cream white for the ruffle, the bow, the doll's face, and the strawberry seeds
- Deep forest green for the strawberry caps, hat leaves, and leaf clusters
- Light pink for the light strawberries and the doll's hair
- Red for the dark strawberries and the doll's hat
- Black yarn for the eyes (or small round black safety eyes)
- Polyester fiberfill, about 120 g
- 7 mm crochet hook for the cone and strawberries
- 6 mm crochet hook for the doll
- Stitch markers, yarn needle, and a hot glue gun
- Blush powder (optional)
Difficulty and Time
In my experience this sits at an easy to intermediate level. The rounds are simple, but chenille hides stitches, so counting takes patience. It took me around two relaxed sessions from first round to final glue, and your time may differ.
Beginner Technique Notes
- Single crochet (SC): insert hook, yarn over, pull up a loop, yarn over, pull through both loops.
- Double crochet (DC): yarn over, insert hook, pull up a loop, then yarn over and pull through two loops twice.
- Half double crochet (HDC): yarn over, insert hook, pull up a loop, then yarn over and pull through all three loops.
- Slip stitch (Sl St): insert hook, yarn over, pull straight through the stitch and the loop on your hook.
- Decrease (dec): work two stitches together into one.
- Back loops only (BLO): work into the loop farthest from you, leaving the front loop free.
- Chain (ch) and magic ring are used to start nearly every piece.
- Chenille tip: feel for each stitch with your fingertip rather than looking for it, since the fluffy pile hides the loops.
The Pattern
Bouquet Cone
- Using the 7 mm hook and hot pink yarn, make a magic ring and work 8 SC into it, then Sl St into the first stitch and ch 1 (8 sts). The ring should close into a tight little disc.
- Round 2: work 2 SC in each stitch around, Sl St, ch 1 (16 sts). You now have a flat circle.
- Round 3: (1 SC, 2 SC in next st) repeat around, Sl St, ch 1 (24 sts). Keep the circle flat; ruffling means extra stitches crept in.
- Round 4: (1 SC in next 2 sts, 2 SC in next st) repeat around, ending with 1 SC in the final stitch, Sl St, ch 1 (32 sts). This is the bottom tip of the cone in my piece.
- Round 5: (1 SC in next 3 sts, 2 SC in next st) repeat around, Sl St, ch 1 (40 sts). The circle should lie flat and roughly palm sized.
- Round 6: 1 SC in each stitch around, then join with a back loop slip stitch instead of a standard one, ch 1 (40 sts). Edges begin to cup upward.
- Round 7: working in BLO, 1 SC in each stitch around, Sl St, ch 1 (40 sts). The free front loops from Round 6 will hold the ruffle later, so leave them untouched.
- Rounds 8 to 12: 1 SC in each stitch around, Sl St, ch 1 at the end of each round (40 sts). The piece now looks like a deep pink bowl.
- Round 13: (1 SC in next 3 sts, dec) repeat around, Sl St, ch 1. The sides start to pull inward.
- Round 14: (1 SC in next st, dec, 1 SC in next 2 sts, dec) repeat around, Sl St, ch 1. You should see a clear narrowing, which forms the handle of the bouquet.
- Round 15: (1 SC in next st, dec) repeat around, Sl St, ch 1. The handle grows slimmer.
- Round 16: dec around to narrow the opening, Sl St, then stuff the base firmly with fiberfill. Firm stuffing keeps the handle from bending when you hold it like mine.
- Round 17: ch 3, work 3 DC into the very first stitch, then 3 DC into every stitch around, Sl St, ch 1. The top flares open into a wide cup that holds the doll and berries.
- Round 18: 1 DC in every stitch around, Sl St, ch 3. I kept this round fully hot pink; switching to cream halfway is optional.
- Round 19: (1 DC in next st, DC dec over next 2 sts) repeat around, finish with an invisible join and weave in ends. The cup edge firms up and sits just below the ruffle.
Ruffle Collar and Bow
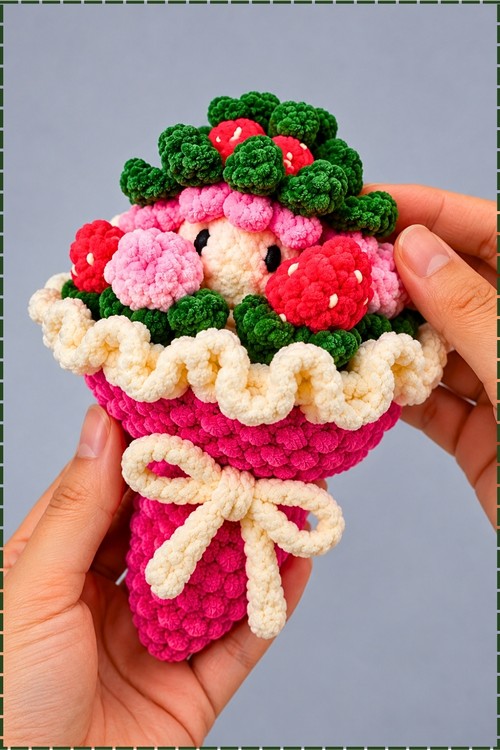
- Join cream white yarn to the unworked front loops from Round 6, ch 3, then work 3 DC in each front loop all the way around and finish with an invisible join. The collar should wave in soft scallops, exactly like the cream frill circling my bouquet.
- For the bow, chain with cream white yarn (the original suggests 50 to 60 chains) until the cord ties into a full double loop bow, then tie it around the narrow handle. In my piece the bow sits just below the cone's widest point with long tails hanging down.
Strawberries (Make 6: 3 Light Pink, 3 Red)
- Using the 7 mm hook, make a magic ring, ch 1, and work 4 SC into it, Sl St (4 sts). A tiny tight ring is the goal.
- Round 2: 2 SC in each stitch around, Sl St (8 sts). The berry tip takes shape.
- Round 3: (1 SC in next 3 sts, 2 SC in next st) repeat twice, Sl St (10 sts). The piece forms a small cup.
- Round 4: 1 SC in each stitch around, Sl St, leave a long tail and cut yarn (10 sts). You should have a short rounded berry shell.
- Lightly stuff with fiberfill, weave the tail through the front loops of the final round, pull tight, and secure. Light stuffing keeps the berry round rather than lumpy.
- Using cream white yarn, stitch small seed lines across each red berry. I added seeds to the red berries only and left the light pink ones plain, which reads more like fluffy blossoms in my photo.
- For each cap, leave a tail, make a magic ring with forest green, ch 3, skip the first chain, 1 SC in the next 2 chains, Sl St into the ring, and repeat for 5 petals total, then pull the ring tight and tie off. Attach each cap to the top of a berry.
- Brushing the pink berries with blush is optional; I skipped it.
Strawberry Doll Head
- Using the 6 mm hook and cream white yarn, make a magic ring, ch 1, and work 5 SC into it, Sl St (5 sts). I used cream for the face so it blends with the ruffle.
- Round 2: 2 SC in each stitch around, Sl St, ch 1 (10 sts). A small flat disc forms.
- Round 3: (1 SC, 2 SC in next st) repeat around, Sl St, ch 1 (15 sts). The disc widens.
- Round 4: (1 SC in next 2 sts, 2 SC in next st) repeat around, Sl St, ch 1 (20 sts). Edges begin to curve.
- Rounds 5 to 7: 1 SC in each stitch around, Sl St, ch 1 each round (20 sts). The head becomes a round dome.
- Round 8: dec around, Sl St, ch 1, leave a long tail, stuff firmly, thread through the front loops, pull closed, and weave in (10 sts). A firm head keeps the face smooth.
- Using black yarn, embroider the eyes across Rounds 5 and 6, or fit small round black safety eyes before closing. Mine sit wide apart with no mouth, giving a calm little face.
- Arms are optional: attach yarn at Round 7, ch 3, work 1 SC back down, and anchor with a Sl St on each side. My doll sits deep in the cone, so I left the arms off.
Doll Hair
- Using the 6 mm hook and light pink yarn, make a magic ring, ch 2, and work 12 DC into it, Sl St, ch 1 (12 sts). A small round cap forms.
- For the short front strands, make 5: ch 4, skip the first chain, 1 SC in the next 3 chains, Sl St back to the ring. These frame the face.
- For the long back strands, make 7: ch 6, skip the first chain, 1 SC in the next 5 chains, Sl St back to the ring. These fill out the back and sides.
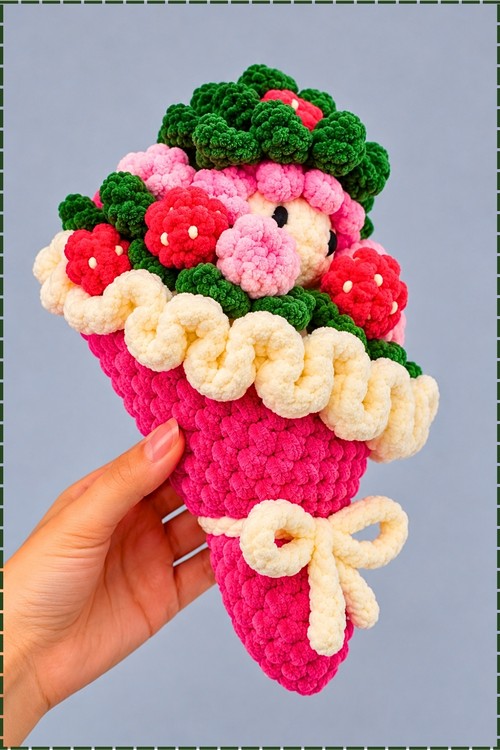
- Glue the hair cap onto the head with the 5 short strands at the front and the 7 long strands behind. In my piece the pink hair peeks out as soft bumps across the forehead.
Strawberry Hat
- Using the 6 mm hook and red yarn, make a magic ring, ch 1, and work 6 SC into it, Sl St, ch 1 (6 sts).
- Round 2: 2 SC in each stitch around, Sl St, ch 1 (12 sts). A flat disc forms.
- Round 3: (1 SC, 2 SC in next st) repeat around, Sl St, ch 1 (18 sts). Keep it flat.
- Round 4: (1 SC in next 2 sts, 2 SC in next st) repeat around, Sl St, ch 1 (24 sts). The disc widens evenly.
- Round 5: 1 SC in each stitch around, Sl St, ch 1 (24 sts). Edges start to rise.
- Round 6: (1 SC in next 3 sts, 2 SC in next st) repeat around, Sl St, ch 1 (30 sts). The cap grows wide enough to sit over the hair.
- Round 7: 1 SC in each stitch around, Sl St, ch 1, cut yarn (30 sts). You now have a shallow red cap.
- Join forest green yarn to the hat edge and make 5 small leaves: ch 2, 1 SC in the 2nd chain from hook, skip a base stitch, Sl St.
- Continue with 5 large leaves: ch 4, 1 SC in the 2nd chain, 1 HDC in the next 2 chains, skip a base stitch, Sl St.
- Finish with 5 more small leaves using the small leaf steps. In chenille the leaves bunch into fluffy green clumps that crown the doll, just like the top of my bouquet.
- Embroider cream seeds onto the red hat and add a small green cap to the top center. My hat shows red berry tops peeking between the green clumps.
Leaf Clusters
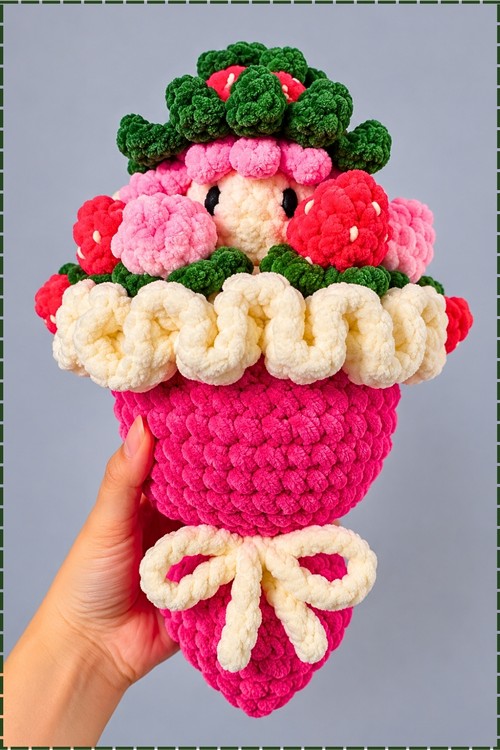
- My bouquet has extra forest green leaf clusters tucked between the berries along the ruffle line. To make them, use the sepal method from Part 3 or the small leaf method from Part 6, making as many clusters as you need to fill the gaps, then pinch each into a fluffy clump.
Final Assembly
- Apply hot glue generously into the center cavity of the finished cone.
- Press the doll firmly into the center so the face sits just above the ruffle, as in my photo.
- Glue the 6 strawberries around the doll, alternating light pink and red, so they frame the face without covering it. In mine, a red berry sits low on each side of the face and light pink berries fill the spaces between.
- Glue the leaf clusters into any gaps between the berries and the ruffle so no hot pink shows inside the cup.
Tips and Troubleshooting
- Count stitches with your fingers on chenille, since the pile hides the loops and it is easy to skip one.
- Place a stitch marker in the first stitch of every round; slip stitch joins shift around quickly in fluffy yarn.
- Stuff the handle firmly before Round 17, because you cannot reach it once the cup flares.
- Test the arrangement dry before using hot glue so you can shift berries around the face.
- Keep hot glue away from the visible surfaces of the chenille, as it mats the pile and shows through.
Yarn Substitution
Any 6 mm velvet or chenille yarn works. Standard worsted acrylic will give a smaller, crisper bouquet with more visible stitches, so drop your hook size slightly if you swap.
Customization Ideas
- Swap the cone color to lilac or white for a softer gift look.
- Replace the doll with one extra large strawberry for a simpler bouquet.
- Add a short satin ribbon over the crochet bow for a dressier finish.
- Make all six berries red for a classic strawberry patch feel.
FAQ
Can I skip the doll? Yes. Fill the center with an extra cluster of berries and leaves instead.
Why did my cone flare too early? Extra stitches likely crept into Rounds 8 to 12. Count each round back to 40 stitches.
Can I use safety eyes on the doll? Yes, small round black safety eyes look very close to my finished face. Insert them before closing the head.
How do I keep the berries from falling out? Use plenty of hot glue at the base of each berry and press it against the doll or a neighboring berry until set.
Is chenille hard for beginners? It is slower to count but very forgiving, since the fluffy pile hides small mistakes.