Crochet Strawberry Bag Keychain Free Pattern That Looks Adorable
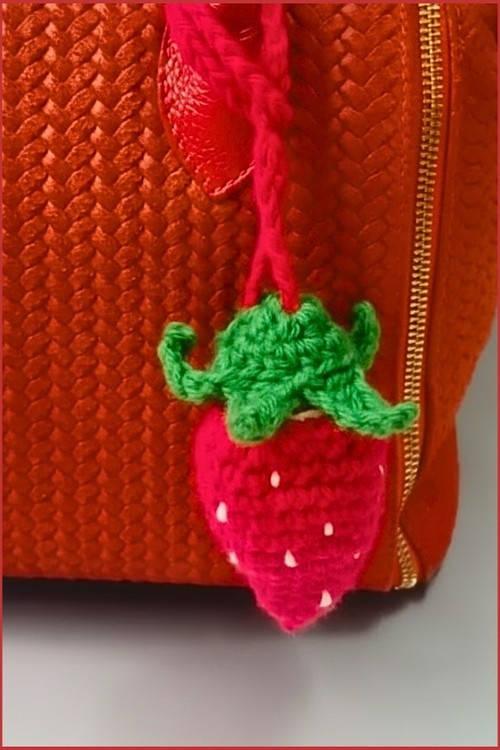
This crochet strawberry bag charm pattern is a fun and beginner friendly project that creates a cute and lightweight accessory you can attach to bags keys or zipper pulls. The pattern guides you through shaping a plump strawberry body and finishing it with simple leafy details that give it a realistic and charming look.
Crochet Strawberry Bag Charm


Skill level
-
This is an ideal project for an advanced beginner who is comfortable with the magic ring and basic shaping.
-
The leaf structure introduces varied stitch heights which is a great way to practice tension control.
Finished size
-
Depending on your yarn weight and hook size, this strawberry typically measures between two and three inches in height.
-
Using a smaller hook than recommended for your yarn will ensure a tight fabric that keeps stuffing hidden.
Materials
-
Red yarn for the strawberry body
-
Green yarn for the leaves
-
Crochet hook appropriate for your yarn weight
-
Fiberfill stuffing
-
Yarn needle for assembly
-
Small loop or keychain ring
-
Scissors
Abbreviations
-
sc: single crochet
-
inc: increase
-
st: stitch
-
dc: double crochet
-
hdc: half double crochet
-
sl st: slip stitch
-
sc2tog: single crochet two stitches together (decrease)
Helpful notes before starting
-
Use a stitch marker to keep track of your rounds since amigurumi is worked in a continuous spiral.
-
Keep your tension consistent particularly during the increase rounds to avoid gaps in the fruit body.
-
When working the leaf petals, ensure your chains aren't too tight so the stitches remain easy to work into.
Construction overview
-
The strawberry is worked from the bottom up starting with a small point and expanding outward.
-
The leaves are worked as a separate flat piece that is later centered and sewn onto the top.
-
The final shape is achieved by stuffing firmly before the final rounds are closed.
Stitch and shaping clarity
-
The increases in this pattern happen in multiples of three which creates a slightly more organic, triangular taper than standard rounds of six.
-
In the leaves, the combination of sc, hdc, and dc creates the natural taper of a strawberry calyx.
-
The "single crochet two stitches together" is used at the end to pull the shoulders of the strawberry inward.
Strawberry Body
-
Start with a magic ring and make 6 single crochets then slip stitch to close
-
Work 1 single crochet and 1 increase and repeat this sequence 3 times
-
Work 2 single crochets and 1 increase and repeat this sequence 3 times to reach 12 stitches
-
Work 4 single crochets and 1 increase and repeat this sequence 3 times
-
Work 5 single crochets and 1 increase and repeat this sequence 3 times to reach 21 stitches
-
Work 6 single crochets and 1 increase and repeat this sequence 3 times
-
Crochet one single crochet in each stitch around for several rounds to build the strawberry height
-
Work 2 single crochets and then single crochet two stitches together and repeat around to reduce to 18 stitches
Leaves
-
Start with a magic ring and make 6 single crochets
-
Work 1 double crochet and 2 half double crochets in the same stitch and repeat around
-
Work half double crochet in the next 2 stitches and then 2 half double crochets in the next stitch and repeat around to reach 18 stitches
-
Chain 6 then slip stitch in the first chain work single crochets in the next two chains half double crochet in the next chain and double crochet in the last chain then skip two stitches on the base and slip stitch into the next stitch and repeat this process to form 6 petals
Assembly guidance
-
Center the leaf piece over the top opening of the strawberry body.
-
Use the tail of the green yarn to stitch down the center of the leaves first to secure the position.
-
Pin the six petals down flat against the red body before sewing to ensure they are spaced evenly.
Eye and facial feature placement
-
If you choose to add eyes, place safety eyes between the rounds with 21 or 24 stitches.
-
Space the eyes about 4 to 5 stitches apart to maintain a cute, wide-set expression.
-
You can embroider small yellow "seeds" across the red body using a simple straight stitch for extra detail.
Stuffing tips
-
Stuff the strawberry firmly but stop just before the fiberfill begins to stretch the stitches apart.
-
Pay attention to the bottom point; use the back of your crochet hook to push stuffing into the very tip to maintain the shape.
-
Add the most volume to the middle section where the strawberry is widest.
Finishing notes
-
When weaving in ends, pull the yarn through the center of the piece and out the other side before clipping to hide the tail inside the stuffing.
-
Ensure the top opening is fully covered by the leaf base so no stuffing escapes.
Beginner notes
-
If your strawberry looks too pointy, you may be crocheting too tightly at the start; try to relax your hands for the first three rounds.
-
The petal sequence (sc to dc) is designed to create a gradient of height; always count your chains to ensure each petal is the same length.
Troubleshooting
-
If the strawberry is leaning to one side, check that your increases were placed evenly.
-
If the leaves are curling too much, try using a slightly larger hook for that section to keep the stitches flat.
Customization ideas
-
Experiment with different shades of pink or deep burgundy for a variety of ripeness levels.
-
Use embroidery thread to add a tiny smiling mouth between the eyes.
-
Try using blanket yarn for a jumbo-sized plush version of this same pattern.
Final Assembly
-
Secure and weave in all yarn ends neatly
-
Sew the green leaves onto the top of the strawberry body
-
Add a small loop or keychain ring to turn it into a bag charm