Crochet Reindeer Pattern Free Amigurumi For Beginners
The Cute Little Reindeer Amigurumi crochet pattern is a charming project designed to add a playful and festive touch to your handmade collection. This pattern focuses on the finishing elements that bring the reindeer to life, including antlers, ears, tail, legs, and facial details.
Crochet Reindeer Amigurumi


Spark your winter crafting imagination by working up a delightfully festive Crochet Reindeer Amigurumi project. This darling piece showcases an oversized head, perky ears, and a soft, huggable body stitched from rich, earthy tones. Highly versatile as a comforting children's toy or a charming mantel display, this detailed guide provides a wonderfully rewarding escape that lets your personal artistic flair shine through.
Skill Level
-
This project is ideal for advanced beginners who are comfortable working in tight rounds and want to practice clean color transitions and multi-piece assembly.
Finished Size
-
The final size depends heavily on your choice of yarn and hook, but the narrow 6-stitch base of the limbs and antlers creates a delicate, palm-sized feature set perfect for a standard holiday plush.
Materials
-
White yarn
-
Green yarn
-
Red yarn
-
Skin tone yarn
-
Black embroidery yarn
-
Crochet hook suitable for your yarn choice to ensure tight stitches
-
Fiberfill stuffing
-
Yarn needle
-
Stitch markers
-
Pins for assembly
Abbreviations
-
MR: Magic ring
-
Sc: Single crochet
-
Inc: Increase
Helpful Notes Before Starting
-
Working pieces that have only 6 stitches in the round can easily turn inside out, so use the back of your hook to push the right side of the fabric facing you after row 2.
-
Leave long yarn tails on every single piece because you will need them for sewing and secure attachment during assembly.
-
Mark the first stitch of every round with a running stitch marker or a safety pin so you do not lose your place in the seamless spirals.
Construction Overview
-
You will create the structural details from the top down, starting with two-part branching antlers and expanding ears.
-
The tail and legs introduce clean color striping to define the feet and the festive theme.
-
The muzzle is worked as a separate three-dimensional cup that adds depth to the face.
-
Everything is brought together during the assembly phase, where careful pinning ensures the character stands and looks balanced from all angles.
Stitch and Shaping Clarity
-
The increases in the ears gradually add three stitches per round, shifting the shape from a tight point into a realistic, gently flared cone.
-
The muzzle requires a flat increase base that quickly transitions into straight rounds to form a cup shape without puckering.
-
The legs and tail rely on color changes, which are cleanest if you pull the new color through the last two loops of the very last stitch of the previous color round.
Step by Step Pattern Instructions
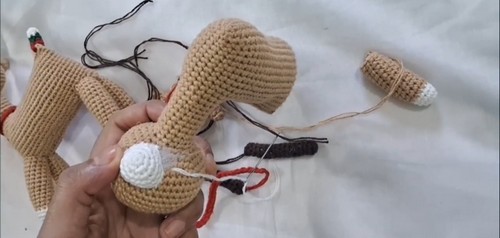
Antlers
-
Start with a magic ring and work 6 single crochet
-
Crochet 13 rows of 6 single crochet for the large branch
-
Crochet 7 rows of 6 single crochet for the small branch
-
Lightly stuff both pieces and sew the small branch onto the large branch
-
Make two complete antlers
Ears
-
Magic ring with 6 single crochet
-
Crochet 1 round of single crochet in each stitch
-
Crochet 1 round of 1 single crochet and 1 increase across for 9 stitches
-
Crochet 1 round of 2 single crochet and 1 increase across for 12 stitches
-
Crochet 1 round of 3 single crochet and 1 increase across for 15 stitches
-
Crochet 2 rounds of single crochet in each stitch
-
Make two ears and flatten slightly without stuffing
Tail
-
With white yarn, make a magic ring and crochet 6 single crochet
-
Crochet 1 round of single crochet
-
Change to green yarn and crochet 2 rounds of single crochet
-
Change to red yarn and crochet 2 rounds of single crochet
-
Lightly stuff and close
Muzzle Mouth Part
-
Magic ring with 6 single crochet
-
Crochet 2 single crochet in each stitch for 12 stitches
-
Crochet 1 single crochet and 1 increase across for 18 stitches
-
Crochet 3 rounds of single crochet in each stitch
-
Lightly stuff before closing
Legs
-
With white yarn, make a magic ring and crochet 6 single crochet
-
Crochet 2 single crochet in each stitch for 12 stitches
-
Crochet 2 rounds of single crochet
-
Change to skin tone yarn and crochet 8 or more rounds for desired leg length
-
Lightly stuff and close
-
Make four legs
Assembly Guidance
-
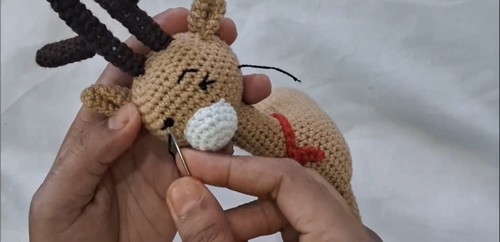
Sew the muzzle to the front of the face and stuff before closing
-
Attach the antlers to the top of the head
-
Sew the ears just below the antlers
-
Attach the legs evenly to the bottom of the body
-
Sew the tail to the back of the body
Eye and Facial Feature Placement
-
Embroider eyes using black yarn with a wrapped stitch and add a small white highlight
-
Embroider a small red nose on the muzzle
Stuffing Tips
-
Use the blunt end of a crochet hook or a chopstick to push tiny bits of stuffing into the narrow antler branches so they do not bunch up at the top.
-
Avoid over-stuffing the muzzle, as too much fiberfill will stretch the stitches open and allow the white stuffing to peek through your neat handiwork.
-
Fill the legs firmly at the white base to give them structure, but taper the stuffing off near the top so they can sit flush against the body.
Finishing Notes
-
Crochet 22 to 25 chains with red yarn to create a collar and tie around the neck
-
Knot your embroidery threads inside the head fabric before hiding the yarn tails to ensure the facial features never pull loose with handling.
-
Give the flattened ears a slight pinch at the base when sewing them on to give them a natural, cupped appearance.
Beginner Notes
-
If your 6-stitch rounds feel too tight, try loosening your tension slightly just for those narrow rows to make inserting the hook easier.
-
Use sewing pins to secure all four legs to the base of the body before stitching so you can test if the toy balances evenly on a flat surface.
-
Count your stitches at the end of each ear increase round to ensure your shapes match perfectly.
Troubleshooting
-
If the small antler branch looks floppy after sewing, use a few extra whip stitches around the base joint to pull it tight and secure against the main branch.
-
If your color changes look jagged, make sure you are changing the yarn color during the final slip through of the previous row rather than starting the new row directly with the new color.
-
If the muzzle sits crookedly, look at it directly from the front while pinning, aligning it precisely between the intended eye spaces before sewing.
Customization Ideas
-
You can lengthen the legs by adding 4 to 6 more rounds of the skin tone yarn to create a floppy, long-legged vintage style plush.
-
Swap the red and green yarn sections on the tail to create a mismatched, whimsical holiday pattern.
-
Thread a tiny jingle bell onto the red chain collar before tying it around the neck for a festive, interactive sound.