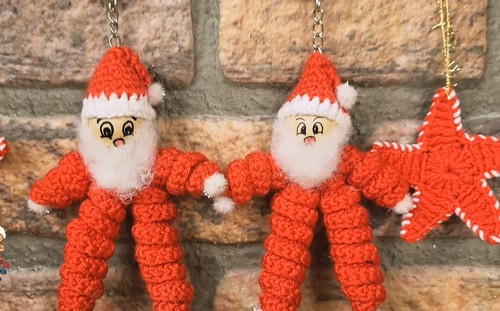
Adorable Crochet Santa Claus Keychain Pattern
A compact gnome with long spiral limbs and a textured hat has a very distinct handmade charm, especially when paired with a wooden bead head and soft fluffy beard. The contrast between the tight crochet stitches, the smooth bead, and the playful spirals gives this little piece a lot of personality despite its simple construction.
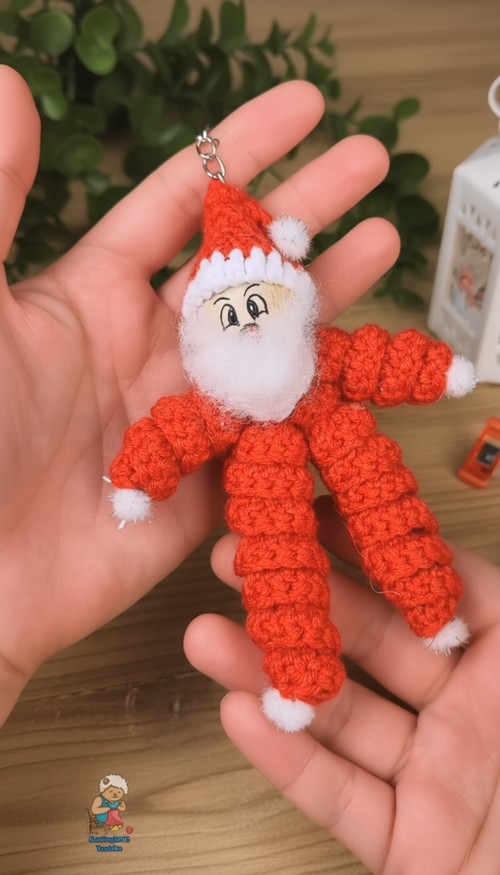
Crochet Santa Claus Keychain
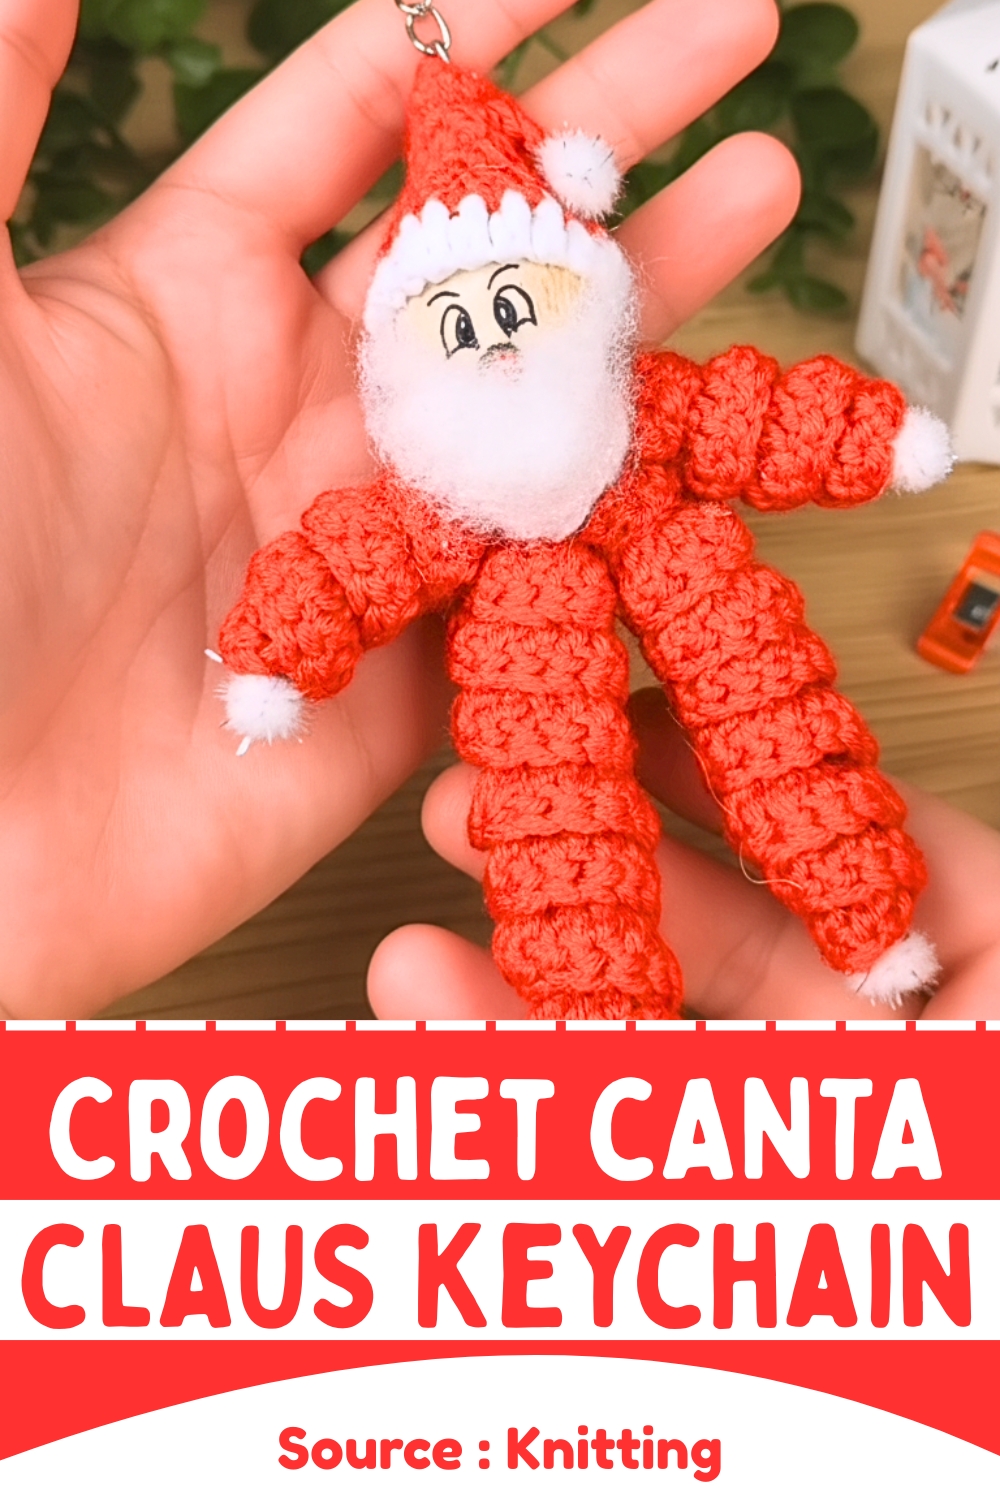
It’s the kind of project that works beautifully as a keychain, a bag charm, or even a quick handmade gift.
Skill Level
Beginner to intermediate
You’ll be working with basic stitches, but shaping spiral limbs and assembling multiple materials (crochet + bead + glue) requires a bit of confidence and attention to detail.
Finished Size
Varies depending on yarn and tension, but typically small enough to fit comfortably in your hand as a keychain charm.
Materials
- Red yarn
- White yarn
- 3.00 mm crochet hook
- 1.75 mm crochet hook
- Wooden bead (for head)
- White fluffy yarn (for beard)
- Small white pompoms
- Keychain ring
- Hot glue gun
Abbreviations
- ch – chain
- sc – single crochet
- hdc – half double crochet
- dc – double crochet
- slst – slip stitch
- dec – decrease
Helpful Notes Before Starting
- The spiral limbs are created by intentionally placing multiple stitches into the same stitch, which forces the fabric to curl. This is expected and what gives the arms and legs their coiled look.
- Tension matters here. If your stitches are too loose, the spirals may not hold their shape well.
- Assembly relies heavily on glue rather than sewing, so placement before attaching is important. Take a moment to position everything before committing.
Construction Overview
This gnome is built in separate parts and then assembled:
- Four spiral tubes form the arms and legs
- A simple collar adds structure between body and head
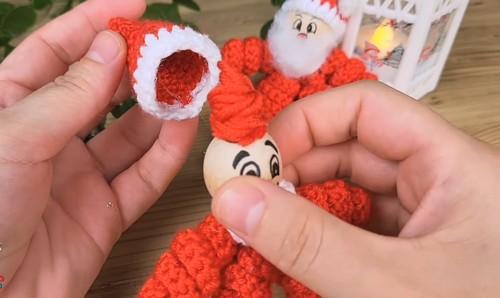
- A wooden bead acts as the head
- A decreasing crochet hat shapes neatly over the bead
- Final details like beard and pompoms bring the character together
Understanding this structure makes assembly much easier and helps you visualize where each piece belongs.
BODY (RED YARN, 3.00MM HOOK)
- Chain 30.
- In the third chain from the hook, make a double crochet (dc).
- Repeat a sequence of 3 dc, then 3 dc in the next stitch to create a spiral tube for the body and limbs.
- Repeat this process to make a total of four red spiral tubes for the arms and legs.
Stitch and Shaping Clarity
The spirals form because you are placing multiple double crochets into the same space repeatedly. This creates excess fabric, which naturally curls.
- The tighter your stitches, the tighter the spiral
- Each tube should be roughly similar in length for symmetry
- If one spiral looks looser than others, it may have fewer grouped stitches
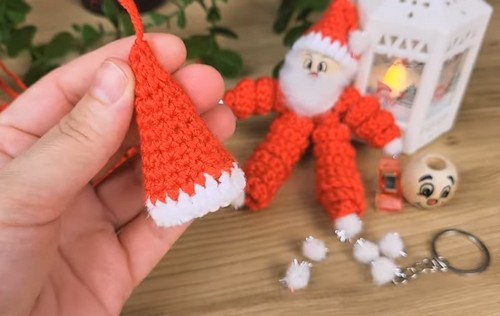
HAT (RED AND WHITE YARN, 3.00MM HOOK)
- Start with white yarn and chain 20.
- Round 2: In the second chain from the hook, make 20 half-double crochet (hdc) stitches to form a circle.
- Round 3: Switch to the red yarn and make 20 single crochet (sc) stitches.
- Round 4: Decrease by making 4 sc, then 1 decrease (dec), repeating until you have 16 stitches.
- Round 5: Make 16 sc.
- Round 6: Decrease by making 3 sc, then 1 dec, repeating until you have 12 stitches.
- Round 7: Make 12 sc.
- Round 8: Decrease by making 2 sc, then 1 dec, repeating until you have 8 stitches.
- Round 9: Make 8 sc.
- Round 10: Decrease by making 1 sc, then 1 dec, repeating until you have 4 stitches.
- Round 11: Make 4 sc.
- Round 12: Make 4 decreases.
Stitch and Shaping Clarity
The hat is shaped using gradual decreases, which taper it toward the top.
- Each decrease round reduces circumference evenly
- The alternating “sc + dec” pattern prevents sharp angles and keeps the hat smooth
- By the final rounds, the opening becomes very small, forming a pointed top
SCARF/COLLAR (WHITE YARN, 1.75MM HOOK)
- Chain 20.
- Row 1: Make a slip stitch (slst) in the second chain from the hook, followed by a single crochet (sc), a half-double crochet (hdc), 13 double crochet (dc) stitches, and then a hdc, a sc, and a slst.
- Cut the yarn and tie off the ends.
Stitch and Shaping Clarity
This row intentionally uses different stitch heights to create a gentle curve.
- The taller stitches (dc) in the center push the piece outward
- The shorter stitches at the ends help it sit neatly around the neck
ASSEMBLY
- Collar: Glue the white scarf/collar piece to the top of the body.
- Head: Glue the wooden bead head onto the body, above the collar.
- Hat: Glue the crocheted hat onto the top of the head.
- Beard: Use hot glue to attach the white fluffy yarn for the beard.
- Pompoms: Glue small white pompoms onto the hat and the ends of the arms and legs.
- Keychain ring: Attach the keychain ring to the top of the hat.
Assembly Guidance
- Position all four spiral limbs before gluing to keep spacing even
- Arms should sit slightly higher than legs for a natural look
- The collar acts as a transition piece, hiding where the bead meets the body
Beard and Facial Placement
- The beard should sit just below the hat edge and above the collar
- Let it fan out slightly for a fuller look
- Since the face is a wooden bead, the beard placement defines the character’s expression
Stuffing Tips
No stuffing is required for this project, but:
- If your spirals feel too soft, you can lightly stiffen them with tighter tension or fabric glue
- The bead provides structure for the head, so no filling is needed there
Finishing Notes
- Trim any excess yarn ends neatly before assembly
- Double-check glue points for security, especially if used as a keychain
- Ensure the keychain ring is firmly attached to avoid pulling on the hat

Beginner Notes
- Take your time with the spiral limbs—they may feel unusual at first
- Practice consistent stitch placement to keep spirals even
- Dry-fit all pieces before gluing to avoid misalignment
Troubleshooting
- Spirals not curling properly: You may not be placing enough stitches into the same stitch. The curl comes from excess stitches.
- Hat too loose on the bead: Try tightening your tension or slightly reducing stitch count in early rounds.
- Pieces look uneven: Check that each spiral has the same number of stitch groupings.
Customization Ideas
- Use different bead sizes for varied head proportions
- Change hat colors for seasonal themes
- Add tiny embroidery details like eyes or a nose if not using a bead
- Swap pompoms for crocheted bobbles for a fully handmade finish