
Squid Game Guard Doll Amigurumi Crochet Free Pattern
Reimagined in yarn, the Crochet Squid Game Guard Doll brings a striking, character driven presence that stands out immediately through its iconic mask design and uniformed silhouette. This handmade figure is often appreciated for its bold visual identity, making it suitable for display shelves, themed collections, or as a unique gift for fans of recognizable screen inspired characters.
Crochet Squid Game Guard Doll

The structured appearance works especially well in crochet form because the clean lines and color blocking translate beautifully into simple stitches while still preserving the mysterious, authoritative look of the original design.
Skill Level
Beginner to intermediate
Comfort with increases, decreases, and color changes is helpful.
Finished Size
Size will vary depending on yarn and hook used, but this type of construction typically creates a small handheld amigurumi figure.
Materials
- Black yarn (main body/head base)
- Red yarn (body transition, hood, arms)
- Fiberfill stuffing
- Crochet hook suitable for yarn weight
- Yarn needle
- Stitch marker
Abbreviations
- MR = Magic Ring
- SC = Single Crochet
- INC = Increase (2 SC in one stitch)
- DEC = Decrease (invisible decrease recommended)
- BLO = Back Loop Only
- FLO = Front Loop Only
Head and Body (Black Yarn)
Head Shaping
- Round 1: Magic ring with 6 single crochet
- Round 2: Increase in each stitch for a total of 12 stitches
- Round 3: One single crochet, one increase repeated around for 18 stitches
- Round 4: Two single crochet, one increase repeated around for 24 stitches
- Round 5: Three single crochet, one increase repeated around for 30 stitches
- Round 6: Four single crochet, one increase repeated around for 36 stitches
- Rounds 7 to 13: One single crochet in each stitch around
Understanding the shaping here
These increasing rounds build a perfectly rounded dome for the head. The even spacing of increases prevents sharp edges and keeps the sphere smooth.

Head Decrease Section
- Round 14: Four single crochet, one decrease repeated around for 30 stitches
- Round 15: Three single crochet, one decrease repeated around for 24 stitches
- Round 16: Two single crochet, one decrease repeated around for 18 stitches
- At this stage, the head starts to close in slightly. This tapering helps create a natural jawline and prepares the piece for stuffing.
- Stuff the head firmly but evenly before fully closing. This is important for maintaining shape.
- Round 17: One single crochet, one decrease repeated around for 12 stitches
- Round 18: Two single crochet, one decrease repeated three times for 9 stitches
- The opening becomes small and controlled, allowing a clean transition into the body section.
Transition to Body (Red Yarn)
- Round 19: Change to red yarn, two single crochet and one increase repeated three times for 12 stitches
- Round 20: One single crochet, one increase repeated around for 18 stitches
- Rounds 21 to 22: One single crochet in each stitch
- Round 23: One increase, eight single crochet, one increase, eight single crochet for 20 stitches
- Round 24: One single crochet in each stitch
- Round 25: Work single crochet in back loops only around
- Then continue in the front loops of the same round:
- Four single crochet and one increase repeated for 24 stitches
- Rounds 26 to 28: One single crochet in each stitch
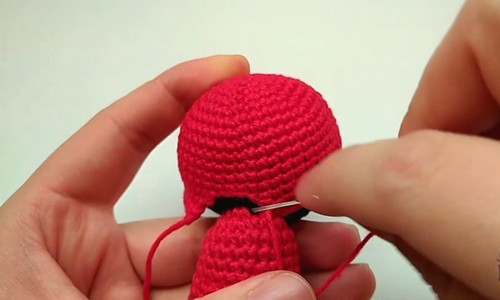
Why BLO and FLO matter here
This round creates structure. Using back loops only gives a clean ridge, which helps define the waist or separation between upper and lower body. The front loops are later used to add shaping without breaking the structure.
Legs and Shoes
- The legs are created by dividing the body opening, which is a very common amigurumi technique for dolls or character plushies.
Leg 1
- Attach yarn and work 10 single crochet for three rounds
- Next round: One single crochet, one decrease, then seven single crochet
- Switch to black yarn for shoes
- Work one single crochet, one decrease repeated around
- Close the opening securely.
Leg 2
- Repeat the same steps on the opposite side.
- Leave two stitches between legs when positioning and sewing to maintain symmetry and balance.

Assembly note
Even spacing between legs is important so the figure can stand or sit evenly without leaning.
Hood (Red Yarn)
- Start with a magic ring of six single crochet
- Increase evenly following the same pattern as the head until you reach 36 stitches
- Next round: Five single crochet, one increase repeated around for 42 stitches
- Next rounds: One single crochet in each stitch
- Work fewer stitches per row to shape the hood opening.
- Sew the hood securely to the head and body once finished.
Construction insight
The hood is shaped like a shallow cap. Gradual widening ensures it drapes naturally instead of sitting stiffly.
Arms
- Start with black yarn and make six single crochet in a magic ring
- Switch to red yarn and work six single crochet evenly for eight rounds
- Sew arms to the sides of the body.
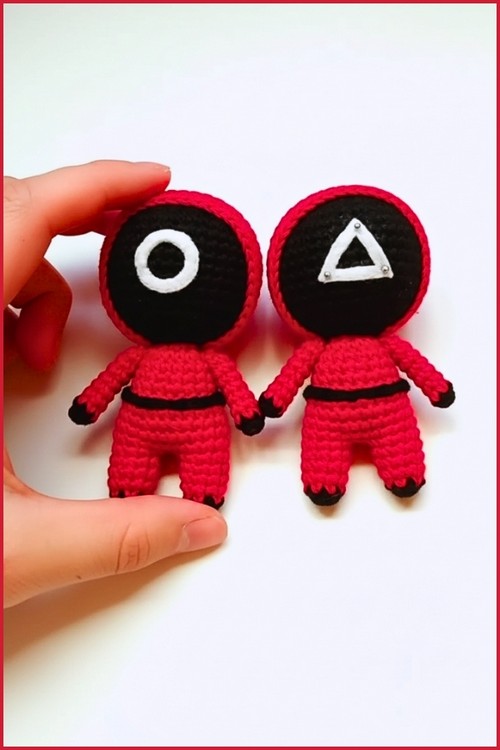
Placement tip
Attach arms slightly below the head line so they sit naturally against the torso rather than pulling upward.
Finishing Details
- Crochet a black chain long enough to wrap around the waist and tie as a belt
- Cut a circle, square, or triangle from white felt
- Glue the felt symbol to the center of the face mask
Final shaping note
Small finishing details like belt and facial symbols bring identity to the character. Placement should always be centered and checked from the front before securing.

Beginner Notes
- Use a stitch marker to avoid losing your place in continuous rounds
- Stuff gradually, not all at the end
- Keep tension consistent to avoid gaps
- Count stitches after each increase/decrease round
Troubleshooting
- Head looks uneven: Check increase spacing in early rounds—uneven increases cause distortion.
- Body feels too loose: Use tighter tension or smaller hook size.
- Legs not even: Recount stitches before dividing and ensure equal spacing.
Assembly Guidance
Take time when attaching:
- Hood should sit naturally over head without pulling backward
- Arms should be level and symmetrical
- Legs must align evenly to support balance