
Mini Crochet Amigurumi Demogorgon Free Pattern From Stranger Things
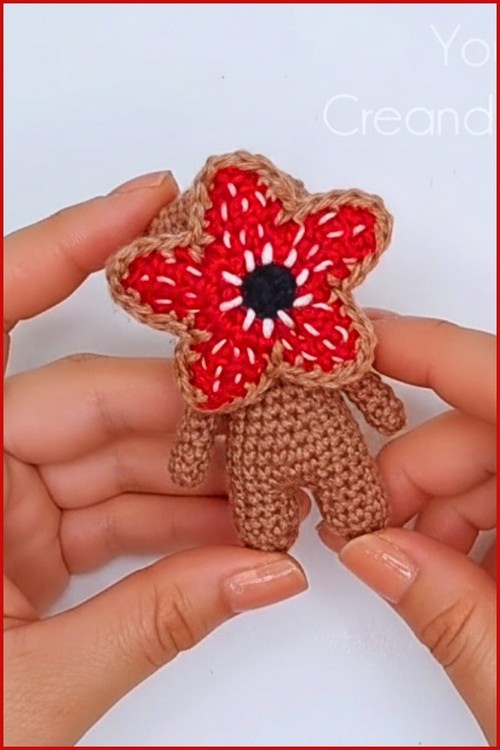
Crochet Demogorgon pattern introduces a striking handmade interpretation of one of the most iconic monster creatures, designed to bring a bold, fantasy inspired presence into crochet art. This creation captures the eerie, flower like open mouth, layered head details, and textured body structure that make the creature instantly recognizable, while still transforming it into a soft, display friendly figure. It can be used as a collectible display piece, a themed gift for fans of supernatural series, or even as a unique decorative item for shelves and desks.
Crochet Demogorgon

The stitched construction allows shaping that highlights its aggressive stance and otherworldly form, giving it both character and personality in yarn form. With careful detailing in its limbs and facial features, the finished piece delivers a dramatic visual impact while still remaining handcrafted and approachable, making it a standout project for anyone who enjoys character based crochet creations.
Skill Level
Intermediate beginner to intermediate
Comfort with increases, decreases, and working in continuous rounds is recommended.
Finished Structure Overview
This amigurumi is constructed in four main parts:
- Two separate legs joined into one body
- A tapered body shaping into a neck area
- A rounded stuffed head
- A layered flower face sewn onto the head
- Arms attached during assembly stage
Abbreviations
- MR = Magic Ring
- SC = Single Crochet
- INC = Increase
- DEC = Decrease
- CH = Chain
- BLO = Back Loop Only
- FLO = Front Loop Only
- SL ST = Slip Stitch
- HDC = Half Double Crochet
Construction Overview (Important Before Starting)
This doll uses a classic amigurumi joining method:
- Each leg is worked separately first.
- The legs are then joined using chains to form the base of the body.
- The body is shaped by gradual decreases to form a narrow waist.
- The head is built directly on top of the body in the same yarn continuity.
- Arms are small tubes and sewn on after shaping.
- The flower face is created as two layered pieces and stitched together before attaching.
Understanding this flow will help you avoid confusion at the joining stage, which is where many crocheters pause.

ORIGINAL PATTERN (WORK EXACTLY AS WRITTEN)
LEGS (MAKE 2)
- Round 1: Create a magic ring with 10 single crochets
- Round 2: 10 single crochets in back loops only
- Rounds 3–5: 10 single crochets
- Cut yarn for the first leg
- Keep yarn attached for the second leg to join later
BODY
- Round 6: Chain 1, work 10 single crochets around first leg, 1 single crochet in chain, 10 single crochets around second leg, 1 single crochet in chain space (22 stitches)
- Rounds 7–9: 22 single crochets, stuff legs
- Round 10: (9 single crochets, 1 decrease) repeat twice (20 stitches)
- Round 11: (8 single crochets, 1 decrease) repeat twice (18 stitches)
- Round 12: 18 single crochets
- Round 13: (7 single crochets, 1 decrease) repeat twice (16 stitches)
- Round 14: 16 single crochets, stuff body
- Round 15: (2 single crochets, 1 decrease) repeat four times (12 stitches)
- Round 16: (1 single crochet, 1 decrease) repeat four times (8 stitches)

HEAD
- Round 17: Increase in each stitch (16 stitches)
- Round 18: (1 single crochet, 1 increase) repeat eight times (24 stitches)
- Round 19: (2 single crochets, 1 increase) repeat eight times (32 stitches)
- Rounds 20–28: 32 single crochets
- Round 29: (2 single crochets, 1 decrease) repeat eight times (24 stitches)
- Round 30: (1 single crochet, 1 decrease) repeat eight times (16 stitches), stuff head firmly
- Round 31: Decrease eight times, close opening
ARMS (MAKE 2)
- Round 1: Magic ring with 6 single crochets
- Rounds 2–8: 6 single crochets
- Do not stuff
- Sew arms between body rounds 14 and 15

PETAL FLOWER FACE INNER PIECE
- Round 1: Magic ring with 5 single crochets using black
- Round 2: Increase in each stitch (10 stitches), change to red
- Round 3: In back loops only, work 10 slip stitches
- Round 4: (1 single crochet, 1 increase) repeat five times in front loops (15 stitches)
- Petals: Each petal uses three stitches
- Row 1: 1 single crochet, 2 half double crochets in same stitch, 1 single crochet, chain 1, turn
- Rows 2–3: 1 single crochet, 2 half double crochets, 1 single crochet, chain 1, turn
- Row 4: Decrease twice, fasten off
PETAL FLOWER FACE OUTER PIECE
- Follow the same steps as the inner piece
- Skip the slip stitch round
- Do not cut yarn so pieces can be joined
FINISHING
-
Embroider ten small white teeth in the center
- Add thin embroidered lines on red petals
- Place inner flower over outer flower and join around edges with single crochets, adding increases at petal tips
- Sew completed flower securely to the center of the head
Helpful Notes Before You Start
The most critical shaping happens in three areas:
- Leg joining (Round 6) – This determines balance and alignment of the entire doll.
- Body decreases (Rounds 10–16) – These create the natural waist and transition into the neck.
- Head expansion (Rounds 17–19) – This builds volume and gives the character its proportions.
If the stitch counts feel tight during joining, it is usually due to tension differences between the two legs. Keeping consistent tension helps the body sit straight.
Stitch and Shaping Clarity
The design relies heavily on controlled decreases:
- Early decreases shape the torso inward gradually
- Mid-body rounds maintain stability before head growth
- Final head decreases ensure a smooth dome instead of a flat top
The BLO round on the legs is especially important because it creates a natural ridge that helps define the ankle area and improves structure.
Assembly Guidance
Arms Placement
The arms are attached between body rounds 14 and 15. This is slightly above the narrowing section, which helps them sit naturally without pulling the body shape downward.
Flower Face Assembly
The flower is constructed in two layers:
- Inner piece adds structure and detail
- Outer piece adds volume and petal definition
Joining them with single crochets ensures a clean, durable edge. Adding increases at petal tips helps the flower maintain its rounded, blooming shape.

Stuffing Tips
- Stuff legs lightly but evenly so they stay balanced.
- Add more stuffing during body narrowing to avoid collapsing.
- Stuff head firmly, especially near Round 30, to maintain a smooth round shape.
Avoid overstuffing early rounds of the body, as it can stretch stitch alignment.
Troubleshooting
- Legs look uneven after joining: Usually caused by different tension between legs. Try adjusting stitch tightness before joining.
- Body leans to one side: Check that Round 6 chains are centered between both legs.
- Head looks flat on top: Increase stuffing gradually before final decrease round.
Customization Ideas
- Change flower colors for seasonal variations
- Add embroidered facial details inside the flower center
- Adjust arm length slightly for different proportions
- Use variegated yarn for a textured floral effect