Home » Easy Peasy Crochet Monster Mug Cover Pattern For Beginners
Easy Peasy Crochet Monster Mug Cover Pattern For Beginners
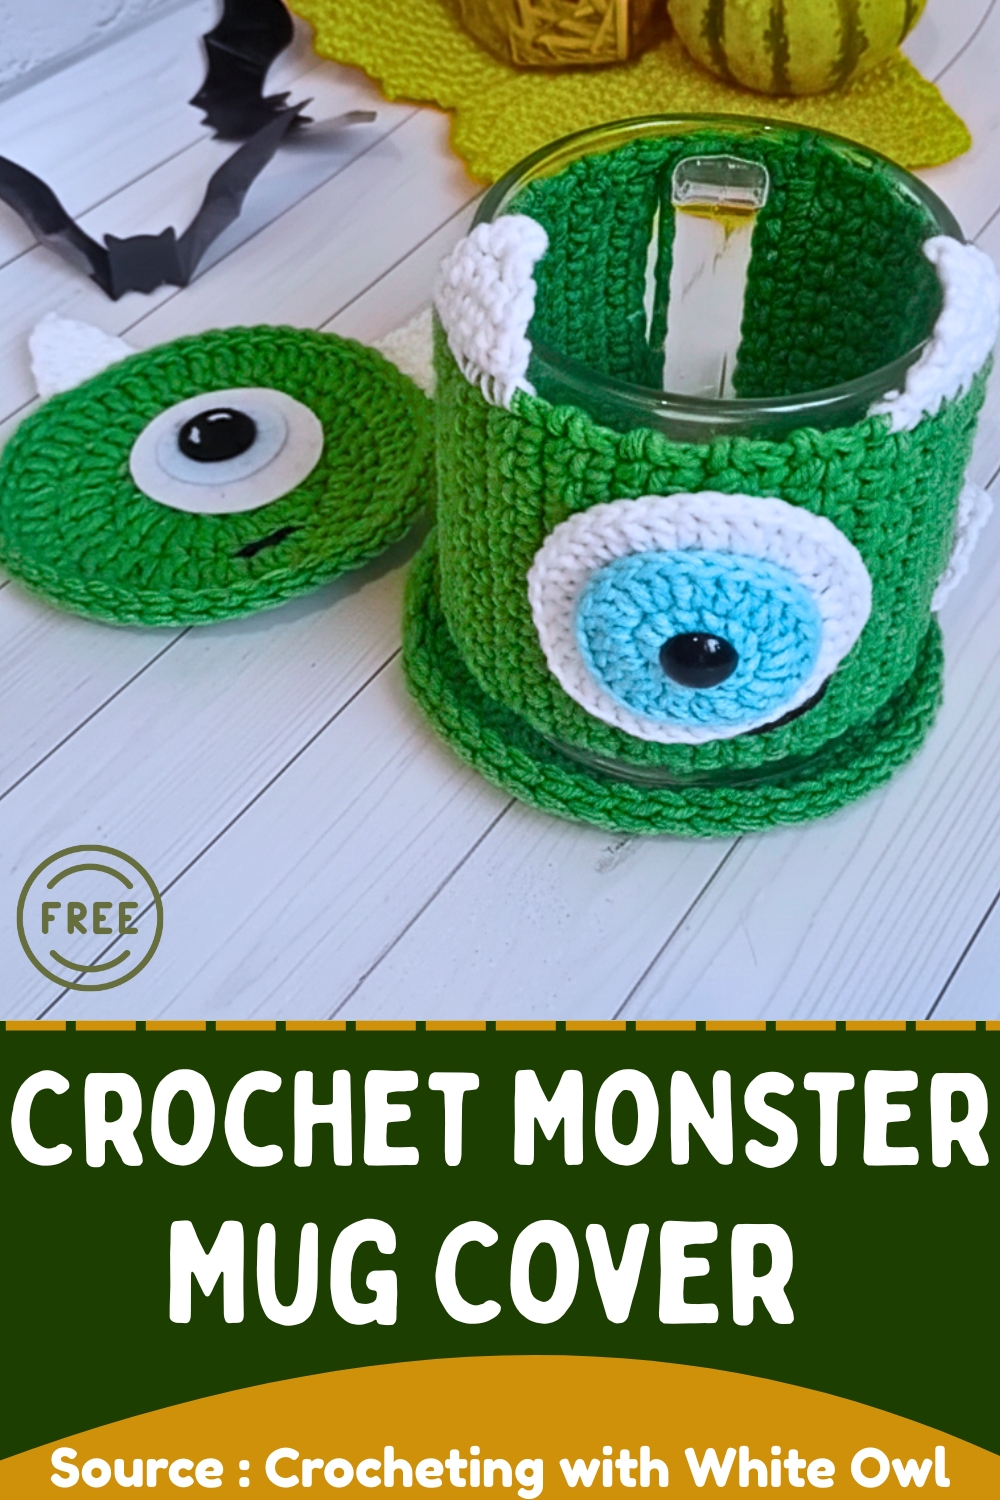
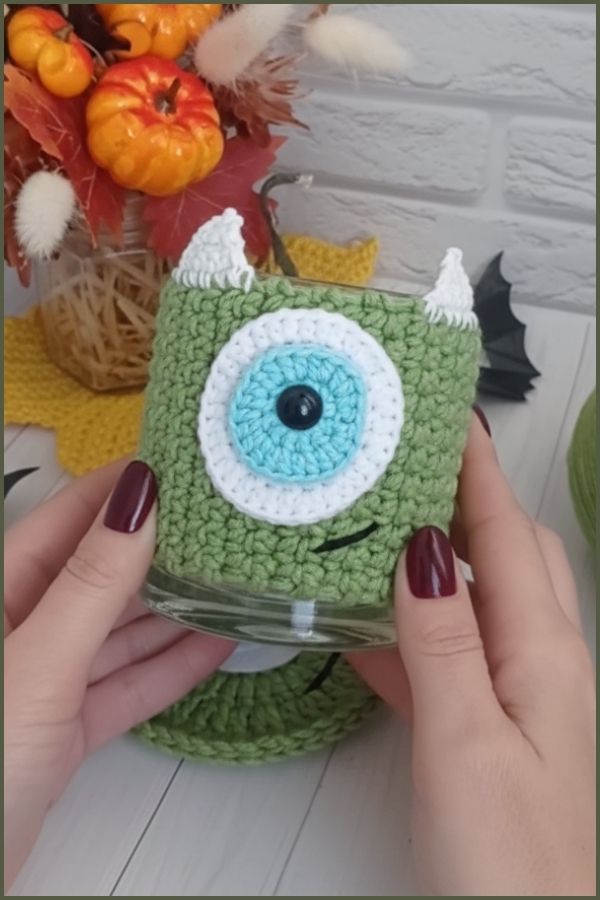
Warm drinks feel a little more enjoyable when they’re wrapped in something with character, and this Crochet Mug Monster Cover pattern brings that idea to life with a bold, eye-catching design. The cover fits snugly around your mug while keeping the handle accessible, combining comfort with a playful appearance that instantly draws attention. With its standout eye detail and shaped horns, it transforms an ordinary cup into a fun, expressive piece you’ll reach for every day, whether at home or on your workspace.
Crochet Monster Mug Cover
Skill Level
Beginner to intermediate
You should be comfortable with:
- Chain stitches
- Single crochet
- Basic increases and decreases
- Simple assembly and sewing
Finished Size
- Adjustable based on your mug
- Length and height can vary depending on your starting chain and total rows
Materials
- Yarn in your preferred color
- Crochet hook
- Stitch marker
- Yarn needle
- Stuffing (and optional catnip)
(Note: Eye and horn materials are included within their sections as written in the pattern.)
Abbreviations
- ch = chain
- sc = single crochet
- dc = double crochet
- dec = decrease (2 stitches together)
Helpful Notes Before Starting
- The starting chain determines how snug the cover fits around your mug.
- The total number of rows controls the height of the cover.
- The handle opening is created by skipping stitches using a chain bridge.
- Keep your tension consistent so the fabric doesn’t warp around the mug.
Construction Overview
- This mug cover is built as a flat rectangular piece that wraps around the mug. One section includes a chain gap that creates space for the handle. Once the body is complete, decorative elements (eye and horns) are added separately and attached.
Stitch and Shaping Clarity
- The handle opening is not a hole cut later—it is built directly into the fabric by chaining across a gap.
- Alternating rows (solid vs. handle opening) keeps the structure aligned so the opening stays in the same position.
- Horn shaping uses decreases to taper the stitches into a point.
MUG COVER INSTRUCTIONS
- Chain Stitch: Make 13 chain stitches. The number may vary depending on your mug's size.
- Row 1: Make 12 single crochet stitches along the chain.
- Handle Opening: Chain 13 stitches to create a handle hole, then make 12 single crochet stitches on the other side of the gap.
- Cover Body: Repeat the single crochet rows, alternating between a full row and a row with the handle opening, until you have 41 rows in total. This number may also vary.

Understanding the Handle Opening
When you chain 13 for the handle:
- You are skipping stitches and replacing them with chains
- On the next row, you will crochet back across those chains
- This creates a clean, reinforced opening that won’t stretch out easily
Finishing the Body
- Finishing: Cut the yarn and weave in the ends.
EYE INSTRUCTIONS
- Blue Circle (Iris): Using a 2.5mm hook, make a magic ring and then make 12 double crochet stitches in the ring. Continue to crochet in the round, increasing by 2 double crochets in each stitch for a total of 12 increases. Cut the yarn.
- White Circle (Sclera): Using a 2.5mm hook, make a magic ring with white yarn and 12 double crochet stitches in the ring. For the second round, repeat the pattern of 2 double crochets in one stitch, followed by a chain stitch in the next.

For Eye Construction Notes
- The blue circle should sit neatly inside the white circle
- The increases help the circle lie flat rather than curl
- Keep stitches even to avoid a wavy edge
Eye Assembly
- Assembly: Glue the blue circle onto the white circle and add a black safety eye or bead to the center.
- Attachment: Attach the eye to the mug cover with a hot glue gun or by sewing it on with a needle and thread.
HORNS INSTRUCTIONS
- Horns: Using white yarn and the smaller hook, attach the yarn to the top of the mug cover. Make 7 single crochet stitches.
- Decreasing: Turn your work and make 2 single crochets together, followed by 3 single crochets, and then 2 single crochets together again. Repeat this decreasing pattern until you form a pointed horn shape.
- Finishing: Make a single chain stitch at the point, and cut the yarn.
- Attachment: Attach the two horns to the top of the mug cover.

Horn Shaping Guidance
- The decreases pull the stitches inward, forming a cone shape
- Keep the decreases aligned so the horn doesn’t twist
- If the horn feels too soft, you can lightly stuff it before closing
Assembly Guidance
- Position the eye slightly above the center for a balanced look
- Place the horns evenly spaced along the top edge
- Wrap the cover around the mug before attaching pieces to confirm placement
FINAL TOUCHES
- Mouth: Sew a small mouth using black yarn and a needle.
- Assembly: Wrap the finished piece around the mug.
Facial Placement Tips
- A centered eye creates a classic monster look
- Slightly offset placement gives a more playful expression
- Keep the mouth small so it doesn’t overpower the eye
Stuffing Tips
- The main cover is not stuffed
- Horns can be lightly stuffed if you want more structure
Beginner Notes
- Count stitches at the end of each row to maintain shape
- Use a stitch marker to track row starts if needed
- Try the cover on your mug as you go to adjust fit
Troubleshooting
- Cover too tight: Add more starting chains
- Cover too loose: Reduce starting chains or use a smaller hook
- Handle opening misaligned: Make sure you are alternating rows consistently
- Edges curling: Check tension and avoid overly tight stitches

Customization Ideas
- Use different yarn colors for different monster styles
- Add multiple eyes for a fun variation
- Stitch eyebrows or eyelashes for expression
- Change horn size by adjusting starting stitches
5 Shares