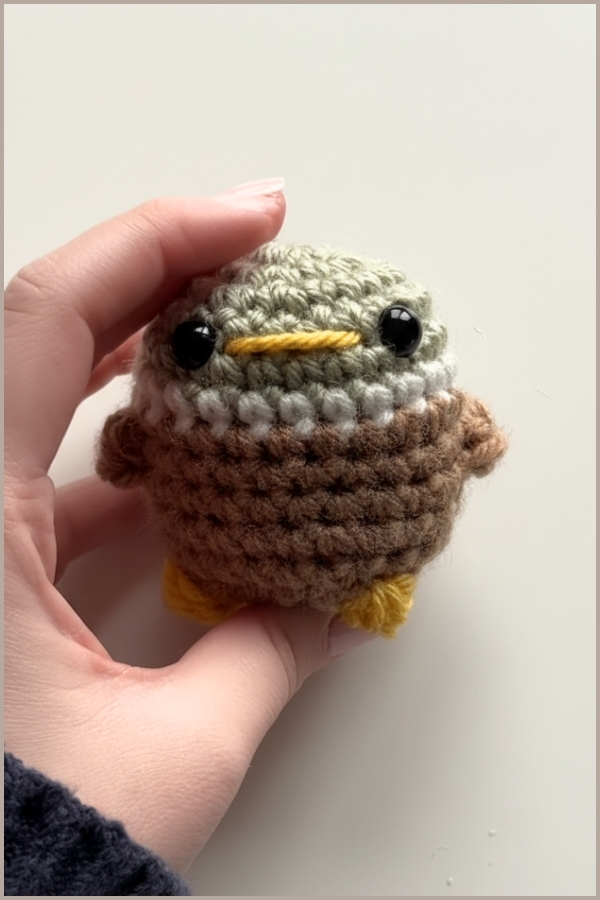
Easy Crochet Duck Pattern Free Amigurumi In Beautiful Colors
Gentle shaping and thoughtful color changes give this crochet duck its rounded body, soft wings, and expressive face, making it a satisfying project for anyone who enjoys building character through stitches. The way the wings are worked directly into the body and the beak is formed with bobble stitches keeps the construction simple while still creating a polished, dimensional result. This design is especially enjoyable if you like seeing a plush come together seamlessly as you crochet, rather than assembling many separate pieces at the end.
Crochet Duck Amigurumi

Skill Level
Beginner to Intermediate
You should be comfortable with:
- Magic circle
- Single crochet
- Increasing and decreasing
- Basic color changes
- Working in front and back loops
- Bobble stitch (explained below)
Finished Size
Size will vary depending on yarn and tension, but expect a small handheld plush, perfect for display, gifting, or keychain adaptation.
Materials
- 4mm crochet hook
- Weight 4 yarn in green, orange, brown, and white (or yellow and orange for a regular duck)
- Scissors
- Stitch marker
- Safety eyes
- Darning or sewing needle
- Polyfill or teddy bear stuffing
Abbreviations
- sc = single crochet
- inc = increase (2 sc in same stitch)
- dec = decrease (invisible decrease preferred)
- hdc = half double crochet
- blo = back loop only
- flo = front loop only
Helpful Notes Before Starting
- This project is worked in continuous rounds. Use a stitch marker to track your rounds.
- The head and body are crocheted as one piece, which helps create a smooth, seamless shape.
- Wings are formed directly into the body during Round 8, so pay close attention during that step.
- The beak is created using bobble stitches and embroidery, combining texture and shaping.
Construction Overview
This duck is built from the top down:
- Head begins with a magic circle and gradual increases
- Body continues without separation
- Color changes create natural sections of the duck’s body
- Wings are crocheted into the body (no sewing required)
- Beak is added using bobble stitches and embroidery
- Final rounds shape and close the body
This approach reduces assembly and keeps everything aligned and symmetrical.
Stitch and Shaping Guidance
- Increases expand the round evenly, forming the rounded head.
- Even rounds (no increases) create height and maintain shape.
- Decreases taper the body closed at the bottom.
- Front loop only (FLO) is used to anchor the wings while leaving the back loop available for later rounds.
- Back loop only (BLO) helps secure the wings upward in the next round.
HEAD AND BODY
- Round 1: Create a magic circle with eight single crochets. Pull the short tail end to close the circle tightly.
- Round 2: Increase in every stitch for a total of 16 stitches.
- Round 3: Single crochet followed by an increase, repeated all the way around, for a total of 24 stitches.
- Rounds 4 & 5: Single crochet all the way around, with each round maintaining 24 stitches.
- Round 6: Before completing the last stitch of round 5, change the yarn color to white. Continue with single crochets all the way around.
- Round 7: Before completing the last stitch of the round, change the yarn color to brown. Continue with single crochets all the way around.
- Round 8: Single crochet in the next six stitches. Then, crochet the first wing by placing four half-double crochets in the front loop of the next stitch. Single crochet in the next 11 stitches. Crochet the second wing by placing four half-double crochets in the front loop of the next stitch. Single crochet in the remaining five stitches.
- Round 9: Single crochet in the next six stitches. Flip the wing up and single crochet into the back loop of the next stitch. Single crochet in the next 11 stitches. Flip the second wing up and single crochet into the back loop of the next stitch. Single crochet in the remaining five stitches.
- Rounds 10 & 11: Single crochet all the way around, with each round maintaining 24 stitches.
Assembly and Finishing
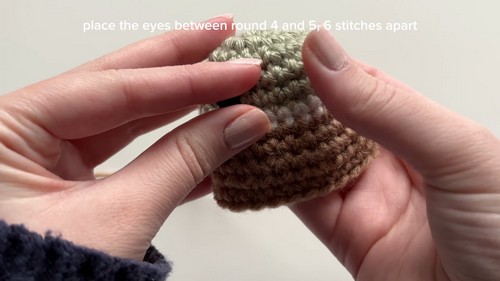
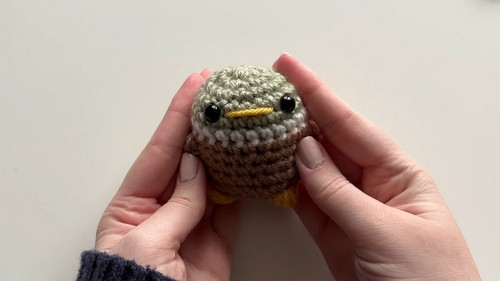
- Insert the safety eyes between rounds 4 and 5, six stitches apart.
- Use orange yarn and a darning needle to add the beak.
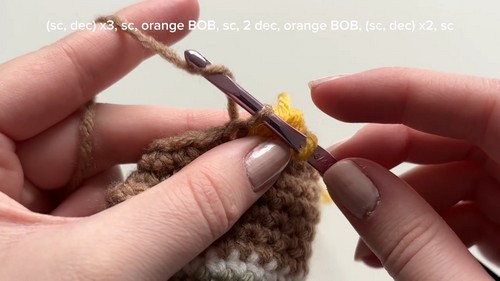
- Round 12: Single crochet followed by a decrease, repeated three times. Crochet a bobble stitch in the next stitch using orange yarn. Do two decreases. Crochet another bobble stitch in the next stitch using orange yarn. Do one decrease. Single crochet in the next stitch. Do one more decrease. Single crochet in the last stitch.
- Begin to stuff the duck with polyfill.
- Round 13: The pattern is eight decreases and one single crochet all the way around.
- Finish stuffing the duck with polyfill.
- Round 14: Decrease four times all the way around.
- Slip stitch into the last stitch and cut a long tail to sew the plushy together and secure the loose end.
Eye and Facial Feature Placement
- Place safety eyes between Rounds 4 and 5
- Keep them six stitches apart for a balanced, centered expression
- The bobble stitches in Round 12 form the base of the beak
- Embroidery with orange yarn enhances the beak shape and definition
Tip: Insert eyes before heavy stuffing so you can adjust placement easily.

Stuffing Tips
- Start stuffing after Round 12, as the opening begins to narrow
- Use small amounts of polyfill at a time
Focus on:
- Firm head shaping
- Even distribution in the body
- Avoid overstuffing near the bottom so decreases close neatly
Finishing Notes
- Use the long tail to close the opening securely
- Stitch through front loops of remaining stitches for a clean finish
- Weave in all ends carefully, especially around color changes
Beginner Notes
- If wings feel confusing, pause and identify:
- Front loop (used to build wing)
- Back loop (used next round to anchor it)
- Practice a bobble stitch separately if it’s new
- Keep tension consistent, especially during color changes
Troubleshooting
- Wings look uneven: Check stitch count before and after wing placement. They should mirror each other.
- Gaps in decreases: Use invisible decreases instead of standard decreases.
- Beak looks unclear: Tighten bobble stitches and reinforce with embroidery.
- Shape looks flat: Add more stuffing gradually and reshape with your hands.
Customization Ideas
- Use yellow yarn for a classic duck look
- Add blush or embroidery for extra personality
- Turn it into a keychain by attaching a loop at the top
- Experiment with textured yarn for a softer plush feel