
Cute Sully Eleven Doll Amigurumi Crochet Free Pattern
With its layered outfit and character focused shaping, Crochet Doll with Dress and Jacket Amigurumi offers a satisfying way to create a fully styled figure that looks dressed and ready for display. The combination of a fitted body, flared skirt, and structured jacket adds depth and realism, making the doll feel more like a complete character than a simple plush. This design works beautifully for personalized gifts, decorative pieces, or themed collections, since the clothing details can be easily adjusted to match different color palettes or styles.
Crochet Eleven Doll Amigurumi

From the neat transitions between sections to the finished look of the outfit and hair, every part contributes to a balanced and expressive result.
Skill Level
Intermediate
You should be comfortable with:
- Working in the round
- Increases and decreases
- Back loop and front loop techniques
- Sewing pieces neatly and symmetrically
Finished Size
Size will vary depending on your yarn and hook choice, but the doll is typically small handheld amigurumi size.
Materials
- White yarn for the body
- Yarn in your preferred color for the bow
- 5 mm safety eyes
- Crochet hook suitable for your yarn
- Stuffing
- Tapestry needle
- Keychain ring
Abbreviations
- sc: single crochet
- inc: increase
- dec: decrease
- sl st: slip stitch
- BLO: back loop only
Helpful Notes Before Starting
- This doll is worked from the legs upward, meaning both legs are made separately and then joined.
- Pay close attention to loop placement (back loop only vs front loop only), as this creates structure for shoes, dress layers, and neck shaping.
- Keep your tension consistent, especially when switching colors, to avoid visible gaps.
- Stuff gradually as you go to maintain shape.

Construction Overview
- Legs and shoes are made first
- Legs are joined to form the body
- Dress base and skirt are added as you build upward
- Head is worked directly onto the body
- Arms, jacket, hair, and ears are made separately and attached
This continuous construction helps the doll stay sturdy and reduces sewing.
LEGS AND SHOES
- Round 1: Make a magic ring with 10 single crochet using white yarn
- Round 2: Work 10 single crochet in back loop only and change to skin color on the last stitch
- Round 0 Transition: Work 10 slip stitches in back loop only
- Round 3: Work 10 single crochet taking only the highest back loop
- Sock Detail: Sew two horizontal lines around the ankle using red and green embroidery thread
- Rounds 4 to 5: Work 10 single crochet in skin color
- Finish the first leg and repeat for the second leg, keeping the second leg attached for joining
Stitch and Shaping Clarity
- The back loop only rounds create a sharp edge, helping define the shoe from the leg.
- The slip stitch transition round tightens the shape and reinforces the shoe edge.
- The embroidered sock lines add detail without extra bulk.

BODY AND DRESS BASE
- Round 6: Chain 1, join both legs, and work single crochet around both legs and the chain for a total of 22 stitches
- Rounds 7 to 9: Work 22 single crochet and stuff the legs
- Round 10: Work 9 single crochet, 1 decrease twice for 20 stitches and change to pink yarn on the last stitch
- Round 11: Work 8 single crochet, 1 decrease twice for 18 stitches
- Round 12: Work 18 single crochet in back loop only
- Round 13: Work 7 single crochet, 1 decrease twice for 16 stitches
- Round 14: Work 16 single crochet and change back to skin color on the last stitch
- Round 15 Neck: Work 2 single crochet, 1 decrease four times in back loop only for 12 stitches
- Round 16: Work 1 single crochet, 1 decrease four times for 8 stitches
Stitch and Shaping Clarity
- The chain join bridges the legs and forms the center of the body.
- Decreases begin shaping the waist and torso.
- Round 12 BLO creates a ridge used later to attach the skirt.
- Neck shaping is tighter to support the head securely.
DRESS DETAILS
- Skirt Attachment: Attach pink yarn to the front loops of Round 12
- Skirt Round 1: Work 1 single crochet, 1 increase nine times
- Skirt Rounds 2 to 7: Work 27 single crochet evenly around
- White Collar: Attach white yarn to the front center neck loops and work 1 half double crochet, 14 single crochet, 1 half double crochet, then finish with slip stitches

Stitch and Shaping Clarity
- Working into front loops only allows the skirt to flare naturally from the body.
- Increases in the first skirt round create volume and movement.
- The collar frames the face and helps hide color transitions.
JACKET AND ARMS
- Jacket: Chain 18 and work 17 single crochet rows, creating arm gaps by chaining 4 and skipping 4 stitches on the second row
- Arms Round 1: Make a magic ring with 6 single crochet using skin color
- Arms Round 2: Work 6 single crochet and change to blue
- Arms Rounds 3 to 8: Work 6 single crochet in blue
- Sewing: Attach arms under the collar aligned with the legs
Assembly Guidance
- Make sure arms are evenly placed on both sides, aligned with the legs for balance.
- The jacket should sit neatly over the shoulders without pulling.
HEAD
- Round 17: Increase in each stitch to make 16 single crochet
- Round 18: Work 1 single crochet, 1 increase eight times for 24 stitches
- Round 19: Work 2 single crochet, 1 increase eight times for 32 stitches
- Rounds 20 to 28: Work 32 single crochet
- Eyes Placement: Insert 7 mm safety eyes between Rounds 22 and 23 with 6 stitches between them
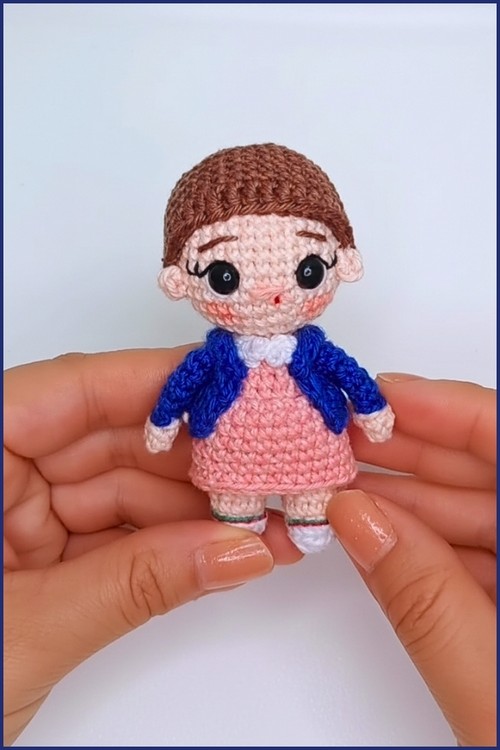
- Round 29: Work 2 single crochet, 1 decrease eight times for 24 stitches
- Round 30: Work 1 single crochet, 1 decrease eight times for 16 stitches and stuff the head
- Round 31: Decrease eight times and close the opening
Eye and Facial Feature Placement
- Place eyes before closing to ensure secure attachment.
- Check alignment from the front to avoid uneven placement.
Stuffing Tips
- Stuff firmly but not overly tight to keep the head round.
- Add extra stuffing near the neck for support.
HAIR AND EARS
- Ears: Make a magic ring with 3 single crochet, create two pieces, and sew them three stitches away from the eyes
- Hair Round 1: Make a magic ring with 8 single crochet
- Hair Round 2: Increase in each stitch to make 16 stitches
- Hair Round 3: Work 1 single crochet, 1 increase eight times for 24 stitches
- Hair Round 4: Work 2 single crochet, 1 increase eight times for 32 stitches
- Hair Round 5: Work 7 single crochet, 1 increase four times for 36 stitches
- Hair Rounds 6 to 9: Work 36 single crochet
- Hair Round 10: Work 15 half double crochet, 6 double crochet for the fringe, then 15 half double crochet
Assembly Guidance
- Position ears evenly, using the eyes as your reference point.
- The hair cap should sit snugly over the head without gaps.
- The fringe (front section) should naturally fall over the forehead.

Finishing Notes
- Check symmetry from all angles before final sewing.
- Weave in all ends securely, especially around color changes.
- Adjust clothing slightly after assembly so everything sits naturally.
Beginner Notes
- Take your time with joining the legs, as this sets the alignment for the entire doll.
- Use stitch markers to keep track of rounds.
- If something looks uneven, it’s usually easier to fix early than later.
Troubleshooting
- Gaps between stitches: Try a smaller hook or tighter tension
- Uneven legs after joining: Recheck stitch count and placement of the chain join
- Head wobbling: Add more stuffing to the neck area
Customization Ideas
- Change dress colors for different styles
- Add embroidery for facial expressions
- Experiment with different hair lengths or textures
- Add accessories like a bag, bow, or hat