Cute Crochet Amigurumi Smiski Pattern Free For Beginners
Exploring the world of quirky, wide-eyed collectibles becomes an incredibly imaginative and joyful endeavor when you bring a Crochet Smiski Amigurumi to life. These whimsical handmade figures serve as delightful companions, perfectly designed to sit on your desk, peek out from hidden shelves, or add a humorous touch to any room.
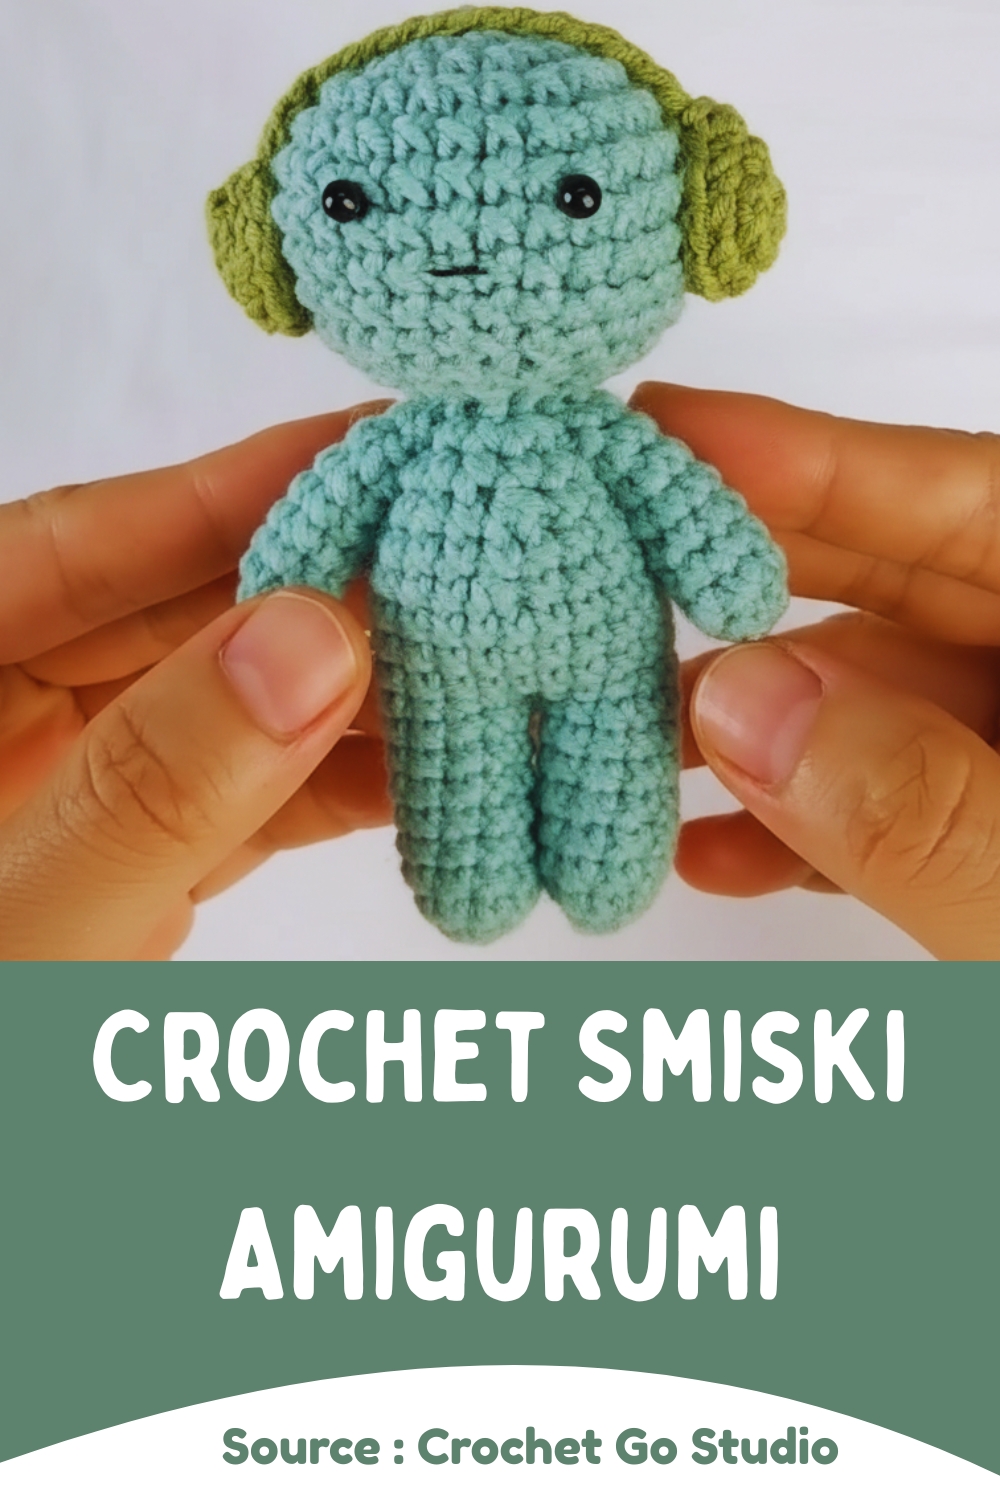
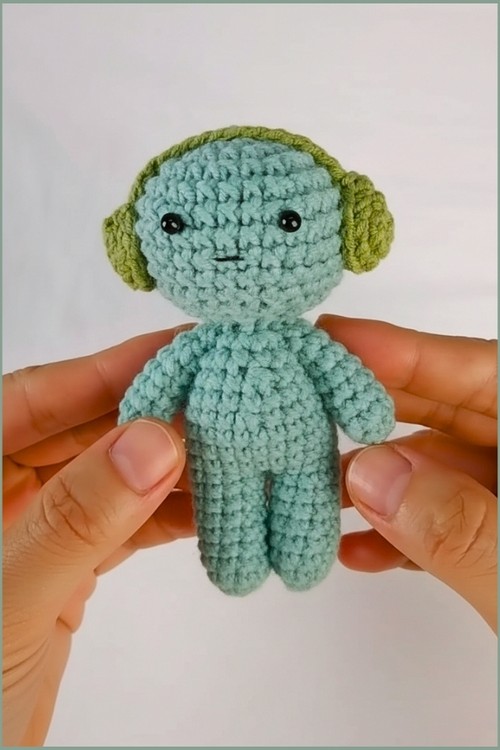
Crochet Smiski Amigurumi
Working through the stitches gives you a wonderful opportunity to practice detailed shaping while capturing their signature elongated bodies and inquisitive expressions using your favorite yarn. Anyone looking for a unique and charming project that stands out from the ordinary will find this creation deeply satisfying to craft.
Skill Level
-
This project is ideal for an advanced beginner who is comfortable with the magic ring and working in continuous rounds but wants to practice more intentional assembly and limb attachment.
Finished Size
-
Using a 2.5 mm hook and standard sport or DK weight yarn, your finished character will stand approximately 3 to 4 inches tall, making it a perfect size for a keychain or a desk companion.
Materials
-
Light green or pastel yarn
-
2.5 mm crochet hook
-
Black embroidery thread (for eyes)
-
Fiberfill stuffing
-
Yarn needle and scissors
-
Optional: contrasting yarn for hat or headphones
Abbreviations
-
MR – Magic Ring
-
SC – Single Crochet
-
INC – Increase (2 SC in one stitch)
-
DEC – Decrease (single crochet 2 together)
-
SL ST – Slip Stitch
-
CH – Chain
Construction Overview
-
The project begins at the base with two identical legs that are joined together to create the foundation for the body.
-
By joining the legs, you eliminate the need for sewing the lower half, resulting in a cleaner look and a more stable base for the figure to stand.
-
The torso and head are worked as separate pieces to allow for better control over the neck shaping and stuffing density.
-
Arms and accessories are added at the end to give the character its final personality and posture.

Stitch and Shaping Clarity
-
When working the increases for the head, ensure your stitches are tight to prevent the stuffing from showing through once the sphere expands.
-
The legs require consistent tension so they remain the same height; if one leg is taller than the other, the figure may lean to one side.
-
Decreases should be worked as "invisible decreases" whenever possible to keep the surface of the head smooth and professional.
Helpful Notes Before Starting
-
Use a stitch marker at the beginning of every round since amigurumi is worked in a continuous spiral without joining.
-
If you are new to joining legs, take a moment to ensure both feet are facing forward before you make the first connecting stitch.
-
The choice of a 2.5 mm hook with pastel yarn ensures a dense fabric that holds its shape well even when firmly stuffed.

Legs and Body
-
Begin with two separate legs using MR and single crochet increases.
-
Once both legs are completed, join them with SC stitches to start forming the body.
-
Continue crocheting in rounds to shape the torso.
-
Stuff lightly as you go for even filling.
Arms
-
Create two small tubes starting with MR and a few SC rounds.
-
Attach the arms to the sides of the body symmetrically.

Head
-
Start with MR and increase gradually to form a round shape.
-
Continue SC in each stitch for several rounds.
-
Begin decreasing once the desired height is reached.
-
Before closing, stuff firmly for a smooth round head.
-
Embroider or sew on tiny black eyes.
Hat (Optional)
-
-
Use a contrasting yarn color.
-
Begin with MR and increase every round until it fits the head size.
-
Crochet a few rounds evenly to create the hat’s depth.
-
Slip stitch to finish and place it on the head.
-
Headphones (Optional)
-
Crochet two small round earpieces.
-
Connect them using a short chain or yarn strand as the headband.
-
Attach them securely on both sides of the head.
Assembly Guidance
-
Pin the arms to the body before sewing to ensure they sit at the same level on both sides of the torso.
-
When attaching the head to the body, align the center of the head with the center point between the legs to maintain proper balance.
-
If adding the headphones, position them slightly forward on the head to give the character a "listening" look.
Eye and Facial Feature Placement
-
Placement of the eyes is the most important step for character expression; generally, placing them between the middle and lower third of the head creates a "kawaii" or cute aesthetic.
-
Space the eyes about 4 to 6 stitches apart, and use your embroidery thread to create small, clean French knots or vertical bars.
Stuffing Tips
-
Focus on stuffing the legs firmly so the toy can support its own weight.
-
When stuffing the head, add small pinches of fiberfill at a time and push them toward the sides to create a perfectly round shape without lumps.
-
Avoid overstuffing the very top of the body where it meets the neck, as this can make the head tilt or sit unevenly.
Troubleshooting
-
If your legs look lopsided after joining, count the stitches on each leg to ensure they are identical before the join round.
-
If the hat is too small, add one more round of increases before working the even rounds for depth.
-
If you see gaps in your stitches, try using a slightly smaller hook or tightening your yarn tension.
Customization Ideas
-
Change the pastel green to a bright yellow or pink to create a different "flavor" of character.
-
Instead of headphones, you could crochet a tiny flower or a leaf to sprout from the top of the head.
-
Experiment with variegated yarn for the hat to add texture and visual interest without extra effort.
Finishing Notes
-
Weave in all loose ends.
-
Adjust the stuffing and shape the figure neatly.
-
Add optional blush or accessories for personalization.