Cute Crochet Amigurumi Puppy Free Pattern You’ll Love Making
Bring a touch of cuteness to your handmade creations with this Mini Crochet Dog Pattern, a perfect project for dog lovers and amigurumi fans alike. Designed as a pocket-sized puppy, this pattern can be turned into an adorable keychain, charm, or small toy.
Crochet Amigurumi Puppy


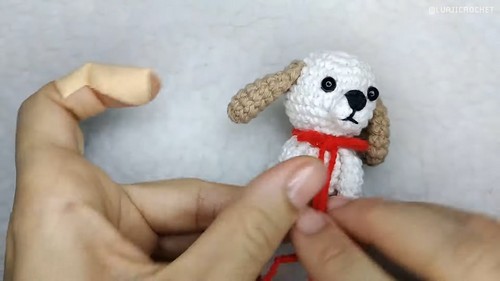


Bringing a touch of handmade magic into your home is easy with this charming Crochet Amigurumi Puppy design, which guides crafters through creating a truly endearing stitched companion. Boasting oversized paws and expressive safety eyes, the finished canine serves as a durable childhood toy or a whimsical bookshelf accent. Stitched with love, this project wonderfully showcases your artistic flair.
Skill Level
-
This project is rated as advanced beginner because it requires working in continuous rounds, changing shapes rapidly between the head and body, and managing small, flat-closed components.
Finished Size
-
Using the specified DK weight yarn and a 2mm hook, the completed character stands approximately 3 to 4 inches tall, making it an ideal size for a keychain or desk companion.
Materials
-
White, brown, and black DK weight yarn
-
2mm crochet hook
-
6mm safety eyes or black embroidery thread
-
Yarn needle, scissors, and fiberfill stuffing
-
Keychain ring (optional)
Abbreviations
-
sc: single crochet
-
inc: increase (two stitches worked into the same stitch)
-
dec: decrease (invisible decrease recommended for amigurumi)
-
hdc: half double crochet
-
dc: double crochet
-
st: stitch
Helpful Notes Before Starting
-
Use a stitch marker in the first stitch of every round because working in continuous spirals makes it very easy to lose track of your placement.
-
Choose an invisible decrease instead of a standard decrease to prevent small gaps where fiberfill stuffing might peek through.
-
Pull your magic rings tight but secure them with a small knot on the inside so they do not loosen over time as the toy is handled.
-
Keep your yarn tension firm and consistent, especially when transitioning between increases and decreases, to achieve a smooth fabric fabric.
Construction Overview
-
The head and body are crocheted as one continuous piece, starting at the top of the head, narrowing down at the neck, expanding for the body, and closing at the bottom base.
-
The front legs and ears are worked in the round but finished by flattening the opening and crocheting through both layers to create a clean edge that is easy to sew.
-
The back legs and snout are worked as flat, circular elements using taller stitches like half double crochet and double crochet to create quick, distinct shapes.
Stitch and Shaping Clarity
-
Rounds 1 through 5 establish the flat top of the head by adding six increases evenly across each round.
-
Rounds 6 through 10 create the straight sides of the head, giving the character its round, spherical structure.
-
Rounds 11 through 13 quickly narrow the piece to form a defined neck, creating the exact area where the head stops and the body begins.
-
Rounds 14 and 15 reverse this direction by adding increases back into the piece, creating a sturdy upper chest area.
-
Round 22 uses a unique rate of reduction to create a flat, stable base for the bottom of the body so the toy can sit nicely.
Step by Step Pattern Instructions
Head and Body
-
Round 1: 6 sc in a magic ring
-
Round 2: 6 inc (12)
-
Round 3: (1 sc, 1 inc) repeat 6 times (18)
-
Round 4: (2 sc, 1 inc) repeat 6 times (24)
-
Round 5: (3 sc, 1 inc) repeat 6 times (30)
-
Rounds 6–10: 30 sc
-
Round 11: (3 sc, 1 dec) repeat 6 times (24)
-
Round 12: (2 sc, 1 dec) repeat 6 times (18)
-
Round 13: (1 sc, 1 dec) repeat 6 times (12)
-
Round 14: (1 sc, 1 inc) repeat 6 times (18)
-
Round 15: (2 sc, 1 inc) repeat 6 times (24)
-
Rounds 16–19: 24 sc
-
Round 20: (2 sc, 1 dec) repeat 6 times (18)
-
Round 21: (1 sc, 1 dec) repeat 6 times (12)
-
Round 22: (1 sc, 1 dec) repeat 4 times (8)
-
Fasten off, close the hole, and weave in the end.
Front Legs (Make 2)
-
Round 1: 6 sc in a magic ring
-
Rounds 2–5: 6 sc in each round
-
Round 6: Flatten and make 3 sc across to close
-
Fasten off and leave a tail for sewing.
Back Legs (Make 2)
-
Start with a magic ring
-
Chain 1, make 7 hdc into the ring
-
Join with a slip stitch, fasten off, and leave a tail.
Ears (Make 2)
-
Round 1: 6 sc in a magic ring
-
Round 2: 6 inc (12)
-
Rounds 3–6: 12 sc each round
-
Round 7: (2 sc, 1 dec) repeat 3 times (9)
-
Round 8: (1 sc, 1 dec) repeat 3 times (6)
-
Fold flat, make 3 sc to close, and fasten off.
Snout
-
Magic ring, chain 2
-
Make 7 dc into the ring
-
Join with a slip stitch and fasten off
-
Use black yarn to embroider the nose and mouth.
Tail
-
Chain 10, skip first chain
-
Make 9 slip stitches back across
-
Fasten off and leave a tail for sewing.
Assembly Guidance
-
Sew front legs between rounds 14 and 15 of the body
-
Sew back legs between rounds 18 and 20
-
Attach snout between rounds 8 and 10 of the head
-
Sew ears between rounds 5 and 6
-
Attach tail to the back of the body
-
Add safety eyes on round 7, spaced 3 stitches apart
-
Add ribbon around the neck and attach a keychain ring if desired
-
Lightly blush cheeks for a cute finish.
Eye and Facial Feature Placement
-
Insert the safety eyes into round 7 before you finish stuffing and closing the body, ensuring there are exactly 3 unworked stitches visible between them.
-
Center the flat snout directly between and slightly below the safety eyes so it covers rounds 8, 9, and 10 perfectly.
-
Embroider a small, delicate 'Y' shape or a simple horizontal line using black yarn onto the snout before sewing the snout onto the face to keep your knots hidden inside.
-
Align the ears symmetrically on either side of the head at rounds 5 and 6, tilting them slightly forward to give the character an expressive look.
Stuffing Tips
-
Begin stuffing the head firmly when you are at round 12, making sure to push fiberfill out against the sides to smooth out any ridges from the increases.
-
Add extra stuffing into the neck area during round 14 to prevent the head from drooping or wobbling once the toy is fully assembled.
-
Fill the body firmly as you work your final decreases, but leave the final half-inch slightly less dense so the bottom base remains flat and does not balloon outward.
-
Do not stuff the front legs or the ears, as these parts are meant to lie flat against the head and body for a streamlined appearance.
Finishing Notes
-
To close the final 8 stitches cleanly, thread your yarn tail onto a needle and pass it through the front loops only of all 8 stitches from the outside in, then pull firmly to draw the circle closed like a drawstring.
-
Knot the remaining yarn tail securely against the body fabric and use your needle to push the tail deep inside the center of the toy before cutting the thread.
Beginner Notes
-
When a pattern asks you to flatten and crochet across to close, press the opening of the tube flat so that the stitches line up directly opposite each other, then insert your hook through both matching stitches at the same time to work your single crochet.
-
If you are new to embroidery, use sewing pins to map out your facial features before committing with your yarn needle to ensure perfect symmetry.
Troubleshooting
-
If you see your stuffing showing through the stitches, your hook may be too large for your yarn weight, so consider switching down to a smaller hook size like 1.75mm to tighten your fabric.
-
If your character is leaning to one side, check that your legs are sewn symmetrically along the exact same rounds on both the left and right sides of the body.
Customization Ideas
-
Change the look of your toy by using brown yarn for the ears and snout while keeping the head and body white to create a classic spotted look.
-
Swap out the safety eyes for sleepy embroidered eyelids using black thread to give your character a calm, resting expression.