
Crochet Ragdoll Cat Free Pattern Amigurumi
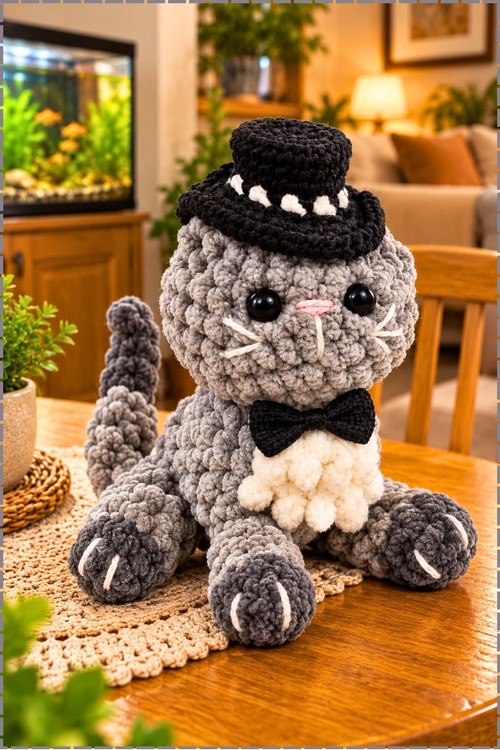
Come New Year’s Eve, the crochet ragdoll cat looks right at home on the party table, with white dots ringing his top hat and white stripes on each grey paw. Any cat lover with a taste for vintage style would happily display a dapper cat amigurumi on a mantel or record cabinet.
Stitching the Crochet Ragdoll Cat gives you a kitten in formal wear, hat and bow tie included. The pattern covers every piece down to the claws. Crocheters who like dressing their toys get a full outfit in one pattern. Change the bow colour, and the Crochet Ragdoll Cat fits any wedding table.
Crochet Ragdoll Cat

Pinching the top of the head flat and crocheting straight across gives this cat its pointed ears without any separate ear pieces to sew. I built the limbs and tail before touching the body, then locked them directly into the body rounds so they sit flush and never pull loose. My crochet ragdoll cat wears a black top hat, a crisp bow tie at his white chest, and embroidered whiskers that stick straight out from each side of his face. Large black safety eyes and a small pink nose land right in the middle of a plush grey face. The tail curves out behind him at a natural angle.
What You Need
- Grey plush or chunky yarn for the body, head, all four legs, and the tail.
- Off white or cream yarn for the chest patch.
- Black yarn for the top hat and bow tie.
- White yarn or embroidery thread for the whiskers and claw marks.
- Pink yarn or embroidery thread for the nose.
- Large black safety eyes, domed and glossy. Mine look about 18 to 20 mm.
- Polyester fiberfill.
- A crochet hook sized for your yarn.
- Yarn needle and scissors.
- Pins for positioning limbs and accessories before sewing.
The Pattern
1. Make the Limbs and Tail First
- Crochet all appendages before starting the body: two longer front legs, two shorter back legs, and one tail.
- Work each piece in the round in grey yarn until it reaches your preferred length and thickness.
- Stuff each leg firmly as you go so it holds its tubular shape; leave the top open and do not fasten off fully, since you will lock each piece into the body.
- Embroider white claw marks across the bottom of each paw before attaching them, while the paws are easy to hold flat; on mine three short white lines sit at the toe of each leg.
- Leave a long yarn tail on each piece for securing inside the body later.

2. Crochet the Body and Lock In the Limbs
- Start the body from the bottom up in grey yarn, working in the round.
- As you crochet upward, place each limb against the body at the point where you want it to sit and work the body stitches directly around the top of the limb so it is locked into the fabric; this is stronger than sewing limbs on at the end.
- Position the two shorter back legs at the lower sides of the body, pointing forward and slightly outward as they do on my cat.
- Lock in the tail at the lower back, angling it so it curves out behind the body.
- Leave the inner yarn tails from each limb hanging loose inside the body for now.
- Continue crocheting the body upward without stuffing yet.
3. Add the White Chest Patch
- When you reach the upper chest area, pause the grey yarn.
- Switch to the off white or cream yarn and crochet two to three rows directly across the front of the body, keeping the sides in grey.
- Work with a slightly looser tension or use a technique that gives the stitches a slight lift so the patch reads as fluffy, the way my chest patch does.
- Switch back to grey and continue up toward the neck; the cream patch should sit like a bib in the centre front, and on my cat it fills the space from the neck down to where the bow tie will sit.
4. Lock In the Front Legs
- At the upper body, lock in the two longer front legs into the body rounds on each side, pointing downward and slightly forward.
- Once the body is built up past them, reach inside and use the long inner yarn tails to sew each leg into its final position, pulling it downward so the legs rest on the surface like the sitting pose on my cat.
- Tie off these inner tails and push the knots into the stuffing.

5. Build the Head
- Continue crocheting upward past the neck in grey yarn to form the head, working in the round until the head is nearly complete.
- Do not close the head yet.
- Once the head is mostly formed and the opening is still wide enough to reach inside, insert the safety eyes and position them in the middle of the face, set wide and low so the forehead has plenty of grey above them, as on my cat.
- Stuff the body and head firmly through the open top, pushing stuffing all the way down through the neck into the tummy so the lower body holds its shape.
- Use the inner yarn tails from the front legs now if you have not already, to pull the legs into their final downward angle before closing up.
6. Close the Head to Form the Ears
- Pinch the open top of the head flat between your fingers so both sides meet evenly.
- Crochet straight across the flattened top from one side to the other to close the head in one row; do not work a round decrease.
- This flat closure pushes the two corners out naturally into pointed ear shapes on each side of the head.
- Once closed, add a few extra stitches around each ear corner with a yarn needle to give the ears more definition and a sharper point, the way mine stand up clearly above the hat brim.

7. Embroider the Face Details
- Nose: embroider a small upside down triangle or oval in pink yarn between the eyes, just below centre.
- Mouth: add a short Y shaped line below the nose in the same pink.
- Whiskers: thread white yarn or embroidery thread and pull three long horizontal stitches out from each side of the nose, keeping them level and evenly spaced; on my cat the whiskers extend well past the width of the head.
- Ear definition: add a stitch or two in grey around the inside edge of each ear point to help them keep their shape.
8. Make and Attach the Groom Accessories
- Top hat: crochet a flat brim circle in black, then work upward in rounds to form the crown, keeping the sides straight and the top flat. Finish with a white band around the base of the crown; on mine a single round of white yarn sits just above the brim. Sew the hat dead centre on the top of the head so it sits level.
- Bow tie: crochet or wrap two small black lobes and cinch them at the centre with a few tight wraps of black yarn to form the knot. Sew the bow tie at the base of the neck, centred over the top of the white chest patch, as it sits on mine.
- White chest fluff: the cream chest patch on mine is full enough that it reads as a fluffy tuxedo front beneath the bow tie. If yours looks flat, add a few surface stitches in cream to build it up before attaching the bow tie.
Tips
Keep the seam running down the back of every limb so the front face looks smooth. In plush yarn the seam is almost invisible, but in smoother yarns it matters.
Stuff each leg before locking it into the body. Once the body rounds close over the top of the limb, there is no way to reach inside and add more.
Sew the hat on last. Position it after the ears are defined so you can place it to balance the two ear points on each side.
FAQ
Can I sew the limbs on instead of crocheting them in?
You can, and many standard amigurumi patterns do this. Sewing on afterward gives you more control over final position, but the limbs may shift or loosen over time. Locking them in as you go, as described here, holds them permanently.
What if the ear points collapse after closing?
Work a few firm stitches through both layers of yarn at each corner with a needle and grey yarn, pulling slightly to sharpen the point. You can also insert a tiny pinch of stuffing into each ear before you sew the corners down.
Do I need safety eyes that large?
The large domed eyes are part of what makes the face read as a ragdoll cat, and they suit the plush chunky yarn. Smaller eyes work but can look sunken in a thick fabric. Embroider the eyes with black yarn if the doll is for a small child.