Crochet Puppy Parts Pattern Free Ears Feet And Arms Made Simple
This crochet puppy pattern focuses on creating the essential finishing details that bring an amigurumi dog to life. Covering the ears, paws, and arms, this pattern helps add personality, balance, and structure to your puppy design.
Crochet Puppy Parts

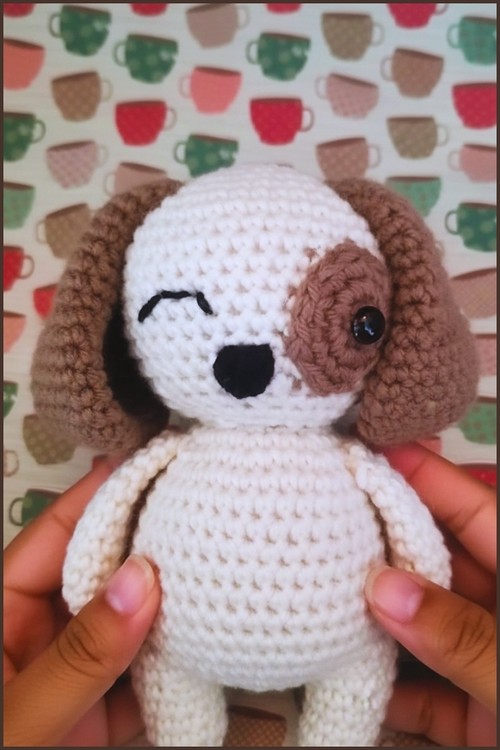

Crafters looking to elevate their handmade toy collection will find immense joy in utilizing a modular crochet puppy parts design template to build their next project. This clever guide outlines distinct features like soulful eyes, perky ears, and contrast-colored paws. It functions as an incredibly practical blueprint for yarn artists, maximizing creative freedom to fashion endlessly charming, personalized canine softies.
Skill level
-
This project sits at an advanced beginner level because it introduces strategic shaping techniques while utilizing foundational stitches.
Finished size
-
The final dimensions will depend heavily on your individual tension, but using the specified medium weight yarn and a larger hook typically yields medium sized components that are easy to handle and assemble.
Materials
-
5.0 mm crochet hook
-
Red Heart Super Saver yarn in main color and contrast color
-
Scissors
-
Sewing needle
-
Stitch marker
-
Stuffing
-
Safety pins
Abbreviations
-
Magic circle
-
Single crochet
-
Increase
-
Decrease
-
Slip stitch
Helpful notes before starting
-
Use a running stitch marker or a standard locking marker in the very last stitch of every round to ensure your stitch counts remain accurate, as missing a single increase or decrease will throw off the alignment of the shaping.
-
Keep your tension firm and consistent throughout the project to prevent the stuffing from peeking through the stitches, which is particularly important when using a 5.0 mm hook with medium weight yarn.
-
When working decreases, consider using the invisible decrease method by inserting your hook into the front loops only of the next two stitches to keep the fabric smooth and free of large gaps.
Construction overview
-
The components of this pattern are worked from the center outward using continuous rounds, meaning you will not join with a slip stitch at the end of each round unless explicitly instructed.
-
The ears use gradual decreases after an initial widening phase to create a long, tapered shape that naturally collapses and thins out at the base.
-
The paws use asymmetric decreasing clustered at the front of the round to force the fabric to bend sharply, creating a distinct foot shape rather than a generic tube.
-
The arms transition quickly from a wide base to a narrower tube, which is flattened at the top to allow the limb to rest flush against the body.
Stitch and shaping clarity
-
An increase means working two single crochet stitches into the exact same stitch from the previous round, which expands the circumference of your piece.
-
A decrease means combining two stitches into one, which narrows the shape and pulls the fabric inward to create curves or closures.
-
Repeating a sequence around means you will duplicate that specific pattern of stitches all the way to the end of the round.
-
Pressing an item flat means you will squash the open tube together, aligning the stitches of the final round into a straight line rather than keeping it open as a hollow cylinder.
Step by step pattern instructions
-
The Ears Make 2
-
Round 1: Magic circle with 6 single crochet
-
Round 2: Increase in every stitch for a total of 12 stitches
-
Round 3: One single crochet then increase, repeat around for 18 stitches
-
Round 4: Two single crochet then increase, repeat around for 24 stitches
-
Round 5: Three single crochet then increase, repeat around for 30 stitches
-
Rounds 6 to 9: Single crochet in each stitch
-
Round 10: Four single crochet then decrease, repeat around for 25 stitches
-
Rounds 11 to 13: Single crochet in each stitch
-
Round 14: Three single crochet then decrease, repeat around for 20 stitches
-
Rounds 15 to 17: Single crochet in each stitch
-
Round 18: Two single crochet then decrease, repeat around for 15 stitches
-
Rounds 19 to 20: Single crochet in each stitch
-
Round 21: One single crochet then decrease, repeat around for 10 stitches
-
Rounds 22 to 23: Single crochet in each stitch
-
Finish with a slip stitch, leave a long tail, and press the ear flat
-
The Paws or Feet Make 2
-
Round 1: Magic circle with 6 single crochet
-
Round 2: Increase in every stitch for 12 stitches
-
Round 3: One single crochet then increase, repeat around for 18 stitches
-
Round 4: Two single crochet then increase, repeat around for 24 stitches
-
Rounds 5 to 6: Single crochet in each stitch
-
Round 7: Two single crochet then decrease, repeat around for 18 stitches
-
Round 8: Decrease four times, then single crochet in remaining stitches for 14 stitches
-
Round 9: Decrease twice, then single crochet in remaining stitches for 12 stitches
-
Lightly stuff the paw
-
Rounds 10 to 12: Single crochet in each stitch
-
Finish with a slip stitch and leave a long tail
-
The Arms Make 2
-
Round 1: Magic circle with 6 single crochet
-
Round 2: Increase in every stitch for 12 stitches
-
Round 3: One single crochet then increase, repeat around for 18 stitches
-
Rounds 4 to 5: Single crochet in each stitch
-
Round 6: Four single crochet then decrease, repeat around for 14 stitches
-
Rounds 7 to 9: Single crochet in each stitch
-
Finish with a slip stitch, leave a long tail, and press flat
Assembly guidance
-
Secure every piece with safety pins before threading your needle, as this lets you evaluate the symmetry from the front, back, and sides before making any permanent attachments.
-
Check that the flattened edges of the ears and arms line up horizontally on the body to prevent the limbs from twisting awkwardly.
-
Use a sharp darning needle and pull your stitches firmly but gently to ensure the limbs are securely anchored without puckering the main body fabric.
Eye and facial feature placement
-
If you are adding safety eyes or embroidering a face, position them relative to where the ears flop down, ensuring the eyes sit centered between the ears to establish balanced proportions.
-
Place the facial features higher or lower depending on the look you want, keeping in mind that features placed lower down on the face tend to give amigurumi a younger, cuter appearance.
Stuffing tips
-
Roll your fiberfill into small, loose balls before inserting it into the paws to prevent clumpiness and ensure an even texture.
-
Leave the upper sections of the arms and the entirety of the ears completely unstuffed, which allows them to lay completely flat against the body as intended by the design.
-
Use the back of your crochet hook to push the stuffing firmly into the very tip of the paws so the foot retains its structural shape over time.
Finishing notes
-
Weave your remaining yarn tails through the interior stuffing of the main body several times to secure them, then snip the yarn close to the fabric so the ends hide away completely inside.
-
Give the assembled plush a gentle squeeze to redistribute the stuffing evenly around the sewn seams and help settle the stitches.
Beginner notes
-
Do not worry if your ears look massive compared to the paws during the first few rounds, as the extensive decrease section will quickly narrow them into the correct proportions.
-
If you find your magic circle has a small hole in the center, pull the starting tail tightly and weave it in securely on the inside of the piece before your work gets too deep.
Troubleshooting
-
If your paw does not bend forward at round eight, double check that your four consecutive decreases were made right next to each other, as clustering them tightly is what forces the ankle curve to form.
-
If your stitch counts do not match the end of a round, look back to see if you accidentally skipped a stitch or put two single crochets into a space that should have been a single stitch.
Customization ideas
-
Try using your contrast color exclusively for the ears and arms while keeping the main color for the paws to give your character a mismatched, playful look.
-
You can easily transform the personality of the project by experimenting with different types of yarn textures, such as a fluffy chenille or a rustic wool blend, keeping your hook size proportional to the yarn width.