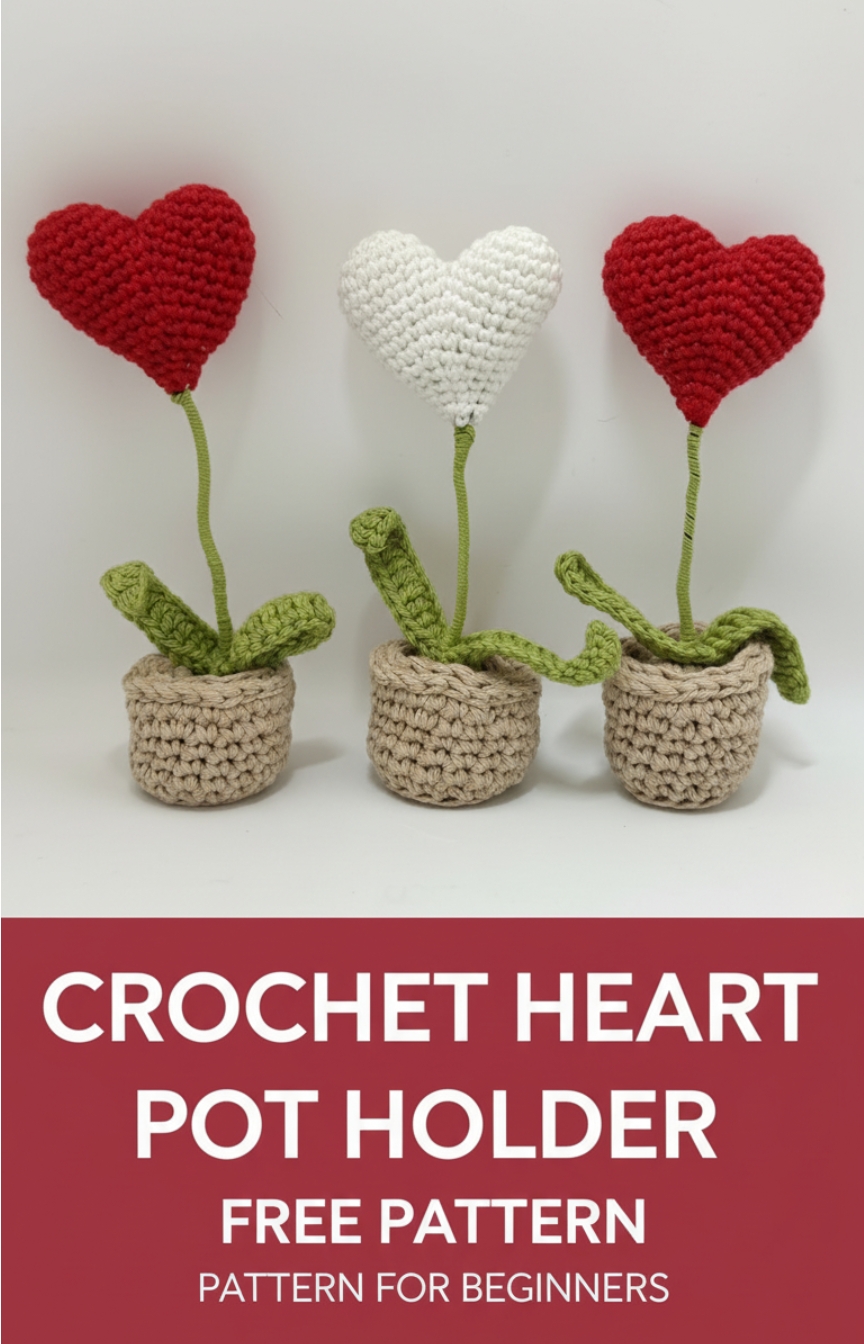
Crochet Heart Pot Holder Free Pattern Pattern For Beginners
This crochet Valentine’s Heart Flowerpot pattern is the perfect project for anyone looking to create a heartfelt handmade gift. Designed with love, it features a charming amigurumi heart resting gracefully above a mini crochet pot ideal for Valentine’s Day, anniversaries, or simply to add a romantic touch to your home.
Crochet Heart

The pattern includes step-by-step instructions for making the heart, pot, leaves, and assembly, making it suitable for both beginners and experienced crocheters. You can easily personalize the heart’s color or decorate the pot to suit your aesthetic, making every piece truly unique.
Materials
- 2.0 mm and 3.5 mm crochet hooks
- Yarn in red, green, and brown shades
- Stuffing
- Wire for the stem
- Tapestry needle and scissors
Heart Pattern (Amigurumi)
- Start with a magic ring and make 6 single crochets.
- Round 2: Increase in each stitch to make 12.
- Round 3: (1 SC, INC) repeat around to make 18.
- Round 4–5: Work 18 SC in each round.
- Make two top pieces. Cut yarn on the first; continue with the second.
Heart Body
- Join both tops by single crocheting around each.
- Total 36 stitches after joining.
- Sew the gap between tops closed with the first yarn tail.
- Round 7: (4 SC, DEC) repeat.
- Round 8: SC around.
- Round 9: (DEC, 13 SC) repeat twice.
- Round 10: (DEC, 5 SC) repeat.
- Round 11: (2 SC, DEC, 4 SC) repeat 3 times.
- Round 12: (DEC, 3 SC) repeat, end with 1 SC. Start stuffing.
- Round 13: (2 SC, DEC) repeat, end with 1 SC.
- Round 14: Repeat same round again.
- Round 15: (3 SC, DEC) repeat.
- Round 16: DEC around four times.
- Cut yarn, weave through remaining stitches, pull tight, and leave a small hole for the stem.

Leaves Pattern
- Chain 15.
- Work SC in 2nd chain, HDC next, then DC in next 10 chains.
- HDC next, SC in last chain.
- Without cutting, chain 15 again to make the second leaf and repeat.
- Leave a long tail for wrapping around the wire stem.

Pot Base and Sides
- Magic ring with 6 SC.
- Round 2: Increase all around.
- Round 3: (1 SC, INC) repeat.
- Round 4: SC in Back Loop Only.
- Rounds 5–7: SC in every stitch.
- Round 8: (2 SC, INC) repeat.
- Round 9: SC around.
- Finish with slip stitches around the top edge.
- Cut yarn and secure.

Pot Lid
- Magic ring with 6 SC, keep it slightly open for the wire.
- Round 2: INC in each stitch.
- Round 3: (1 SC, INC) repeat around.
- Slip stitch to finish and leave a long tail for sewing.

Assembly
- Bend one end of the wire stem into a loop to prevent it from slipping through the pot.
- Wrap the yarn tail from the leaves around the bent part for stability.
- Insert the wire through the center of the leaves and wrap tightly to form the stem.
- Feed the wire through the heart’s bottom hole and secure it by bending inside the heart.
- Sew the stem from the inside of the heart for added security.
- Stuff the pot and add a small weight at the base if desired.
- Insert the wire stem and sew the pot lid to the pot, skipping stitches evenly to fit.
- Tuck in all ends and shape the stem as desired.