
Astronaut Crochet Doll Pattern Free With Light Up Helmet Visor Amigurumi
Rocket birthday parties have a ready centrepiece in a crochet astronaut doll, standing tall beside the cake in a white suit with royal blue bands. Space-themed nurseries and kids' bedrooms keep an astronaut amigurumi propped on the pillows, right under the planet posters.
Kids give this crochet astronaut doll a mission the moment he lands in their hands. Black eyes stare straight ahead under the helmet, calm about everything. The astronaut doll takes every order well and never once argues back. Crochet him once and he ends up running the whole shelf.
Crochet Astronaut Doll

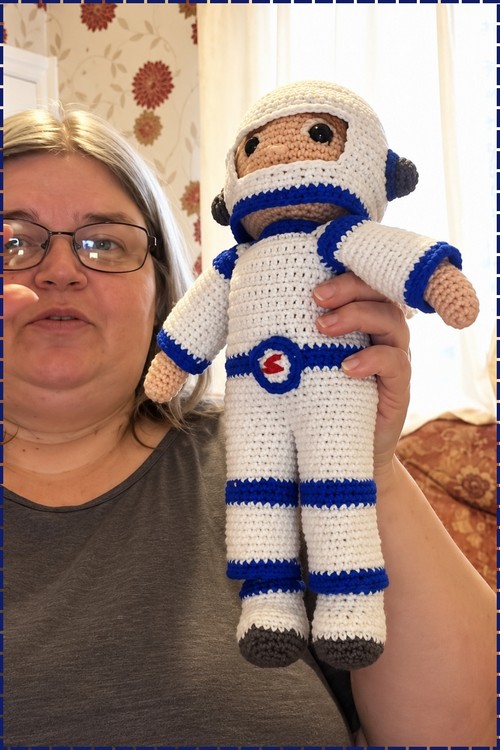
The helmet is worked as part of the head, with an open oval that frames the face and leaves the rest covered. Bands of blue circle the collar, wrists, knees and ankles, breaking up the white suit. Hands and face stay in skin tone so the doll reads as a person inside the gear, and the boots sit at the bottom in grey. At the waist there is a round buckle with a red mark stitched onto it. You make the head, body, arms and legs separately, stuff them, then sew everything in place. The stitch work is plain. Keeping the colour changes tidy is the part that takes patience.
What This Project Is
This is a modification, not a doll pattern from scratch. The body comes from the My Little Crochet Doll base pattern, which you crochet and stuff first. Everything below happens afterward, on a completed doll. If you have never worked a soft circuit, this is a good first one, because the fabric is dense enough to hide the thread and forgiving enough that a wobbly stitch line still works.
Materials and Tools
- Pre made small crochet doll worked from the My Little Crochet Doll base pattern
- 3.3V LilyPad coin cell battery holder with switch
- LilyPad LED, white
- Conductive thread
- CR2032 coin cell battery
- White felt
- Sewing needle
- Scissors
Approximate notes from experience, not from the pattern: a doll around 15 to 20 cm tall gives you enough body length to route two separate thread lines without them crowding each other. Budget roughly an hour for the circuit work once the doll is finished, and plan on a needle with an eye large enough for conductive thread, which is thicker and stiffer than sewing thread.
Pieces List
Everything that goes into the finished astronaut, so you know the scope before you start.
- Crochet doll body: 1, already made and stuffed
- LilyPad battery holder with switch: 1, worn on the back as the backpack
- LilyPad white LED: 1, hidden inside the head
- CR2032 coin cell battery: 1
- White felt visor: 1 small piece, cut to fit the helmet area of the face
- Conductive thread lines: 2 separate runs, one positive and one negative
How the Circuit Works
Worth reading before you thread a needle. A simple circuit needs three things:
- A power source, which is the coin cell battery
- A light component, which is the LED
- A conductive path connecting positive and negative terminals
In this project the conductive thread replaces wire. It carries electricity along stitched lines running inside the doll. You will create two completely separate stitched paths:
- A positive line from the battery holder to the LED
- A negative line from the battery holder to the LED
If those two paths touch anywhere inside the body, the circuit shorts and the LED stays dark. Amigurumi fabric happens to be ideal for this. It is flexible and dense, so it hides the circuit while still letting the glow come through the visor.
Construction Overview
The electronic elements are added to the finished doll in this order:
- Prepare the visor area on the doll's face
- Place the battery holder on the back of the doll
- Position the LED inside the head
- Stitch the positive conductive line
- Stitch the negative conductive line
- Test the circuit
- Cover the LED with the felt visor
The battery holder does double duty as a design element, sitting on the back like the astronaut's pack.
Stitch and Circuit Placement
Conductive thread behaves like wire, so placement matters more than neatness.
- Positive thread path: runs from the battery holder on the back, through the body, and up into the head to reach the LED
- Negative thread path: also runs from the battery holder to the LED, but must stay separated from the positive path
- Many crocheters find it easier to route the two lines through slightly different areas of the body so they never touch
The Pattern
Preparing the Helmet Visor
- Cut a small piece of white felt shaped to fit the doll's helmet area
- Position it on the face where the visor or eyes would sit
- Mark the center point where the LED light should glow. Checkpoint: hold the felt up to a window before you mark it, and if you can see the outline of your fingers sharply through it, the felt is too thin to diffuse well
The felt acts as a diffuser. Instead of a sharp point of light, it spreads the glow so the whole helmet looks lit.

Positioning the Components
- Place the battery holder on the back of the doll so it reads as the astronaut backpack
- Position the LED inside the head, directly behind the felt visor area
- Confirm the LED orientation before sewing anything. Checkpoint: at this stage nothing is stitched down, so both components should still shift freely under your fingers, and the LED should sit flat against the inside of the face fabric rather than tilting into the stuffing
LEDs only work in one direction. Reverse the positive and negative sides and the light will not come on, no matter how good your stitching is.
Still learning how amigurumi patterns work? That's totally okay, follow the video tutorial below and check the written pattern as you go!
Wiring the Positive Circuit
- Thread a needle with conductive thread
- Secure the thread tightly to the positive terminal of the battery holder using multiple loops
- Stitch through the body and up into the head
- Connect the thread to the positive terminal of the LED
- Loop several times through the LED terminal for strong contact
- Knot securely and trim the excess thread. Checkpoint: give the thread a gentle tug at both ends, and it should feel like a taut line rather than a loose thread lying inside the doll
Multiple loops are what create solid electrical contact between the thread and the metal terminal. One pass is not enough.

Wiring the Negative Circuit
- Thread a new length of conductive thread
- Secure it tightly to the negative terminal of the battery holder
- Sew through the body toward the LED
- Keep the negative line clearly separated from the positive line to prevent a short
- Attach it to the negative terminal of the LED
- Loop multiple times and knot securely. Checkpoint: before you knot off, squeeze the doll's body flat between your palms and check that the two lines still sit apart, because a path that clears by a few millimetres when the doll is upright can cross when the body is squashed
Keeping the two stitched lines apart is the single most important thing you will do in this project.
Testing the Circuit
- Insert the CR2032 battery into the holder
- Switch the battery holder to on
- Look for an even glow through the marked visor area. Checkpoint: the light should read as a soft patch, not a pinpoint, and if it is a pinpoint the LED is probably pressed too tightly against the fabric
Finishing Touches
- Once the LED lights properly, stitch the white felt visor over the LED area
- Check that the felt covers and diffuses the light evenly
- Trim and tuck all thread ends inside the doll
- Double check that the circuit lines remain separated inside the body. Checkpoint: switch the light on one last time with the visor sewn down, since a stitch through the felt can shift the LED just enough to change how the glow sits
The felt finishes the astronaut look and softens the glow, so the helmet appears illuminated rather than showing a bright dot.

Stuffing and Internal Space
- If the head is tightly stuffed, gently shift the stuffing to open a small pocket for the LED
- Avoid compressing the LED wires or terminals against the stitches
- Keep a small open space behind the visor so the light spreads evenly through the felt
- The body can stay firm, since it only needs to hold the thread runs, but the head stays a little softer than you would normally make it
- Over-stuffing shows up as a hard bulge around the battery holder on the back, where the fabric has nowhere to give
One small thing I did not expect: a head stuffed slightly under-full actually looks better lit than a firm one, because the light has room to bounce before it hits the felt.
Assembly
Since the doll is already built, assembly here means placing the electronics.
- Attach the battery holder first, centered between the shoulder blades, with the switch facing outward so you can reach it without turning the doll over
- Pin or hold the LED in place behind the face before sewing, and check the glow position by pressing the felt over it
- Sew the positive line, then the negative line, then test, and only then sew the visor down permanently
- Pin the felt visor in place and look at the doll from arm's length before committing, because a visor a few millimetres off center reads as a crooked face
Toy Safety
- This doll is not suitable for children under three. A CR2032 coin cell is a serious swallowing hazard, and no amount of stitching over the holder makes it safe
- For a young child, make the same doll with an embroidered face and skip the electronics entirely
- If the base doll uses safety eyes, those go in before the head is closed and stuffed. Swap them for embroidered eyes for anyone under three
- Check the battery holder periodically to confirm the battery is still seated and the housing has not loosened

Colour and Customization Ideas
- Grey or off white yarn for a classic suit, with an orange body for a flight-suit look
- A second LED in the chest as a control panel light, wired onto the same two lines
- Tinted felt behind the white felt for a warm or blue glow
- Small embroidered patches or a flag on the arm
- A slightly domed felt shape rather than flat, which reads more like a real helmet
Yarn Substitution and Size Scaling
Approximate guidance rather than pattern-specified numbers. Going up a yarn weight makes the body thicker, which helps hide the thread lines but makes it harder to feel where the LED is sitting. Going down a weight gives you a smaller doll and much tighter routing, and below about 12 cm tall the two thread paths get uncomfortably close. Whatever you choose, keep the fabric dense. Loose stitches let conductive thread show through and let it wander.
Troubleshooting
- LED does not light at all. Check that the thread loops are tight around both metal terminals. Loose loops are the most common failure, and they look fine while conducting nothing.
- LED still does not light with tight loops. Confirm the LED orientation. If positive and negative are reversed, everything else can be perfect and the light stays off.
- Light flickers when you move the doll. A thread path is intermittently touching the other line, or a loop is barely holding contact. Squeeze the body in different directions to find where it cuts out.
- Circuit dies immediately when switched on. That is usually a short. Trace both lines and look for a spot where they cross or run alongside each other.
- Battery seems dead quickly. Check the switch is being turned off between play sessions, and confirm the battery is seated fully in the holder.
- Glow is a bright dot instead of an even patch. The LED is too close to the felt, or the felt is too thin. Open a little space behind the visor or add a second felt layer.
- Conductive thread shows through the fabric. Re-route that section to run between stitch bumps rather than across them, and keep the runs on the inside face of the fabric.
FAQ
- Can I add the circuit to a doll I made years ago? Yes, as long as you can get a needle through the body without fighting the stuffing. Older dolls that were stuffed very firmly are the harder ones. You may need to work the stuffing loose through the head opening first.
- Do I need to know anything about electronics? No. If you can sew two lines that do not touch and tell positive from negative, you have everything you need. There is no soldering and no wiring diagram beyond what is described above.
- What happens if the two thread lines touch? The circuit shorts and the LED will not light. Nothing catches fire and nothing is damaged. You just have to find the crossing point and re-route one of the lines.
- How long will the battery last? It depends entirely on how often the switch is left on. With normal use and switching off between sessions, a CR2032 lasts a long time in a single LED circuit. Leave it on overnight a few times and you will be changing it sooner.
- Can I wash the doll? Not in water, no. Take the battery out, spot clean carefully around the circuit area, and let it dry fully. Submerging a soft circuit is how you kill it.