
Car Hanging Crochet Amigurumi Pattern Free
White yarn keeps the car hanging crochet amigurumi easy to spot against a dark windscreen as it sways from the rearview mirror on every turn. Halloween turns the little white car charm into a friendly ghost, and a backpack zip works just as well as a mirror once October ends.
Requests keep coming for the crochet hanging amigurumi because the ruffled skirt does something most patterns skip. It hangs, it spins, it fills a doorway. Makers come back to the crochet hanging amigurumi when a flat ornament will not do, and the blushed face is why it gets asked for by name.
Crochet Hanging Amigurumi

Below the head the body flares out into a wide ruffled skirt that spreads wider than the head itself. Everything works up in white, with a small loop standing up at the crown for hanging. Two large black safety eyes sit above an embroidered smile, and pink blush marks fill the cheeks. Stubby arms poke out where the skirt meets the head. Parts come as head, skirt, arms, the crown loop, and the stitched face. The ruffle is the only section asking for attention, since increases build the flare row by row. Everything else is standard round work, so newer makers can follow along without stalling.
Beginner Technique Notes
If any of the following techniques are new to you, read this before you start. All five appear somewhere in this pattern.
The Magic Ring
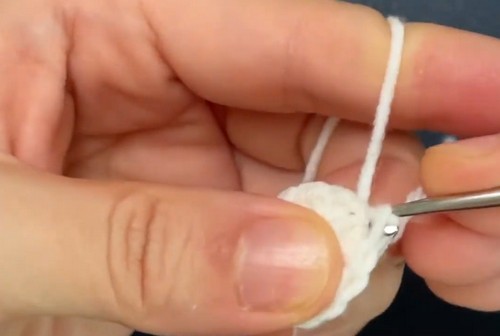
A magic ring is how most amigurumi pieces begin. It gives you a centre that pulls fully closed rather than leaving a hole. Make a loop with the yarn tail crossing over the working yarn. Insert your hook through the centre of the loop from front to back. Pull up a loop of working yarn and chain 1, then crochet your first round of stitches into the ring. When the round is done, pull the tail to close the hole. Hold the ring pinched between your thumb and finger while you work the first few stitches if it keeps slipping open.
Continuous Rounds
This pattern is worked in a continuous spiral. You do not join at the end of each round and you do not chain up to begin the next one. The work simply spirals. This means there is no visible seam and the surface looks smooth — but it also means one round blends invisibly into the next, so you can very easily lose track of where you are. Use a stitch marker. Drop it into the first stitch of each new round and move it up when you start the next. Without it, you will miscount somewhere between round 6 and round 9 and not realise until the numbers are off.
Increase
An increase means working 2 single crochet into the same stitch instead of one. This adds a stitch to your total for that round and makes the piece wider. When the pattern says "6 inc," that means find 6 stitches and work 2 SC into each of them, adding 6 stitches overall.
Decrease
A decrease combines two stitches into one, removing a stitch from the total and making the piece narrower. Insert the hook into the first stitch and pull up a loop. Then insert into the second stitch and pull up another loop. Three loops are now on the hook. Yarn over and pull through all three. One decrease made. For a smoother result, insert under the front loop only of each stitch — this is called an invisible decrease and is easier to spot later.
Marking the Round
Each time you finish a round, move your stitch marker into the stitch your hook is sitting in. That stitch is the first stitch of the new round. When you work all the way around and arrive back at the marker, you have completed the round. Count your stitches before moving the marker. If the count is wrong, fix it before moving on.
Materials and Tools
- 5 ply yarn in your chosen colour or colours
- 3 mm crochet hook
- Stuffing
- Yarn needle
- Scissors
- Embroidery thread for the face
- Strong string or cord for the hanging loop
Abbreviations
- MR, magic ring
- SC, single crochet
- Inc, increase, 2 SC into the same stitch
- Dec, decrease, 2 stitches combined into one
- Ch, chain
- Sl st, slip stitch
Pieces List
- Head and body, make 1, one continuous piece from the crown down, 15 rounds
- Arms, optional, make 2 if desired, tiny tubes sewn to the sides
- Hanging loop, make 1, attached at the top centre after the body is closed
- Embroidered face, worked onto the finished body
Eyes and Face
- The pattern offers a choice: embroidered eyes or safety eyes, both positioned between rounds 7 and 8.
- For embroidered eyes, work two small oval or curved lines in embroidery thread between rounds 7 and 8 while the piece is open enough to knot the thread inside. This is the safest option for any decoration near children and the only option for children under three.
- For safety eyes, insert them between rounds 7 and 8 while the head is still fully open — before round 10 begins the decrease section. Push the washers on firmly from inside until they click. Do not use safety eyes for any piece going to a child under three. Embroider instead.
The Pattern
Head and Body
- Round 1: Magic ring, 6 SC. [6] Pull the tail snug once the round is done. If a small hole remains, thread the tail on the needle and take two stitches across the gap from the inside.
- Round 2: Work 6 inc around. [12]
- Round 3: Work 1 SC then 1 inc and repeat 6 times around. [18]
- Round 4: Work 2 SC then 1 inc and repeat 6 times around. [24]
- Round 5: Work 3 SC then 1 inc and repeat 6 times around. [30] By round 5 the head should be a flat circle lying level, wider than your palm. Cupping means tension is too tight; ruffling at the edge means an extra stitch crept in somewhere.
- Rounds 6 to 9: Work 30 SC around. [30] By round 8 the flat circle has deepened into a clear dome. Between rounds 7 and 8 is where the eyes go — insert them now, before continuing.
- Round 10: Work 3 SC then 1 dec and repeat 6 times around. [24]
- Round 11: Work 2 SC then 1 dec and repeat 6 times around. [18] Stuff the head firmly now. Push filling toward the crown first, then outward to the sides. The head should feel solid and hold its round shape when you press it gently.
- Round 12: Work 18 SC around. [18]
- Round 13: Work 1 SC then 1 dec and repeat 6 times around. [12]
- Round 14: Work 12 SC around. [12] By round 14 the body is clearly narrower than the head, and the piece should look like a figure with a distinct head-to-body shape.
- Round 15: Work 6 dec. [6] Stuff the body lightly before this round closes the opening. Just enough filling to give it a small amount of body — not packed, because a soft body hangs more naturally.
- Fasten off. Thread the tail through the remaining 6 stitches and pull tight to close.
Optional Arms — Make 2
- Magic ring, 5 SC. [5]
- Rounds 2 to 4: Work 5 SC around. [5] A small narrow tube. Leave unstuffed or add just a pinch of filling.
- Fasten off leaving a long tail for sewing.
- Sew to the sides of the body roughly level with the lower head or upper body join. Pin both at the same time and check from the front before sewing.
Just picking up your first amigurumi project? The video tutorial below breaks it all down in a simple, beginner-friendly way!
Hanging Loop
- Attach yarn to the top centre of the head.
- Chain to your preferred loop length.
- Slip stitch into the same stitch to close the loop.
- Secure and weave the tail in. For a keychain or bag charm, use strong cord instead. Pass the cord through the top of the head before the final closing and knot it securely inside the body before pulling the loop out through the crown.

Face Embroidery
- Using embroidery thread, work two small oval or curved shapes between rounds 7 and 8 for eyes, spaced evenly apart.
- Embroider a small curved smile below the eyes.
- Optional: add small pink blush marks beside the eyes in pink yarn or pink embroidery thread.

Assembly
- Embroider the face before attaching the arms, while you have full sight lines to the face area.
- Pin both arms at the same height before sewing either. A single stitch's difference in height reads as lopsided on a small make.
- Attach the hanging loop last and check that it exits from the very centre of the crown. A loop that is even slightly off-centre makes the whole piece hang at an angle.
Stuffing Guide
- Head: firm. This is the largest section and needs solid filling to hold its round shape. Start at round 11 while the opening is still accessible.
- Body: light. The body should feel noticeably softer than the head. Overfilling makes it stiff and the piece tips forward when hung. Just enough to give it shape.
- Arms: none, or a tiny pinch. Unstuffed arms lie against the body naturally; stuffed ones stick outward.

Toy Safety
- Embroidered faces have no small parts and are the safest option for any age.
- Safety eyes are not suitable for children under three. Use embroidery instead.
- If using a cord for the hanging loop, make sure the knot inside the body is firm and will not pull through under the weight of the piece. A small square knot with the tail passed back through the loop before trimming is more reliable than a single knot.
- Weave all tails through at least 3 stitches in multiple directions. On a small piece that will be handled frequently, short tails work loose faster than on shelf toys.

FAQ
- My magic ring keeps sliding open while I crochet. Hold the ring pinched between your thumb and finger throughout the first round. You can also hold the yarn tail against the ring with the same two fingers. The ring only needs to stay put for those first 6 stitches — after that you pull the tail to close it and it locks in place.
- How do I know when my round is finished? Your stitch marker tells you. When you have crocheted all the way around and arrived at the stitch the marker is in, that is the end of the round. Count your stitches, move the marker into the next stitch, and start the new round. If your count is off, do not move the marker until you find and fix the mistake.
- The head looks more cone-shaped than round. Cone shapes usually mean the increase pattern shifted during rounds 3 or 4. The increases need to be evenly spaced — 6 increases spread equally around the round, not bunched together on one side. Undo back to round 3 and place the increases at regular intervals rather than wherever the next stitch happens to fall.
- Can I make this without the hanging loop as a plain toy? Yes. Skip the hanging loop section entirely and close the top of the head normally by pulling the starting tail through the magic ring stitches from the inside. The piece works perfectly as a small stuffed toy.
- The body stuffing is showing through the stitches. This means either the hook was too large for the yarn, or the tension was loose. Use a smaller hook — going down 0.5 mm makes a significant difference on 5 ply yarn — and keep your tension consistent. You can also try pulling each stitch a little tighter as you work, though the hook size change is more reliable.