
Free Chocolate Covered Strawberry Crochet Pattern Amigurumi
Cocoa brown chenille and a candy pink top make the chocolate covered strawberry crochet amigurumi a natural fit for a Valentine’s gift box or café counter. Pretend tea parties need a dessert course, and a crochet strawberry amigurumi fills that spot without leaving any crumbs.
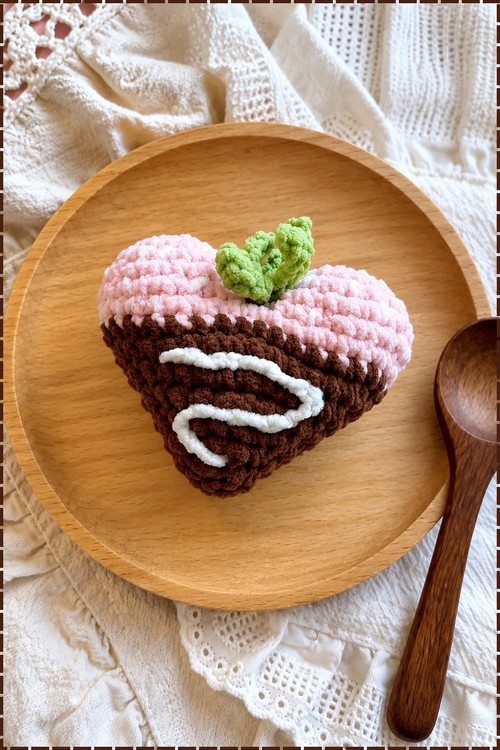
Half dipped and drizzled, this crochet chocolate covered strawberry amigurumi acts like dessert that never melts. It sits on a plate and fools people for a second. Pick it up and it squishes. Sweet on the outside, stuffing on the inside, and it never once asks to be refrigerated.
Crochet Chocolate Covered Strawberry Amigurumi

Half the berry sits dipped in brown, with a white zigzag drizzle stitched across the front and pink covering the top. The shape reads as a wide heart rather than a cone, flat across the shoulders and tapered to a point at the base. Leaves branch off the top in bumpy green, worked as a separate piece and sewn in place. Chenille yarn gives the whole thing a fuzzy surface. Parts stay minimal, the berry body with its colour change, the leaf sprig, and the surface drizzle added last. Working the drizzle evenly over textured yarn is the only step that needs a slow hand.
Quick Facts
- Finished size: roughly 5 to 7 cm tall depending on yarn weight. This is an estimate, not a measured figure from the pattern.
- Difficulty: advanced beginner. The only tricky part is the joining round.
- Time: around an hour to an hour and a half once you have made one.
- Piece count: 3 crocheted pieces. Two bumps and one leaf crown. The body is worked directly onto the joined bumps.
- Stuffing: optional. Firm charm or flat keychain, your call.
Materials and Tools
Quantities are approximate.
- Red yarn, roughly 15 to 20 g
- Chocolate brown yarn, roughly 10 to 15 g
- Green yarn, a small amount for the stem and leaves
- Crochet hook suitable for your yarn, going down a size from the ball band recommendation
- Fiberfill stuffing, optional, a small handful
- Yarn needle
- Scissors
- White or yellow yarn for the seeds if you want them
- Keyring or lobster clasp if making a charm
Abbreviations
- SC: single crochet
- INC: increase, two single crochet in the same stitch
- DEC: decrease, invisible decrease where possible
- SL ST: slip stitch
- CH: chain
- Stitch counts appear in brackets at the end of each round
Pieces List
- Strawberry bumps, 2, worked to 18 stitches each and then joined
- Strawberry body, worked directly onto the joined bumps, so it is not a separate piece
- Green stem and leaf crown, 1, worked as a five point star and sewn on
- Embroidered seeds, optional
- Two seams total at the end. The joining round and the stem.
Colour and Customization Ideas
Worth deciding before you start, since the colour change happens partway through the body.
- White chocolate version, using cream instead of brown, with the seeds embroidered in red for contrast
- Green strawberry for an unripe berry, which looks better than it sounds
- Dark chocolate in near black, which makes the red half look much brighter
- Skip the chocolate entirely and carry red all the way down for a plain strawberry
- Drizzle effect, adding a few surface slip stitches in white across the brown section once the piece is finished
- Blue or purple body for a berry that is not pretending to be real
If you are making a set, keep the leaf crown the same green across all of them. Varying the berry colour and matching the crowns is what makes a group look intentional rather than random.
Tips
- Go down a hook size. At 36 stitches around, loose fabric will show stuffing through the red section before it shows anywhere else.
- Count round 7 twice before moving on. It is the first round where the two bumps behave as one piece and a miscount there throws every decrease round after it.
- Work the seeds before you sew the stem on. Easier to hold the berry and judge spacing when there is nothing on top of it.
Chocolate Covered Strawberry Pattern
Worked in continuous rounds unless stated. Shape checkpoints sit at the end of the round they apply to.
Strawberry Bumps, Make 2
- Round 1: magic ring, work 6 SC into the ring, pull the tail to close [6]
- Round 2: work 6 increases, placing 2 SC in each stitch [12]
- Round 3: 1 SC, 1 INC, repeat 6 times [18] Checkpoint: a small flat disc that lies down without cupping. If it is domed already, your tension is tight and both bumps will come out smaller than they should.
- Round 4: 18 SC around [18]
- Round 5: 18 SC around [18] Checkpoint: a shallow cup, roughly the depth of a bottle cap and about as wide. Both bumps must match. Sit them side by side and check before you go on, because they are joined next and there is no fixing a size difference after that.
- First piece: cut the yarn and fasten off.
- Second piece: do not cut the yarn. You will use it to join the two pieces.

Joining and Strawberry Body
- Round 6: align both bumps and work single crochet around both pieces to join them into one circle [36] Checkpoint: hold both bumps facing the same direction with their tops level before you start. When the round is done you should have one continuous opening with a slight valley across the middle where the two pieces meet. That valley is where the stem goes later, so it is meant to be there.
- Round 7: 7 SC, 2 DEC, 14 SC, 2 DEC, 7 SC [32] Checkpoint: the decreases sit at the two sides where the bumps meet, which is what pulls the figure eight into a rounder shape. Look down at the opening. It should be reading as an oval now rather than two circles stuck together.
- Colour change: at the end of round 7, switch to chocolate brown yarn.
Just picking up your first amigurumi project? The video tutorial below breaks it all down in a simple, beginner-friendly way!
Chocolate Dip Section
- Round 8: 32 SC around in the chocolate colour [32] Checkpoint: a clean horizontal band of brown with no jog or slant. This is the only round in the whole body with no shaping in it, and that is deliberate. It gives the colour change a straight line to sit on instead of a stepped one.
- Round 9: 6 SC, 2 DEC, 12 SC, 2 DEC, 6 SC [28]
- Round 10: 5 SC, 2 DEC, 10 SC, 2 DEC, 5 SC [24] Checkpoint: the sides should be pulling in noticeably and the piece should start reading as a berry rather than a pouch. If you are stuffing, begin now with small pinches.
- Round 11: 4 SC, 2 DEC, 8 SC, 2 DEC, 4 SC [20]
- Round 12: 3 SC, 2 DEC, 6 SC, 2 DEC, 3 SC [16]
- Round 13: 2 SC, 2 DEC, 4 SC, 2 DEC, 2 SC [12] Checkpoint: a clear tapered point forming at the base. The opening should be about the width of your thumb. Stuff lightly now if you want a firmer charm, because the next round closes it.
- Final round: work 6 DEC to close the bottom of the strawberry [6]
- Pull the yarn tail tight, weave it securely through several stitches, and trim neatly.

Green Stem and Leaf Crown
- Base: start with a magic ring and work 5 SC [5]
- CH 5.
- Starting in the second chain from the hook, work 4 SL ST back down the chain.
- SL ST into the next stitch of the base ring.
- Repeat the chain and slip stitch process five times in total to create five leaves. Checkpoint: a small green star with five points radiating from a tight centre. The points should lie flat rather than curling up. If they curl, your slip stitches down the chain are too tight, and the crown will sit like a claw on top of the berry instead of lying against it.
- Fasten off leaving a tail for sewing.
Eyes and Face Timing
The pattern gives eye placement as an optional extra, and it puts that instruction at the very end. Read this before you close the berry.
- Placement: slightly above the chocolate dip line, so on the red section, spaced about 6 to 8 stitches apart depending on your yarn.
- Safety eyes must go in before the final round, while the bottom is still open and unstuffed. The washers go on from the inside. Once you work the final 6 decreases and pull the tail tight there is no way back in, and the only fix is unpicking the closure.
- Practically, insert them around round 9 or 10. The piece is still open and roomy enough to get a hand in, and you can still see the red section clearly to judge symmetry.
- Embroidered eyes can go on at any point, before or after finishing, since you only work through the surface.
- For anything going to a child under three, embroider. A charm this size is exactly what ends up in a mouth, and a safety eye on a small crocheted piece is not worth the risk no matter how well the washer seated.
- A small embroidered smile between the eyes finishes the kawaii version.

Assembly
- Sew the stem on first, centred over the top where the two bumps meet. The valley between the bumps tells you exactly where centre is, so use it.
- Pin the crown before you sew. Look at the berry from the side and from directly above. A stem sitting even slightly off centre will make the whole thing hang crooked if you are using it as a charm.
- Anchor each of the five leaf points with a single small stitch as well as sewing the centre down. Sew only the middle and the points will lift away from the berry over time.
- Add the seeds with small white or yellow embroidery stitches scattered across the red section. Keep them irregular. Evenly spaced seeds look like polka dots.
- If you are attaching a keyring, thread it through the centre of the stem base before you sew the crown down rather than after.
Stuffing Guide
- Stuffing is optional here, which is unusual. Left empty the piece works as a flat keychain. Filled it works as a small toy.
- If stuffing: light to medium. This is a charm, not a plush, and a hard little berry loses the softness that makes it worth picking up.
- Add stuffing in small pieces from round 10 onward. Do not wait until round 13.
- Keep the two bumps at the top slightly rounded and let the bottom stay tapered. Pushing stuffing up into the bumps too firmly flattens the valley between them and you lose the strawberry shape.
- Where overstuffing shows first: across the brown band at round 8, where the stitches stretch and the colour change line starts to gap.
- For a bag charm, very light stuffing holds the shape without making the piece heavy enough to swing.

Yarn Substitution and Size Scaling
Cotton gives sharper stitch definition and a firmer charm that holds its shape unstuffed. Acrylic is softer and more forgiving on the joining round.
- Sport or 4 ply with a 2 mm hook: around 4 to 5 cm tall
- DK with a 2.5 mm hook: around 5 to 6 cm tall
- Worsted with a 3.5 mm hook: around 7 to 8 cm tall
Estimates rather than measured sizes. Going up in yarn weight makes the leaf crown proportionally larger, which usually looks fine on this shape. Going down makes the chain 5 leaves quite short, so consider chaining 6 and working 5 slip stitches back if the crown looks stubby.
Toy Safety
- Embroidered features only for a child under three.
- Sew the stem down thoroughly. It is the piece most likely to be pulled, especially on a keychain.
- No beads for the seeds on anything a small child will handle. Embroidery only.
- Weave all tails to the inside of the berry rather than along the surface.
- Hand wash in cool water and press the water out. A charm that lives on a bag gets grubby fast, so cotton is the better choice if you expect to wash it.
FAQ
- Do I have to make two bumps, or can I just work one bigger circle? You can work one circle to 36 stitches, but you will lose the dip at the top and the finished piece will read as a round ball with a green star on it. The two bump construction is the whole reason this looks like a strawberry.
- My two bumps came out different sizes, is that fixable? Only before you join them. Once round 6 is worked they are locked together. Pull back the smaller one and rework rounds 4 and 5, which is usually where a stitch goes missing on a plain round.
- Why does the colour change look stepped instead of straight? Because you switched at the start of round 8 rather than on the last yarn over of round 7. Pull the new colour through to complete the final stitch of the previous round and the transition sits flat.
- Can I leave it unstuffed? Yes, and for a keychain that is usually better. It squashes flat in a pocket and springs back, and there is no stuffing to migrate into lumps over time. Just keep your tension tight, because an unstuffed piece shows loose stitches more clearly.