
Crochet Snow White Doll Free Pattern Amigurumi - Chibi Princess
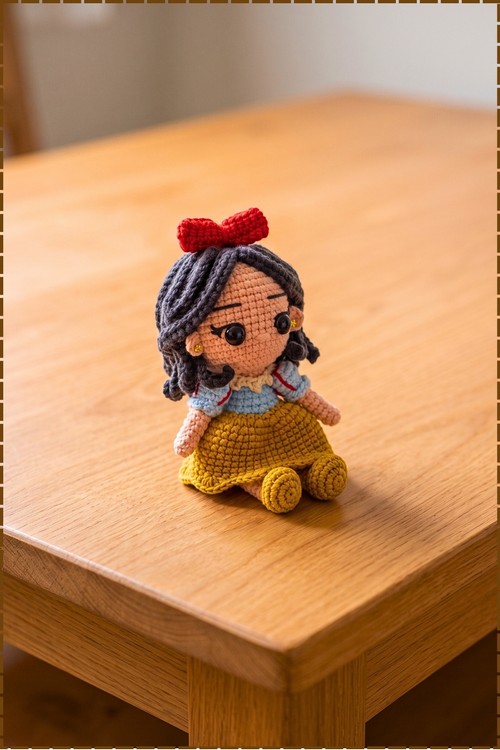
On a nursery shelf beside picture books, the crochet Snow White doll amigurumi stands upright on tiny mustard shoes. Fairy tale fans get a pocket sized chibi princess doll in a sky blue bodice, ready for a birthday gift, a dress up party or a cozy bedtime story.
Those eyes give this crochet Snow White doll amigurumi a look of surprise, as though someone knocked with an apple. She seems ready to trust them anyway. Tilt her head and the crochet Snow White doll amigurumi turns curious. Each crochet Snow White doll amigurumi stays hopeful.
Crochet Snow White Doll Amigurumi
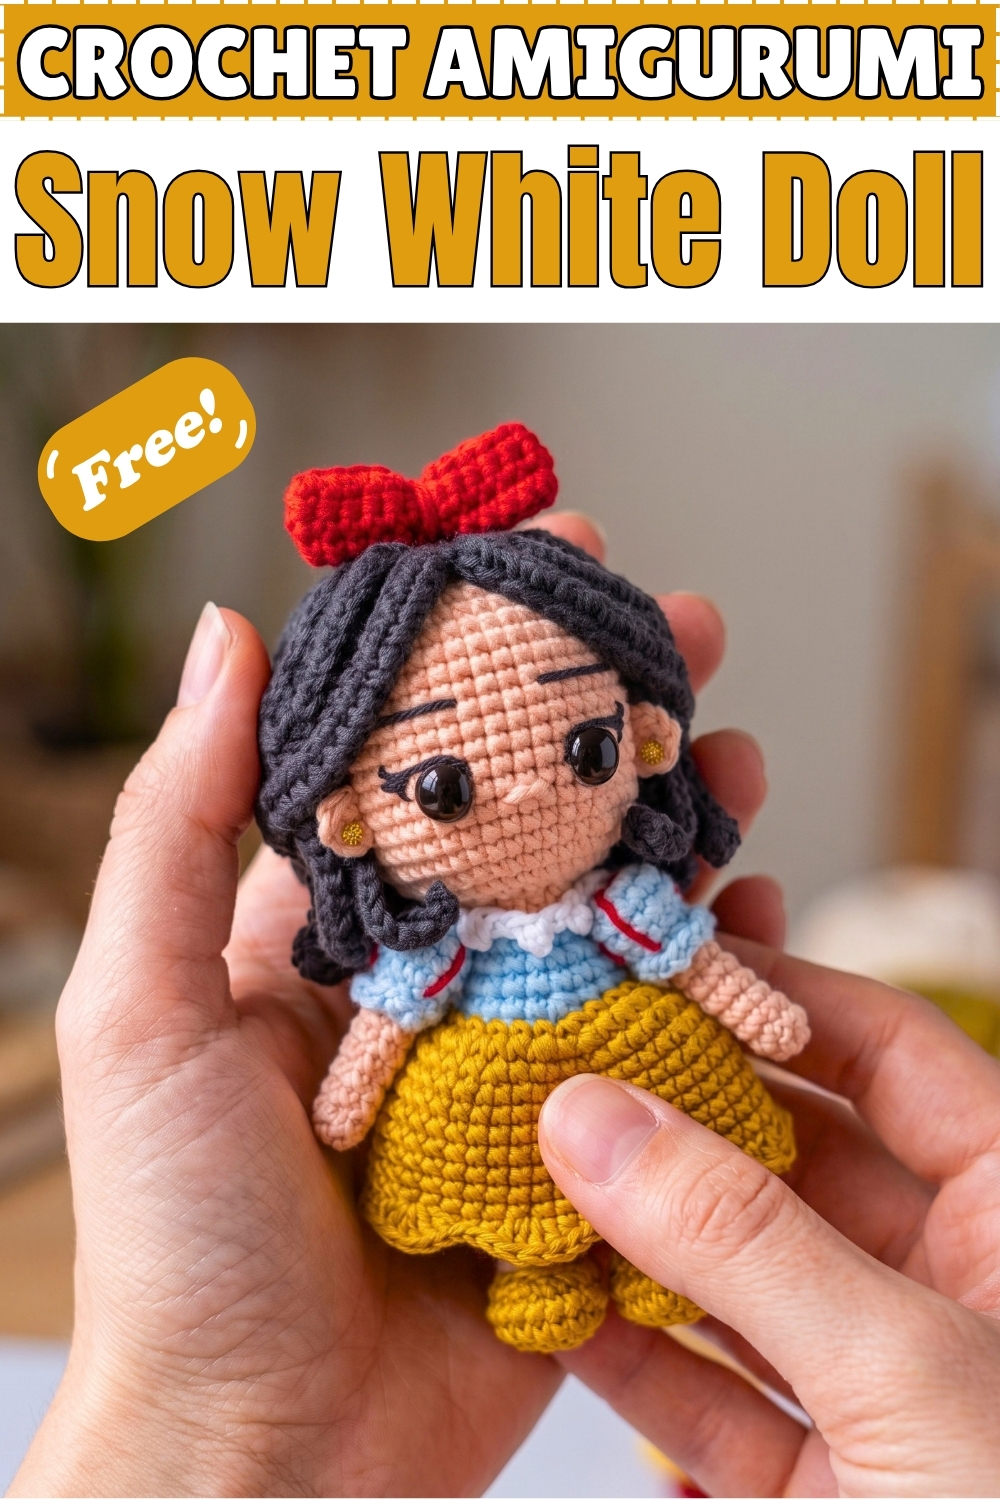
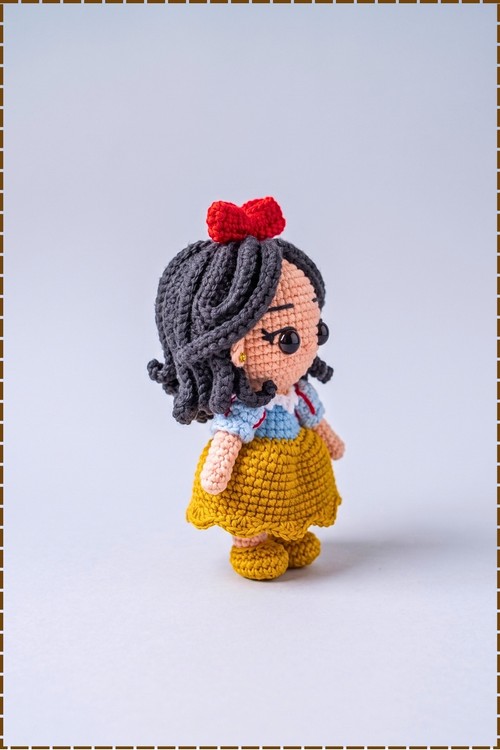
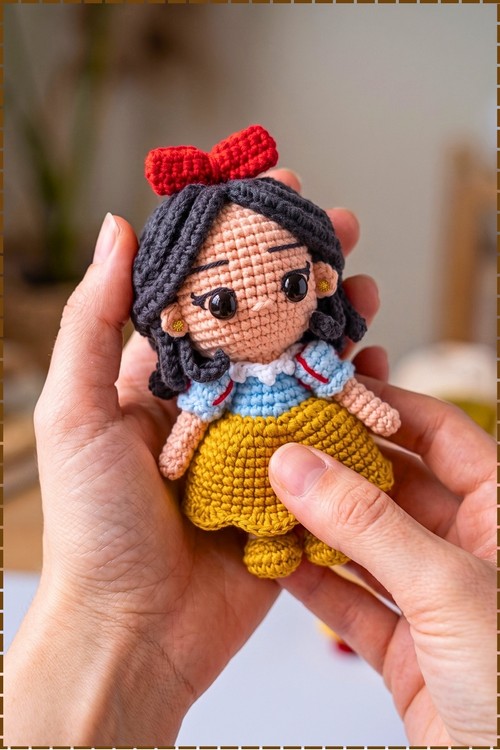
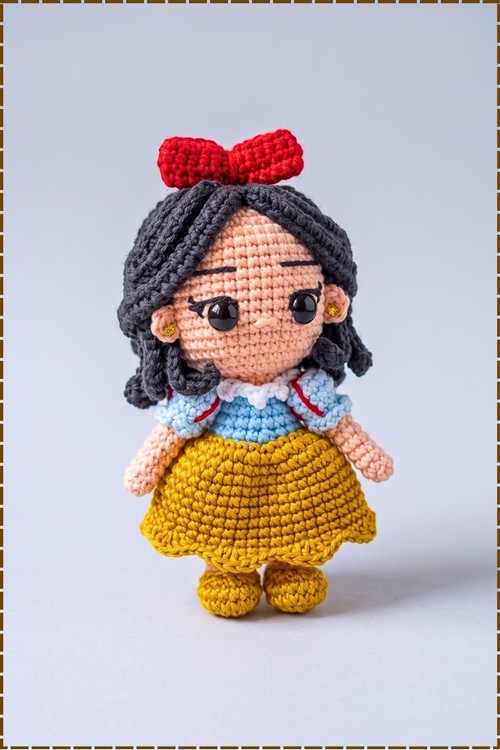
Only the arms, hair, skirt, and bow get attached separately, since the legs, body, and head grow as one continuous piece. My crochet Snow White doll stands about palm height with a peach face, black safety eyes, and dark charcoal hair that curls at the tips. Around her shoulders, a white ruffle collar meets puff sleeves striped in red. Her mustard skirt flares from loops left free on the body, and a red bow sits tilted on her head. Tiny gold studs finish each ear. Expect a few relaxed evenings, in my experience, to complete her.
Materials and Tools
- Mustard yellow yarn for the shoes and skirt
- Peach skin tone yarn for the legs, neck, head, arms, and ears
- Light blue yarn for the bodice and puff sleeves
- Red yarn for the bow and sleeve stripes
- Dark charcoal or black yarn for the hair
- White yarn for the ruffle collar
- Black and dark brown yarn for the eyelashes and eyebrows
- Black safety eyes
- Small gold stud stickers or beads for earrings (crystal stickers also work)
- Crochet hook to match your yarn
- Tapestry needle, stitch markers, and fiberfill
- Plastic support stick, such as an empty glue stick, for the neck
Difficulty and Time
I would call this an intermediate doll. The stitches are simple, but the leg join, the color changes, and the hair take patience. In my experience it takes a few evenings from first round to final bow.
Beginner Technique Notes
- Single crochet (sc): insert the hook, yarn over, pull up a loop, yarn over, and pull through both loops.
- Increase (inc): work 2 sc in the same stitch.
- Decrease (dec): work 2 stitches together; an invisible decrease through the front loops keeps the face and body smooth.
- Half double crochet (hdc): yarn over, insert the hook, pull up a loop, yarn over, and pull through all three loops.
- Double or treble crochet: taller stitches used only in the skirt border for the scallops.
- Back loops only (BLO): work into the loop farthest from you, leaving the front loop free for later.
- Slip stitch (sl st) and chain (ch): used for joins, edging, and the collar.
- Color change: work the last stitch of the old color until two loops remain, then pull the new color through.
The Pattern
Legs (Make 2)
- Round 1: with mustard yellow, make a magic ring with 6 sc (6); pull it fully closed so the shoe tip stays smooth.
- Round 2: inc in each stitch around (12); you have a small flat disc.
- Round 3: (1 sc, 1 inc) repeat around (18); this is the sole of the shoe.
- Round 4: 1 sc in each stitch around (18); the edge starts to rise into a little shoe.
- Round 5: 3 sc, 6 tight decreases in a row, 3 sc (12), and change to skin tone in the last stitch; the decreases pull in the toe so the shoe looks rounded at the front.
- Round 6: 3 sc, 3 decreases in a row lined up directly over the previous ones, 3 sc (9); stacking the decreases keeps the toe facing forward.
- Rounds 7 to 13: 1 sc in each stitch around for 7 rounds (9), stuffing the leg as you go; in my doll only the yellow shoes peek out under the skirt, so the skin tone section stays hidden.
- Fasten off the first leg, then make a second leg the same way but do not cut the yarn.
Joining the Legs
- From the back of the second leg, work 2 sc toward the left side.
- Chain 2 loosely.
- Work 9 sc around the first leg.
- Work 1 sc into each of the 2 chains.
- Work 9 sc around the second leg.
- Work 2 sc into the back loops of the starting chains (22); check that both feet point the same way before moving on, because a twisted join makes her stand pigeon toed.
Body
- Rounds 15 and 16: 1 sc in each stitch around for 2 rounds (22), and keep stuffing; change to light blue in the last stitch of Round 16.
- Round 17: (9 sc, 1 dec) repeat twice (20); the blue band marks the start of her bodice.
- Round 18: working in BLO, (8 sc, 1 dec) repeat twice (18); the free front loops will hold the skirt later, so do not skip this.
- Rounds 19 and 20: 1 sc in each stitch around for 2 rounds (18); the bodice rises straight.
- Round 21: (4 sc, 1 dec) repeat 3 times (15), and change to skin tone in the last stitch; the shoulders start to slope in.
- Round 22: 1 sc in each stitch around (15); this short skin round becomes her neck.
- Round 23: (3 sc, 1 dec) repeat 3 times (12); the neck narrows ready for the head.
- Insert the plastic support stick down through the neck into the body between the legs; without it, the heavy head flops forward.
Head
- Round 24: inc in each stitch around (24); the head starts flaring out from the neck.
- Round 25: (1 sc, 1 inc, 1 sc, 1 inc) repeat around (36); the base of the head widens fast.
- Round 26: (5 sc, 1 inc) repeat around (42); this is the full width of her big chibi head.
- Rounds 27 to 38: 1 sc in each stitch around for 12 rounds (42); the head grows into a tall round dome.
- Place the safety eyes between Rounds 30 and 31 with 7 stitches between them; on mine they sit in the lower half of the face, which gives the chibi look.
- Round 39: (5 sc, 1 dec) repeat around (36); the top of the head begins to close.
- Round 40: (4 sc, 1 dec) repeat around (30); keep the decreases invisible on the face side.
- Round 41: (3 sc, 1 dec) repeat around (24), and stuff the head firmly around the support stick; firm stuffing stops the face from wrinkling.
- Round 42: (2 sc, 1 dec) repeat around (18); top up the stuffing if needed.
- Round 43: (1 sc, 1 dec) repeat around (12); the opening is now small.
- Work 6 decreases, then weave the yarn through the front loops of the remaining stitches, pull closed, and secure.
Skirt
- Turn the doll upside down with the feet pointing up, and join mustard yellow to one of the front loops left free on Round 18.
- Round 1: (4 sc, 1 inc) repeat 4 times (24); the skirt starts to flare away from the body.
- Round 2: (1 sc, 1 inc, 1 sc, 1 inc) repeat around (36); the flare grows wider.
- Round 3: (5 sc, 1 inc) repeat around (42); this gives the skirt its full bell shape.
- Rounds 4 to 10: 1 sc in each stitch around for 7 rounds (42); the skirt should hang down to just above the shoes, as on my doll.
- Border: (1 sc, 1 hdc, 3 treble or double crochets in the same stitch, 1 hdc, 1 sc, 1 sl st) repeat 7 times around the skirt edge, then fasten off and weave in ends; the border forms soft scallops along the hem.
Arms (Make 2)
- Round 1: with skin tone, make a magic ring of 7 sc (7).
- Rounds 2 to 10: 1 sc in each stitch around for 9 rounds (7), then fasten off with a sl st and a short tail; the arms are not stuffed, so they bend naturally at her sides.
Puff Sleeves (Make 2)
- Round 1: with light blue, make a magic ring of 7 sc (7).
- Round 2: inc in each stitch around (14); the sleeve begins to puff.
- Rounds 3 and 4: 1 sc in each stitch around for 2 rounds (14); you now have a small rounded cup.
- Round 5: 7 decreases in a row (7); the puff closes in to fit the arm.
- Edge: ch 2, 1 sc, then (ch 2, 1 sc) repeat 7 times, sl st to close, and leave a long tail for sewing.
- With red yarn, embroider the stripes on each sleeve; on my doll each sleeve carries a red slash along the outer edge rather than small crosses.
- Slide a skin tone arm into each blue sleeve and sew the sleeves to the sides of the upper body, just under the collar line.
Ears and Collar
- Ears (make 2): with skin tone, make a magic ring of 5 sc, ch 1, and leave a long tail; sew them to the sides of the head level with the eyes, as on mine.
- Collar: with white yarn, make a slip knot, ch 4, and 1 sc in the first chain, then repeat (ch 4, 1 sc in the first chain) for 9 times in total to make the ruffle strip; wrap it around the neck where the blue bodice meets the skin tone and sew it down.
Hair
- Round 1: with dark charcoal yarn, make a magic ring of 7 sc (7).
- Round 2: inc in each stitch around (14); a small flat cap forms.
- Round 3: (1 sc, 1 inc, 1 sc, 1 inc) repeat around (21); the cap is ready for strands.
- Strands: ch 22, then starting in the 3rd chain from the hook work 20 hdc loosely so the strand stays flat, anchor to the next base stitch with 1 sc, and repeat for 21 strands in total, then fasten off with a long tail.
- Pin the hair base to the top of the head, leave 4 strands framing the face, tuck the others behind the ears, and arrange the rest around the back before sewing down securely.
- Gently twist the ends of the front strands so they curl at the tips, as on my doll; a few stitches at each curl hold the shape.
Bow
- With red yarn, ch 25.
- Row 1: starting in the 2nd chain, work 24 sc across, ch 1, and turn (24).
- Rows 2 and 3: 1 sc in each stitch for 2 rows (24), then fasten off with a long tail; you have a short flat strip.
- Fold the ends of the strip to meet at the center back, sew them together, and wrap yarn tightly around the middle 2 or 3 times to pinch the bow.
- Sew the bow to the top of the hair; mine sits slightly to the left side, tilted.
Face Details
- Embroider a small horizontal nose over 1 or 2 stitches right below and between the eyes with skin tone yarn.
- With black yarn, embroider an outline around the upper part of each eye and a few small lashes at the outer corners.
- Embroider straight eyebrows 3 rows above the eyes; mine are dark brown and slightly long.
- Add a small gold stud to the center of each ear for earrings; crystal gem stickers work as an alternative.
Tips and Troubleshooting
- Mark the first stitch of every round, because the color changes make it easy to lose your place.
- Stuff the legs firmly before the join, as you cannot reach them properly afterward.
- Count the Round 18 front loops before starting the skirt so you know exactly where the skirt begins.
- Pin the hair in place and step back before sewing; small shifts make a big difference to the face.
- Keep the hair strands loose, since tight hdc makes the strands curl into spirals along their whole length.
Yarn Substitution
Cotton yarn gives the crisp stitch texture you see on my doll. Acrylic works and gives a softer, slightly fuzzier finish. Thicker yarn with a larger hook makes a bigger doll with the same counts.
Customization Ideas
- Swap the outfit colors to make other fairy tale characters with the same body.
- Use embroidered eyes instead of safety eyes for a baby safe version.
- Add a small felt apple to her hand.
- Make a tiny yellow cape from a crocheted rectangle.
FAQ
Can I skip the support stick? You can, but the large head will tilt forward. A rolled strip of plastic or a pipe cleaner bundle also works.
My skirt pulls in at the top. Why? The first skirt round may be working into fewer loops than it needs. Check that you are using every free loop from Round 18.
How do I get the hair to lie flat? Work the strands loosely and pin them before sewing. A light steam helps them settle.
Is this doll safe for small children? Not with safety eyes and earring studs. Embroider both for children under three.
How tall is the finished doll? Mine comes out about palm height in my experience. Your yarn and tension will change the size.