
Crochet Pumpkin Doll Pattern Free Amigurumi
Instead of a carved jack o lantern that rots by November, a crochet pumpkin doll keeps grinning in the hallway every autumn for years. Pairs look especially sweet, so set two pumpkin head amigurumi dolls side by side on a fall bookshelf or tuck one into a trick or treat bucket.
Pulling the segment lines into this Crochet Pumpkin Doll Amigurumi is the moment the whole thing stops being a ball and turns into a pumpkin. Stuff it firm first. Then watch the ridges appear as you cinch. Embroidering the grin comes last, and where you place it decides the face you end up with.
Crochet Pumpkin Doll Amigurumi

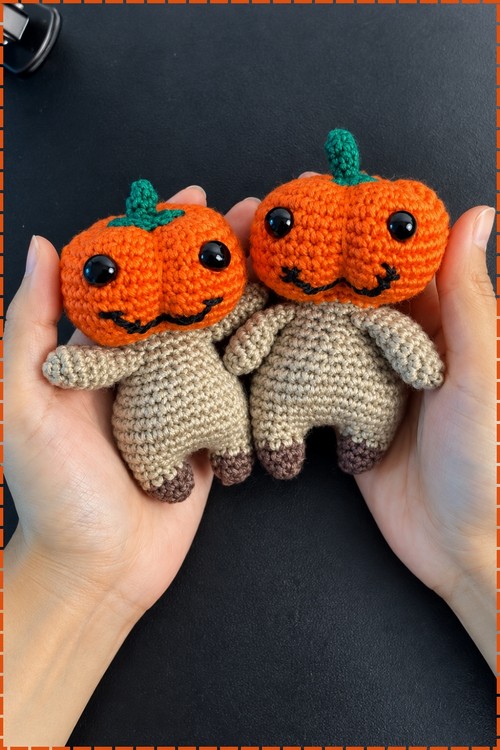
Ridges run down the pumpkin head, shaped by lines of stitching that pull the orange surface into segments, with a green stem standing upright at the top. The head takes up almost half the doll. Under it sits a tan body with stubby arms held out to the sides and two short legs ending in darker brown feet. The face is embroidered in black thread, a stitched grin with glossy round eyes set wide apart. Pieces are straightforward. Head, body, two arms, stem, and the segment shaping done after stuffing. That shaping step and the face placement are the two things worth slowing down for.
Materials and Tools
Amounts are approximate and shift with your tension. The pattern does not name a yarn weight, though a 2 mm hook points to sport weight or finer.
- Orange yarn for the pumpkin head, roughly 25 to 35 g
- Light brown yarn for the arms and body, roughly 20 to 25 g
- Dark brown yarn for the boots, a small amount
- Green yarn for the stem, a small amount
- Black yarn for the embroidered smile
- 2 mm crochet hook
- Safety eyes, or black yarn for embroidered eyes
- Fiberfill stuffing, around 20 to 30 g
- Stitch markers
- Long embroidery or doll needle for the ridge sculpting
- Scissors
- Pins
Finished height lands somewhere around 12 to 15 cm at this hook size with sport weight. That is an estimate, not a figure the pattern gives. Go heavier on the yarn and it scales up quickly, since the head is the largest piece by a wide margin.
Abbreviations
- SC: single crochet
- Increase: two single crochet in the same stitch
- Invisible decrease: a decrease worked through the front loops only for a smoother surface
- Magic circle: adjustable loop used to begin working in the round
- Stitch counts appear in brackets at the end of each round that has one
Pieces List
- Pumpkin head, 1, in orange
- Stem, 1, in green
- Arms, 2, in light brown
- Feet, 2, starting in dark brown and changing to light brown
- Body, worked directly upward from the two joined feet, so it is not a separate piece
- Embroidered smile and sculpted ridges added at the end
Sewing at the end: the head to the body, and the stem to the head. The arms are crocheted into the body rather than sewn on.
Notes Before You Start
- Worked mostly in continuous rounds. Mark the first stitch of every round and move the marker up.
- Keep your stitches tight. At 2 mm the fabric should be dense enough that no stuffing shows, and the head especially needs to hold a hard shape for the ridges to grip.
- Stuff gradually rather than all at once. This matters more than usual here because the head gets reshaped after stuffing.
- The head will look like a plain ball the entire time you are crocheting it. That is expected. The ridges are added at the very end with yarn, not with stitches.
- Something the pattern does not mention but which is worth knowing before you sculpt: the widest round is 48 stitches, and 48 divides evenly by 6 but not by 5. If you want your ridges spaced exactly 8 stitches apart, make 6 of them. Five ridges means eyeballing the spacing and living with one section slightly wider than the rest.
Crochet Pumpkin Doll Pattern
Worked in continuous rounds. Shape checkpoints sit at the end of the round they apply to.
Pumpkin Head, Orange Yarn
- Round 1: magic circle, 6 SC
- Round 2: increase in every stitch
- Round 3: 1 SC, 1 increase, repeat around
- Round 4: 1 SC, 1 increase, 2 SC, 1 increase, repeat around Checkpoint: this round does not divide into 18 stitches as written.
- Round 5: 3 SC, 1 increase, repeat around
- Round 6: 4 SC, 1 increase, repeat around
- Round 7: 5 SC, 1 increase, repeat around
- Round 8: 6 SC, 1 increase, repeat around Checkpoint: a wide flat circle roughly the size of a jar lid, still lying flat on the table. If the edge is ruffling, your increases are too loose and every round from here will make it worse.
- Round 9: SC in each stitch
- Round 10: SC in each stitch
- Round 11: SC in each stitch

- Round 12: SC in each stitch
- Round 13: SC in each stitch Checkpoint: five straight rounds should give you a deep open bowl with straight sides, not flaring ones. This is the face and the widest part of the pumpkin. Mark your eye positions with pins now while you can still see the inside clearly.
- Round 14: 3 SC, 1 invisible decrease, repeat around Checkpoint: this round does not divide into 48 either. See the Pattern Note.
- Round 15: 5 SC, 1 decrease, repeat around
- Round 16: 4 SC, 1 decrease, repeat around
- Round 17: 3 SC, 1 decrease, repeat around
- Round 18: 2 SC, 1 decrease, repeat around Checkpoint: the head closes to 18 stitches and stays open. It should read as a slightly flattened sphere, wider than it is tall. That 18 matches the top of the body exactly, which is what makes the two pieces sit together cleanly.
- Slip stitch and fasten off.
Pumpkin Stem, Green Yarn
- Round 1: magic circle, 4 SC
- Round 2: SC around
- Round 3: SC around
- Round 4: SC around
- Round 5: SC around
- Round 6: SC around Checkpoint: a very narrow tube, about the width of a matchstick, with a closed end. This closed end is the top of the stem.
- Round 7: increase in every stitch
- Round 8: increase in every stitch Checkpoint: a sharp flare at the open end. Those two rounds should splay out almost flat, which is what lets the stem sit against the curve of the head instead of perching on it.
- Slip stitch and fasten off.
If rounds and stitch counts look confusing right now, don't stress! The video tutorial below walks you through this plushie step by step.
Arms, Make 2, Light Brown Yarn
- Round 1: magic circle, 6 SC
- Round 2: 1 SC, 1 increase, repeat around
- Round 3: 2 SC, 1 increase, repeat around
- Round 4: SC around Checkpoint: a short wide tube. This is the shoulder end, which is counterintuitive since it comes off the magic ring, but the taper below it confirms the direction.
- Round 5: 2 decreases, 8 SC
- Round 6: SC around
- Round 7: 2 decreases, 6 SC
- Round 8: SC around Checkpoint: a gently tapered arm, narrower at the open end than at the closed one. Both arms must match. Lay them side by side before moving on, because they get crocheted into the body and there is no adjusting afterwards.
- Slip stitch and fasten off.
Feet, Make 2
- Round 1: using dark brown, magic circle, 6 SC
- Round 2: 1 SC, 1 increase, repeat around
- Round 3: SC around Checkpoint: a small dark brown cup. This is the boot.
- Change to light brown.
- Round 4: SC around Checkpoint: one round of light brown above the boot, giving a clean colour line. Both feet end at 9 stitches and stay open.

Joining the Feet and Building the Body
This section carries no round numbers and no per round stitch counts in the original. Only the target totals are given. See the Pattern Note.
- Chain 3 to connect the feet.
- Work around both feet and the chains.
- Add increases along the chains and the sides to reach 30 stitches Checkpoint: with two feet at 9 stitches each plus 3 chains on either side, the joining round starts from 24, so you are adding 6 increases across it. The result should be a single oval opening with both boots below it and no gap at either end of the chain.
- Increase further to 36 stitches
- Work 2 rounds even Checkpoint: a barrel shaped torso standing on two boots. Sit it on the table. It should stand without tipping.
- Begin the decrease rounds: 7 SC, 1 decrease, repeat
- Continue decreasing: 2 SC, 1 decrease, repeat
- Continue until reaching 18 stitches Checkpoint: a second round of 2 SC and 1 decrease takes 24 down to 18. The shoulders should now match the head opening. Stuff the body firmly as you go, since this is the last comfortable access.
- Crochet the arms into the body by working through the arm and body stitches at the same time.
- Finish with 18 SC
Pattern Note
Three things need flagging. The first two will stop you mid round if you are not expecting them.
- Round 4 of the head does not divide. As written it gives 1 SC, 1 increase, 2 SC, 1 increase, which is a repeat of 5 stitches. You have 18 going into that round, and 18 does not divide by 5. The pattern's own progression tells you what it should be. Round 3 is 1 SC then an increase, round 5 is 3 SC then an increase, round 6 is 4 SC, round 7 is 5 SC, round 8 is 6 SC. Round 4 is the missing 2. Work it as 2 SC, 1 increase, repeated 6 times, which consumes all 18 and gives you the 24 the round states.
- Round 14 of the head does not divide either. It says 3 SC then an invisible decrease, a repeat of 5 stitches worked into 48. That does not divide, and it would not produce 42 even if it did. The decrease sequence runs backwards down the same ladder: round 15 is 5 SC, round 16 is 4 SC, round 17 is 3 SC, round 18 is 2 SC. Round 14 should be 6 SC then a decrease, repeated 6 times. That uses all 48 and leaves you with 42.
- Everything else on the head is correct. Rounds 15 through 18 all consume exactly what the round above produces, and the head closes at 18 stitches, which matches the top of the body precisely.
- The body section has no round numbers and no per round counts. It gives you target totals of 30, then 36, then 18, and tells you to add increases along the chains and sides to get there. Working it out: two feet at 9 stitches plus 3 chains on each side gives you 24 in the joining round, so you need 6 increases spread evenly to reach 30, then 6 more to reach 36. The decreases do resolve cleanly. Seven SC and a decrease repeated 4 times takes 36 to 32. Then 2 SC and a decrease repeated 8 times takes 32 to 24, and the same repeat again takes 24 to 18. So it is two rounds of that repeat, not one, which the phrase continue until reaching 18 stitches is doing a lot of work to hide.
- One smaller thing. The arm attachment is listed as the last step of the body, after all the decreasing, which puts it at the 18 stitch round. That is the neck rather than the shoulder. Work the arms in one or two rounds earlier, at 24 stitches, where there is room for both an 8 stitch arm on each side and space between them.
Eye Timing and Safety
The pattern gets this right, which is worth saying, but the wording hedges when it should not.
- The head fastens off at round 18 with the opening still 18 stitches wide and nothing stuffed. That is your window.
- Insert the safety eyes after the head is finished and before you stuff it. Not after. Once the head is stuffed firmly, and this one needs to be very firm, there is no reaching a washer.
- Position them across the straight rounds, somewhere in rounds 9 to 13, which is the widest part and the face. Space them so the smile can sit centred underneath.
- Mark the positions with pins at round 13 while you can still see inside, then insert once the head is off the hook. Judging symmetry from the outside of a finished head is guesswork.
- Push the post through from the outside, look at the face straight on and from both sides, then seat the washer from inside. Washers do not come off.
- For a doll going to a child under three, do not use safety eyes at all. Embroider them in black at the same position. Embroidery can go on at any stage, including after the ridges are sculpted, which lets you set the expression once the head is its final shape.
- Bear in mind the ridge sculpting pulls the surface of the head inward. Eyes placed right on a ridge line will end up tilted, so plan the ridges around the face rather than the other way round.

Creating the Pumpkin Ridges
This is the step that turns a ball into a pumpkin, and it is worth doing slowly.
- Thread a long needle with orange yarn.
- Push the needle through the top centre of the head and bring it out at the bottom centre.
- Pull the yarn down the outside and go back through the top centre again.
- Pull tightly but gradually. Sudden hard tension distorts the whole head rather than making a clean groove.
- Repeat around the head at even spacing.
- Six ridges is the number that divides cleanly into the 48 stitch round, giving 8 stitches per section. Five works too but you will be spacing by eye.
- Do the ridges after stuffing and after the eyes are in, but before you sew the stem on. The stem covers the top centre where all the ridge stitches converge, which is exactly what you want it to hide.
- Check the face after every ridge. It is easy to pull the head slightly off centre and much easier to correct one ridge than five.
Assembly
Pin before you sew. On a doll this small a two stitch error in placement is visible.
- Insert the eyes into the head first, then stuff it very firmly.
- Sculpt the ridges next, following the section above.
- Sew the head to the body, matching the 18 stitch opening to the 18 stitch shoulder round. Stitch all the way around, catching several loops on each pass.
- Check that the head faces forward relative to the boots before you finish the seam. The ridges make it easy to have the face sitting between two sections instead of centred on one.
- Sew the stem to the top centre, flared end down, covering where the ridge stitches meet.
- Embroider the smile in black, sitting below and centred between the eyes.
- Hide every yarn end inside the body rather than weaving along the surface.
Stuffing Guide
- Head: very firm, firmer than you would normally stuff a head. The ridges only hold their shape if there is something solid pressing back against the yarn. This is the single most important stuffing decision in the whole project.
- Body: firm, but less than the head. Stuff as you work the decrease rounds rather than at the end.
- Boots: light. Enough to keep them rounded so the doll stands.
- Arms: none or very light. They are 8 stitches around at the wrist and stuffing makes them lumpy rather than fuller.
- Stem: none. It is too narrow and the flare needs to sit flat.
- Shape the head with your hands as you fill it, working stuffing outward toward the widest round rather than pushing straight down the middle.
- Where overstuffing shows first: rounds 9 to 13 of the head, where the fabric stretches and white fiberfill shows through orange yarn very clearly. If you see it there, you have gone too far.
Troubleshooting
- Round 4 or round 14 will not come out even. Neither of them divides as printed. Read the Pattern Note. Round 4 wants 2 SC before each increase, round 14 wants 6 SC before each decrease. Nothing you did caused this.
- The ridges keep flattening out after a few hours. The head is understuffed. There is nothing behind the yarn to press against, so the groove relaxes. Unpick the stem, add more stuffing, and re-sculpt.
- The head pulled off centre while sculpting. Almost always from tightening one ridge fully before starting the next. Work all the ridges loosely first, going around the head, then tighten them in a second pass so the tension balances.
- The face sits between two ridges instead of on a section. Plan backwards. Mark the centre of the face with a pin before you sculpt, then place your first ridge line either side of it at equal distance.
- One arm sits higher than the other. The arms are crocheted in rather than sewn, so this happens during the body rounds and there is no unpicking without undoing the shoulder. Count the stitches between the two attachment points on both sides before you crochet the second arm in.

Yarn Substitution and Size Scaling
Cotton is the better choice here. It gives crisp stitch definition and, more importantly, it holds a sculpted groove much better than acrylic, which springs back over time.
- Thread or 4 ply with a 2 mm hook, as written: around 12 to 15 cm tall
- DK with a 3 mm hook: around 18 to 21 cm tall
- Worsted with a 4 mm hook: around 24 to 28 cm tall
Estimates rather than measured sizes. Scaling up suits this design well, since a bigger head gives the ridges more to work with. If you scale down, the 4 stitch stem becomes very fiddly and you may prefer to work it at 5 or 6 stitches instead.
Colour and Customization Ideas
- Classic orange with a green stem, which is what most people want
- White pumpkin with a pale brown stem, which reads as a heirloom variety
- Deep rust or burnt orange, less cartoonish and better for a mantelpiece
- Dark grey boots instead of dark brown for a slightly witchier doll
- Work the ridge sculpting in a shade darker than the head so the grooves read as shadow lines
- Swap the smile for a jack o lantern mouth embroidered in black, and give it triangle eyes instead of safety eyes
The one thing worth protecting is contrast at the stem. A green stem on orange reads instantly. A brown stem on orange disappears from a distance.
Toy Safety
- Embroidered eyes only for a child under three.
- Sew the head to the body thoroughly. It is the heaviest piece and the only structural seam.
- Secure the ridge sculpting yarn with a firm knot buried inside the head, then hide the tail. A ridge that comes loose unravels the whole shape.
- Sew the stem on rather than gluing it.
- Hand wash in cool water and press the water out. Wringing will distort the ridges and they do not fully recover.
FAQ
- Why does the head look nothing like a pumpkin while I am making it? Because the shape comes from the sculpting, not the stitches. You are crocheting a plain sphere on purpose. The pattern even warns you about this, and it is still unsettling the first time.
- How many ridges should I actually make? Six, if you want the spacing to be exact. The widest round is 48 stitches, which divides by 6 into neat sections of 8. Five ridges looks fine too but you will be judging the gaps by eye.
- Can I sew the arms on instead of crocheting them in? You can, but the crocheted in join is much stronger and it is one of the better things about this pattern. If you do sew them, work the body straight through those rounds and attach the arms afterwards at the 24 stitch level.
- My head and body openings do not match up. They should both be 18. If the head is off, check round 14, which is one of the two broken rounds. If the body is off, the phrase continue until reaching 18 stitches means two rounds of the 2 SC and decrease repeat, not one.
- Do I need a special needle for the sculpting? You need a long one. A standard yarn needle will not reach from the top of the head to the bottom in one pass, and doing it in two passes makes it very hard to keep the ridge in a straight line. A doll needle or a long darning needle is worth having.