
Crochet Amigurumi Hot Air Balloon Pattern - Green & White Paneled Plush
Hanging a crochet hot air balloon above a changing table adds soft green and white colour right at a baby's eye level. Safari nursery themes pair well with a hot air balloon crochet ornament, since the piglet riding in the basket brings a storybook character to the room.
That pig peering over the basket edge gives this crochet hot air balloon amigurumi the look of a passenger who has just realised how high up it is. Half nervous, half thrilled. Hang it where it turns and the pig keeps arriving at a new view, which is the whole joke of it.
Crochet Hot Air Balloon Amigurumi

Green and white panels run vertically down the balloon envelope, tapering from a rounded top to an open rim at the base. Four white cords drop from that rim to a square brown basket, and a small pink pig sits inside with black eyes and a stitched snout. The envelope hangs from a loop at the top, so the whole thing works as something to suspend rather than set on a shelf. Pieces come as the envelope, the basket, the cords and the pig. Colour changes in the envelope need tracking, and the cords have to hang even, which is the part most people redo once.
What You Need
- Green yarn for the main panels and white yarn for the alternating panels. A worsted weight acrylic or cotton works well, though the pattern does not name a weight, so treat that as a suggestion. Pick a hook that suits your yarn; around 3.5 mm is a common choice for worsted amigurumi, going a size smaller than the label so the stuffing stays hidden. You will also want fiberfill, a yarn needle, scissors and a stitch marker.
- Finished size is roughly 4 to 5 inches tall with worsted yarn. That is an estimate from the stitch counts, not a figure from the pattern, and your tension will move it. Time sits somewhere around two to four hours for most makers.
- Pieces: 1 balloon (top, body and bottom worked as one piece) and 1 bottom plate. There are no safety eyes or small attached parts.
- Abbreviations: sc is single crochet, inc is increase (2 sc in one stitch), dec is decrease (2 stitches worked together).
The Pattern
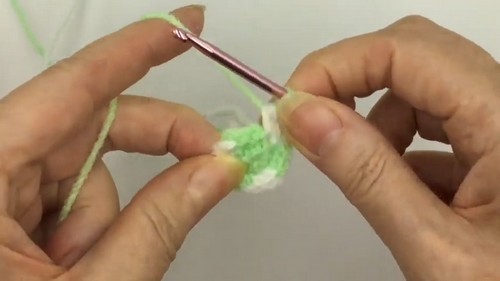
Work in continuous rounds with a marker in the first stitch. To change color, start the stitch in the current color and pull the new color through on the final yarn over. Carry the unused strand behind your work and crochet over it so it stays buried inside the fabric. Keep that carried strand a little loose. Pulled tight, it puckers the panels and narrows the balloon.
Balloon Top
- Round 1: Magic ring with 6 sc in green (6)
- Round 2: Inc in every stitch while alternating colors in small sections (12)
- Round 3: (1 inc, 1 sc) repeat across each color section (18)
- Round 4: (1 sc, 1 inc, 1 sc) repeat across each color section (24)
- Round 5: (2 sc, 1 inc, 2 sc) repeat across each color section, and the circle should still lie almost flat at this point (30)
- Round 6: (3 sc, 1 inc, 1 sc) repeat across each color section (36)
- Round 7: (1 sc, 1 inc, 4 sc) repeat across each color section, with the edges now starting to lift into a shallow bowl (42)
- Round 8: (3 sc, 1 inc, 3 sc) repeat across each color section (48)
- Round 9: (1 sc, 1 inc, 6 sc) repeat across each color section, and the top should now cup your palm like a rounded cap with clear vertical panels (54)
Balloon Body
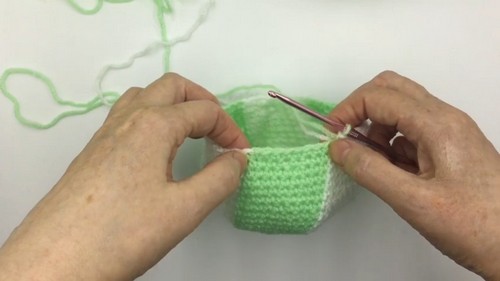
- Round 10: Sc in each stitch around, maintaining the color pattern (54)
- Round 11: Sc in each stitch (54)
- Round 12: Sc in each stitch (54)
- Round 13: Sc in each stitch, and the sides should be rising straight up now rather than flaring outward (54)
- Round 14: Sc in each stitch (54)
- Round 15: Sc in each stitch (54)
- Round 16: Sc in each stitch (54)
- Round 17: Sc in each stitch, and the piece should look like a deep cup, about as tall as it is wide (54)
These straight rounds set the height. If your balloon looks short, add a round or two here; the shaping above and below will not change.
If magic rings and invisible decreases sound like another language, start with the video tutorial below, it makes everything click!
Balloon Bottom
- Round 18: (3 sc, dec, 4 sc) repeat across each section (48)
- Round 19: Sc in each stitch (48)
- Round 20: (3 sc, dec, 3 sc) repeat across each section, and the lower edge should just be starting to curve inward (42)
- Round 21: Sc in each stitch (42)
- Round 22: (2 sc, dec, 3 sc) repeat across each section, a good moment to begin stuffing the top dome (36)
- Round 23: Sc in each stitch (36)
- Round 24: (2 sc, dec, 2 sc) repeat across each section, and the balloon should now read clearly as a teardrop with a wide opening at the base (30)
- Round 25: Sc in each stitch (30)
- Round 26: (2 sc, dec, 1 sc) repeat across each section (24)
- Final round: Sc in each stitch to smooth the shape, then fasten off leaving a long tail
Bottom Plate
- Round 1: Magic ring with 6 sc (6)
- Round 2: Inc in each stitch (12)
- Round 3: (1 sc, inc) repeat 6 times, and the circle should lie completely flat with no ruffling (18)
- Round 4: (2 sc, inc) repeat 6 times, ending with a disc close in size to the balloon opening (24)
- Fasten off, leaving a long tail for sewing
Assembly and Stuffing
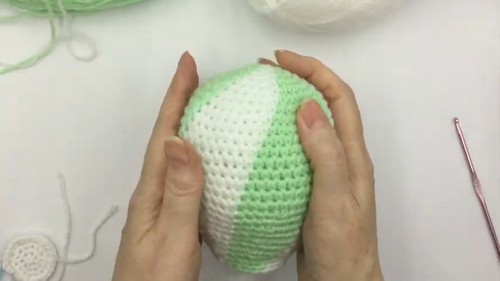
- Stuff firmly, adding small tufts at a time so the dome stays smooth. The top is where lumps show first, so pack it before anything else and roll the balloon between your hands to even it out. The body should feel firm when squeezed but still give a little. Too much fiberfill in the middle pushes the panels out into bulges and the straight sides go barrel shaped.
- Just before closing, add a final handful at the base so the bottom does not cave in once the plate is on. Place the bottom plate over the opening and pin it at four evenly spaced points before you sew. Pins keep the plate centered and stop the panels from twisting as you stitch around. Sew the plate on with the yarn needle through both edges, check that the stuffing still feels even, then weave in all ends inside the body.
- Since there are no eyes or small parts, this one suits younger children well. Secure every yarn end firmly and knot it inside before trimming.

FAQ
- Why are my panels leaning into a spiral? That happens naturally with continuous rounds, since each round starts one stitch over from the last. Nudge the color change a stitch earlier or later whenever a panel drifts, and it straightens right up.
- Can I make it bigger? Swap to a chunky yarn and a bigger hook and the same counts will give you a much larger balloon. Adding straight rounds in the body also gives extra height without touching the shaping.
- Do I have to carry the yarn, or can I cut and rejoin? Cutting works, but you will end up with dozens of ends to weave in. Carrying the strand is faster and gives a smoother inside, so it is worth the practice.