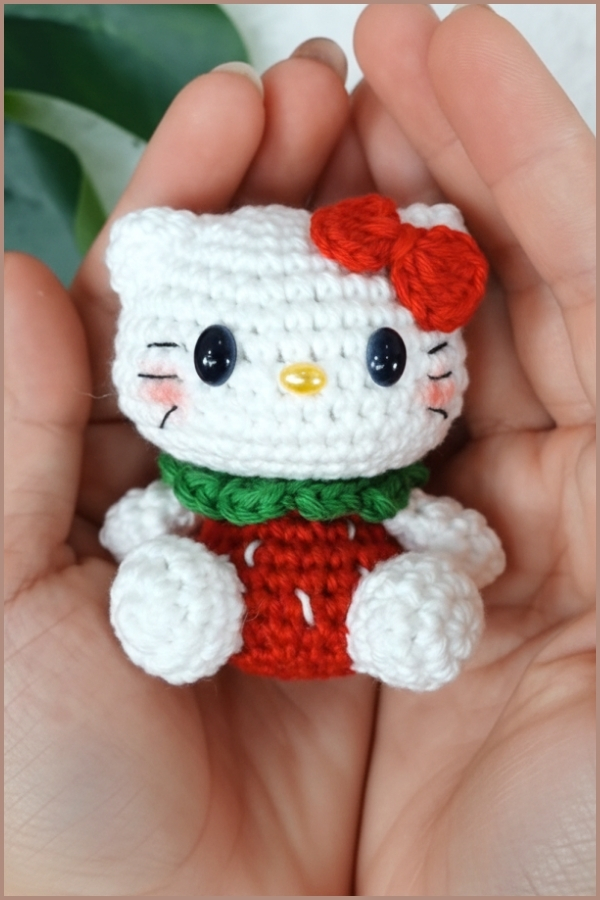
Amigurumi Hello Kitty Crochet Pattern To Make Mini Doll
Classic character styling comes through clearly in the Crochet Hello Kitty Amigurumi Doll pattern, where a rounded head, tiny ears, and minimal facial features create a soft and balanced look that feels instantly familiar. This design lends itself well to handmade gifts, nursery decor, or a personal collection piece, offering a clean finish that highlights careful shaping and neat assembly. With its simple structure and recognizable details, the doll allows crocheters to focus on placement, proportion, and finishing touches that bring personality to the final piece.
Crochet Hello Kitty Amigurumi

Skill Level
Beginner to intermediate
This project uses basic stitches with repeated increase and decrease patterns. The shaping is straightforward, but careful placement during assembly makes a big difference in the final look.
Finished Size
Size will vary depending on yarn and hook used, but expect a small handheld plush with a proportionally larger head and compact body.
Materials
HELLO KITTY BODY
- Row 1: Start with a magic ring of 6x stitches.
- Row 2: Work 6V stitches (V = 2x in one stitch) to get 12 stitches.
- Row 3: Alternate X and V stitches (XV) for 6 repeats to get 18 stitches.
- Row 4: Work 2XV stitches for 6 repeats to get 24 stitches.
- Row 5: Work 3XV stitches for 6 repeats to get 30 stitches.
- Row 6: Work 4XV stitches for 6 repeats to get 36 stitches.
- Rows 7-8: Work 36x stitches in each row.
- Row 9: Work 5XV stitches for 6 repeats to get 42 stitches.
- Rows 10-11: Work 42x stitches in each row.
- Row 12: Work 5XA stitches (A = decrease) for 6 repeats to get 36 stitches.
- Row 13: Work 4XA stitches for 6 repeats to get 30 stitches.
- Row 14: Work 3XA stitches for 6 repeats to get 24 stitches.
- Row 15: Work 2XA stitches for 6 repeats to get 18 stitches.
- Row 16: Work XA stitches for 6 repeats to get 12 stitches, then switch to red yarn.

- Row 17: Using red yarn, work XV stitches using only the front loop of each stitch for 6 repeats to get 18 stitches.
- Row 18: Work 18x stitches.
- Row 19: Work 2XV stitches for 6 repeats to get 24 stitches.
- Rows 20-21: Work 24x stitches in each row.
- Row 22: Work 3XV stitches for 6 repeats to get 30 stitches.
- Row 23: Work 30x stitches.
- Row 24: Work 3XA stitches for 6 repeats to get 24 stitches.
- Row 25: Work 2XA stitches for 6 repeats to get 18 stitches.
- Row 26: Work XA stitches for 6 repeats to get 12 stitches.
EARS (2 PIECES)
- Row 1: Start with a magic ring of 6x stitches.
- Row 2: Alternate X and V stitches (XV) for 3 repeats to get 9 stitches.
- Row 3: Work 2XV stitches for 3 repeats to get 12 stitches.
ARMS (2 PIECES)
- Row 1: Start with a magic ring of 6x stitches.
- Row 2: Alternate X and V stitches (XA) for 3 repeats to get 9 stitches.
- Row 3: Work 9x stitches.
- Row 4: Alternate X and A stitches (XA) for 3 repeats to get 6 stitches.
- Row 5: Work 6x stitches.
LEGS (2 PIECES)
- Row 1: Start with a magic ring of 6x stitches.
- Row 2: Work 6V stitches to get 12 stitches.
- Rows 3-4: Work 12x stitches in each row.
- Row 5: Work 3X, 3A, and 3X to get 9 stitches.
BOW
- Create a loop and chain 3.
- Work 3F stitches (F = treble crochet) into the loop.
- Chain 3 and slip stitch into the loop.
- Chain 3 again.
- Work 3F stitches into the loop.
- Chain 3 and slip stitch into the loop.
- Pull the yarn tail to tighten the center.
SCARF
- Chain 20.
- Work 2T stitches (T = half double crochet) into the next stitch.
- Chain 1, then slip stitch into the next stitch.
- Repeat the pattern of (chain 1, 2T, chain 1, slip stitch) until the end of the scarf.
ASSEMBLY
- Sew the ears to the head on the third row from the top.
- Attach the legs, making sure the seam line is on the bottom.
- Attach the arms.
- Glue the nose to the center of the face.
- Attach the eyes, making sure the bottom edge of the eyes lines up with the bottom edge of the nose.
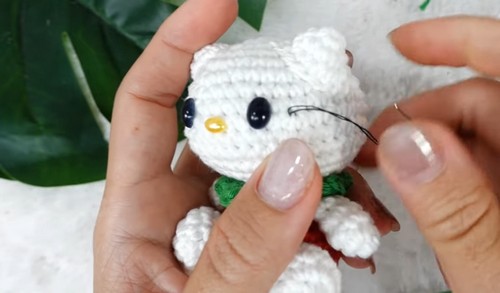
- Embroider the whiskers with black thread.
- Add blush to the cheeks.
- Glue the bow onto the head.
- Wrap the scarf around the neck.

Abbreviations
- X: single crochet
- V: increase (2 single crochets in one stitch)
- A: decrease
- F: treble crochet
- T: half double crochet
Helpful Notes Before Starting
- Work in continuous rounds unless otherwise stated.
- Use a stitch marker to keep track of your rounds.
- Stuff gradually as you go, especially through the head section, to maintain a smooth shape.
- Keep stitches tight and consistent to avoid gaps.
Construction Overview
This piece is worked in one main body section that starts at the top of the head, expands outward, then narrows to form the neck. After that, the color change and front loop round create a clear separation between the head and clothing.
The arms, legs, and ears are made separately and attached later, allowing you to adjust placement for symmetry before securing them.
Stitch and Shaping Clarity
- Increase rounds (V patterns) gradually widen the head to achieve a smooth, rounded dome.
- Even rounds (same stitch count) allow the shape to develop height without widening.
- Decrease rounds (A patterns) taper the head into the neck.
The transition at Row 16 to Row 17 is especially important:
- Switching yarn changes the visual section into clothing.
- Working into the front loops only creates a subtle ridge, which helps define the edge between head and outfit.
Head Shaping
The early rounds build a perfect sphere:
- Increasing from 6 to 42 stitches ensures a wide, smooth head.
- Maintaining 42 stitches for two rounds gives the head its full width before shaping downward.
Neck Formation
From Rows 12 to 16:
- Decreases are evenly spaced to pull the shape inward.
- This creates a clean transition from the head into a narrower neck.
Stuff firmly before finishing these rounds so the head stays round and supported.
Body and Skirt Section

From Row 17 onward:
- The front loop round acts as a turning point.
- Increases after the color change expand outward again, forming a gentle flare that reads as a dress or body shape.
Assembly Guidance
Take your time here. Placement defines the character.
Ears
- Position on the third row from the top as instructed.
- Keep them slightly forward-facing, not directly on the sides.
- Check alignment from the front before sewing.
Legs
- Attach evenly at the base.
- Ensure both feet sit flat so the piece can rest evenly.
- Keep seam lines hidden underneath.
Arms
- Place slightly below the head on each side.
- Angle them slightly forward for a more natural pose.
Eye and Facial Feature Placement
- The nose sits centered on the face and acts as your anchor point.
- Eyes should align horizontally with the bottom of the nose, not above it.
- Keep spacing even on both sides for balance.
Whiskers should be embroidered lightly and evenly, extending outward without pulling the fabric.
Stuffing Tips
- Stuff the head firmly to avoid collapsing.
- Use smaller amounts at a time and push into place to avoid lumps.
- The body should be slightly softer than the head so it sits naturally.
Finishing Notes
- Secure all yarn ends inside the body neatly.
- Shape the head gently with your hands after stuffing to smooth out any uneven areas.
- Adjust the bow placement before gluing to ensure it sits slightly off-center for a natural look.
Beginner Notes
- If decreases leave gaps, try an invisible decrease technique.
- Keep tension consistent throughout, especially when switching yarn colors.
- Don’t rush assembly. Taking extra time here will noticeably improve the final result.
Troubleshooting
- Head looks uneven: Check stitch count in each round and ensure increases are evenly spaced.
- Body flares too much or too little: Tension may be inconsistent during increase rounds after the color change.
- Ears look mismatched: Count stitches carefully and compare both pieces before attaching.
Customization Ideas
- Change the bow color to match different outfits.
- Use embroidered eyes instead of glued pieces for a softer look.
- Add a small bag or accessory to personalize the character.
- Adjust scarf length or texture for seasonal variations.