Crochet Pumpkin Pie Turtle Amigurumi Pattern Adorable Autumn Project
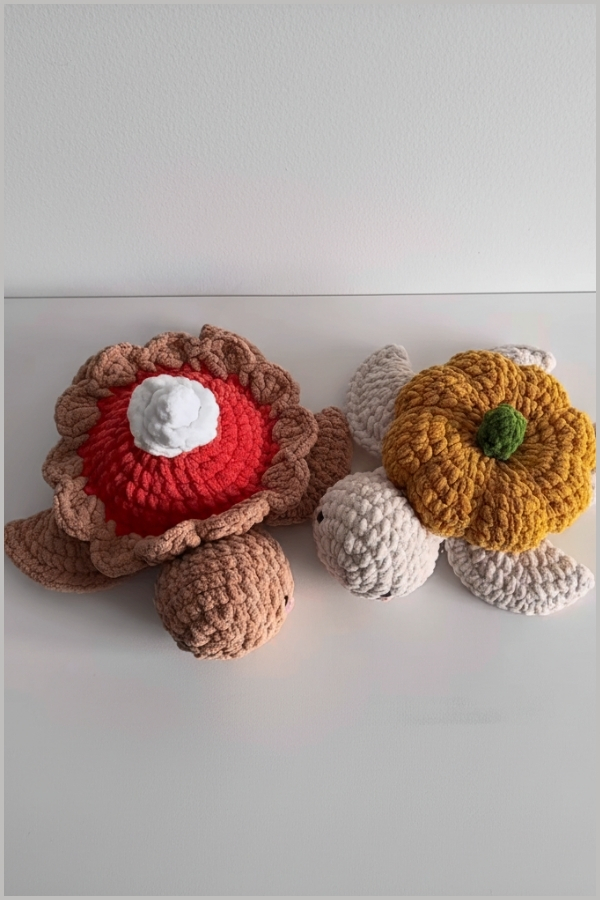
Warm autumn details come together in this pumpkin pie turtle design, where a rounded shell mimics the look of a baked dessert and the soft sculpted head and fins bring the character to life.
Crochet Pumpkin Pie Turtle Amigurumi
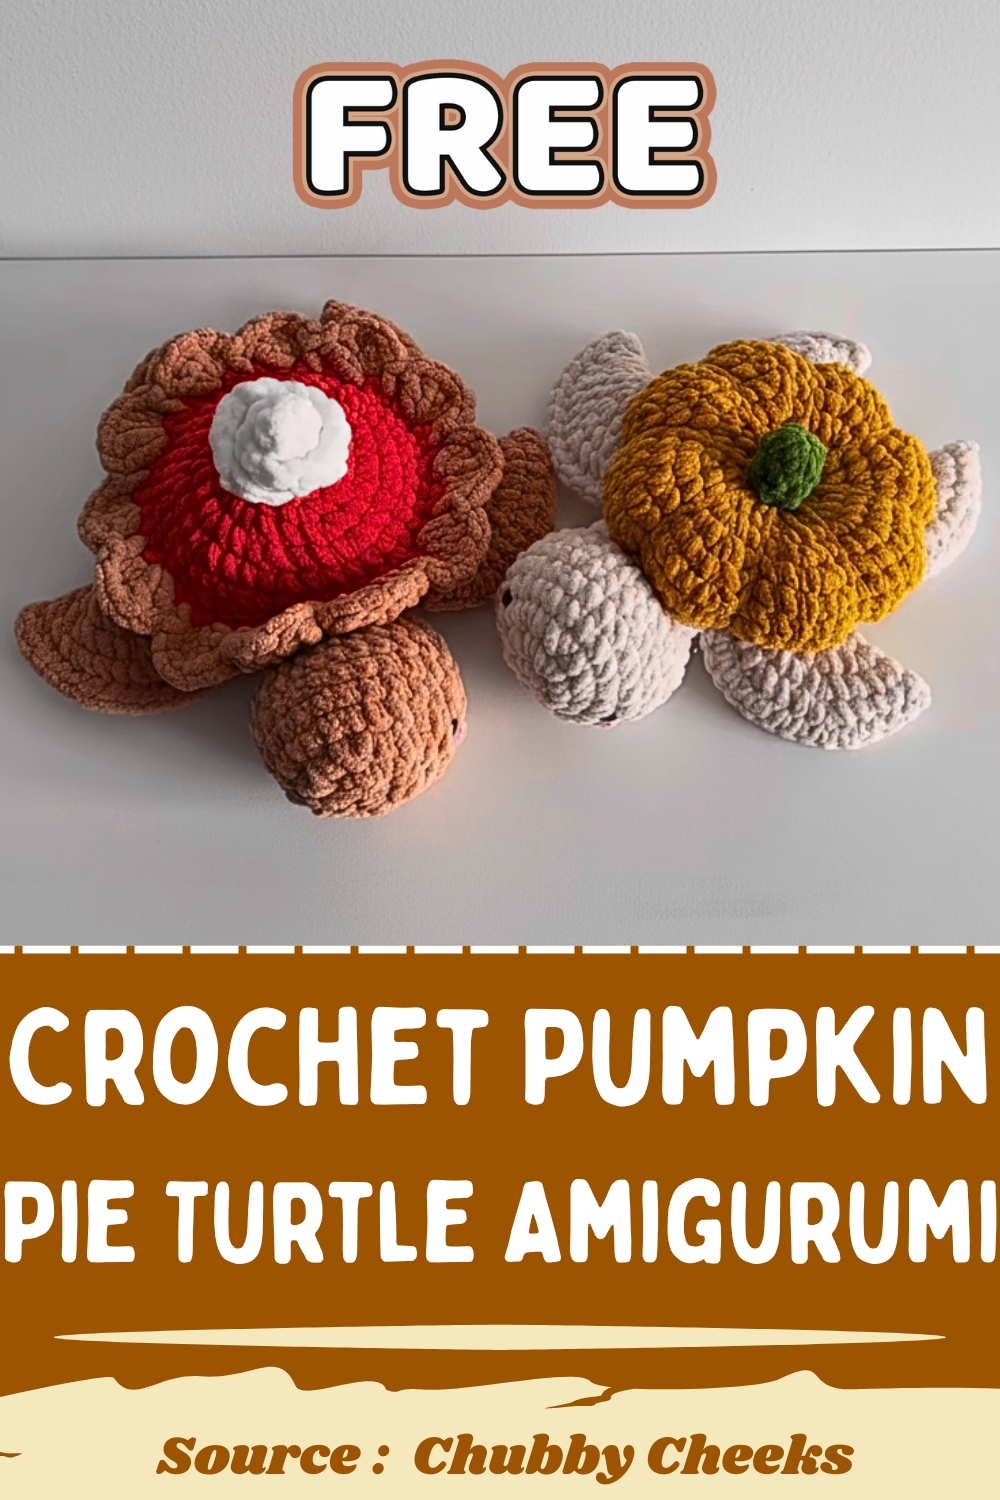
The combination of textured stitches, layered construction, and decorative cream topping gives this piece both personality and visual depth, making it ideal for seasonal decor, gifting, or simply enjoying a more detailed amigurumi project that focuses on shaping and assembly.
Skill Level
Intermediate
This pattern is approachable if you’re comfortable with:
- Working in the round
- Increasing and decreasing evenly
- Basic shaping and assembly
- Handling different stitch textures (like double crochet clusters)
Finished Size
Size will vary depending on yarn and hook choice, but expect a palm-sized turtle with a slightly domed shell and layered texture.
Materials
(Use exactly as provided in your pattern)
- Light brown yarn
- Bright orange yarn
- 12mm safety eyes
- Stuffing
Abbreviations
- sc: single crochet
- inc: increase
- dec: decrease
- dc: double crochet
- sl st: slip stitch
Helpful Notes Before Starting
- This pattern is worked in continuous rounds unless stated otherwise.
- Keep stitch markers in place, especially when shaping the head and shell.
- The shell is constructed in two layers: upper shell first, then lower shell using back loops.
- The decorative edge and cream topping are what give the “pumpkin pie” look, so take your time with those details.
Construction Overview
This turtle is built in separate parts and then assembled:
- Head is worked first and shaped with gradual increases and decreases
- Fins are made flat by folding and closing
- Upper shell creates the textured pie top
- Lower shell forms the base and connects to the upper shell
- Cream is added as a decorative element
- All pieces are sewn together at the end
Understanding this structure makes assembly much easier and helps with proper placement.
HEAD
- Round 1: Using light brown yarn, make 8 single crochet stitches into a magic ring.
- Round 2: Make 8 increases (16 stitches total).
- Round 3: Alternate 1 single crochet and 1 increase (24 stitches total).
- Round 4: Repeat (11 single crochet stitches, 1 increase) twice (26 stitches total).
- Rounds 5-7: Single crochet in each stitch (26 stitches total per round).
- Round 8: Repeat (11 single crochet stitches, 1 decrease) twice (24 stitches total).
- Round 9: Alternate 1 single crochet and 1 decrease (16 stitches total).
- Round 10: Single crochet in each stitch (16 stitches total).
- Finishing: Attach 12mm safety eyes between rounds 3 and 4, stuff the head, and close the hole.
Stitch and Shaping Clarity
- The increases in early rounds create a smooth, rounded front of the head.
- The small jump from 24 to 26 stitches in Round 4 slightly widens the head for a softer shape.
- Decreases in Rounds 8 and 9 taper the back, helping the head sit naturally against the shell.
- Place eyes before fully closing so you can adjust symmetry easily.
FINS
- Hind Fins: Rounds 1-4 are worked similarly to the head, with increases in each round until you have 24 stitches. Fold the fin and close it with 11 single crochet stitches. Make two.
- Front Fins: Rounds 1-4 are the same as the hind fins.
- Round 5: Alternate (3 single crochet stitches, 1 increase) for a total of 30 stitches. Fold and close with 14 single crochet stitches. Make two.
Stitch and Shaping Clarity
- Folding and closing the fins creates a flat, paddle-like shape.
- Front fins are slightly larger, which helps balance the visual weight of the shell.
- When closing, crochet through both layers to seal the shape evenly.
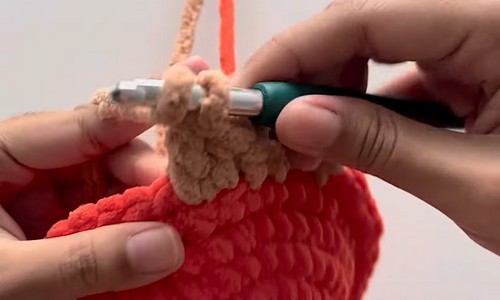
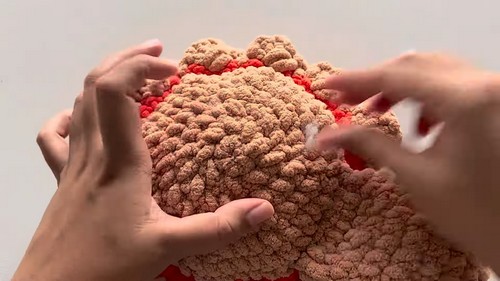
UPPER SHELL
- Round 1: Using bright orange yarn, make 8 single crochet stitches into a magic ring.
- Round 2: 8 increases (16 stitches total).
- Round 3: Alternate (1 single crochet, 1 increase) (24 stitches total).
- Round 4: Alternate (2 single crochet stitches, 1 increase) (32 stitches total).
- Round 5: Alternate (3 single crochet stitches, 1 increase) (40 stitches total).
- Round 6: Single crochet in each stitch (40 stitches total).
- Round 7: Alternate (4 single crochet stitches, 1 increase) (48 stitches total).
- Round 8: Single crochet in the front loop only of each stitch (48 stitches total). Change to light brown yarn.
- Round 9: Repeat (skip next stitch, 5 double crochet stitches in the third stitch, skip next stitch, 1 single crochet) 12 times.
Stitch and Shaping Clarity
- Gradual increases create a wide, domed shell.
- Round 8 is critical: working in the front loop leaves the back loops free for the lower shell.
- The double crochet clusters in Round 9 form the textured “pie crust” edge.
- Keep tension consistent here so the edge ruffles evenly.
LOWER SHELL
- Using the back loops from Round 8 of the upper shell:
- Round 1: Single crochet in each back loop (48 stitches total).
- Rounds 2-5: Decrease in each round, following a pattern of single crochet stitches and decreases until you have 16 stitches left.
- Finishing: Stuff the body and close the hole.
Stitch and Shaping Clarity
- Working into the back loops connects the lower shell seamlessly.
- Decreases pull the base inward, creating a rounded, filled shape.
- Stuff gradually to avoid lumps and maintain symmetry.
CREAM
- Make a slip knot and chain 12.
- Starting from the third chain, double crochet increase in each chain.
- Sew the curled piece on top of the shell.
Stitch and Shaping Clarity
- Increasing in every stitch causes the strip to curl naturally.
- This curl mimics whipped cream, so avoid over-tight tension.
- Position slightly off-center for a more natural look.
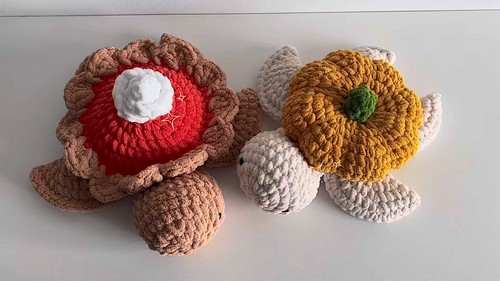
PUMPKIN TURTLE
- The body of the pumpkin turtle is similar to the upper shell of the pumpkin pie turtle.
- Rounds 1-5: Same as the pumpkin pie turtle's upper shell.
- Round 6: Alternate (4 single crochet stitches, 1 increase) (48 stitches total).
- Round 7: Alternate (5 single crochet stitches, 1 increase) (56 stitches total).
- Rounds 8-10: Single crochet in each stitch (56 stitches total per round).
- Rounds 11-15: Decrease in each round, following a pattern of single crochet stitches and decreases until you have 16 stitches left.
- Finishing: Stuff the pumpkin and close the hole. You can use the long yarn tail to shape the pumpkin.
Stitch and Shaping Clarity
- Extra increase rounds create a fuller, pumpkin-like body.
- The long tail can be threaded through sections to create subtle ridges.
- Even spacing is key for a balanced pumpkin shape.
ASSEMBLY
- Pumpkin Pie Turtle: Sew the head between rounds 1 and 2 of the lower shell. The fins are sewn to the side of the shell.
- Pumpkin Turtle: Sew the head and fins to the same row of the pumpkin body, between rounds 12 and 13.
Assembly Guidance
- Position the head centered and slightly angled upward for a natural look.
- Attach fins evenly on both sides; use pins first to check placement.
- Front fins should sit slightly forward compared to hind fins.
- Keep all parts aligned horizontally to avoid a tilted appearance.
Eye and Facial Placement
- Eyes are placed between Rounds 3 and 4 of the head.
- Leave enough space between them to avoid a crowded look.
- Adjust slightly before securing to ensure symmetry.
Stuffing Tips
- Stuff the head firmly but not stretched.
- The shell should feel full but still soft to the touch.
- Add stuffing in small amounts to avoid lumps.
Finishing Notes
- Secure all yarn ends tightly, especially where pieces are joined.
- Shape the shell gently with your hands after stuffing.
- Adjust the cream piece if needed for better balance.
Beginner Notes
- Count stitches at the end of each round to stay on track.
- Use a stitch marker to avoid losing your place.
- Take extra time with assembly—this is where the character really forms.
Troubleshooting
- Uneven shell shape: Check increase placement and tension.
- Fins look twisted: Make sure they are folded evenly before closing.
- Head tilting: Reposition and re-sew with tighter stitches.
- Shell edge not ruffling properly: Loosen tension on double crochet stitches.
Customization Ideas
- Change shell colors for different seasonal themes
- Add embroidered details for a more expressive face
- Use textured yarn for a softer, plush finish
- Adjust cream placement or size for different “dessert” styles