
Free Crochet Ube Swiss Roll Plush Pattern - Kawaii Food Amigurumi
Kawaii food collectors can finish the crochet ube swiss roll plush in two to three hours, using ube purple and cream yarn on a 3.5 to 4.0 mm hook. Back loop only rounds and a few double crochets shape the 4 to 5 inch cake slice before the bear face goes on.
Sleepy and a little smug, the crochet ube swiss roll plush sits there like it has no plans today. The face gives it a calm, well fed look. Every part of it acts like dessert that decided to be a bear, and that attitude is exactly why people keep it on the shelf.
Crochet Ube Swiss Roll Plush
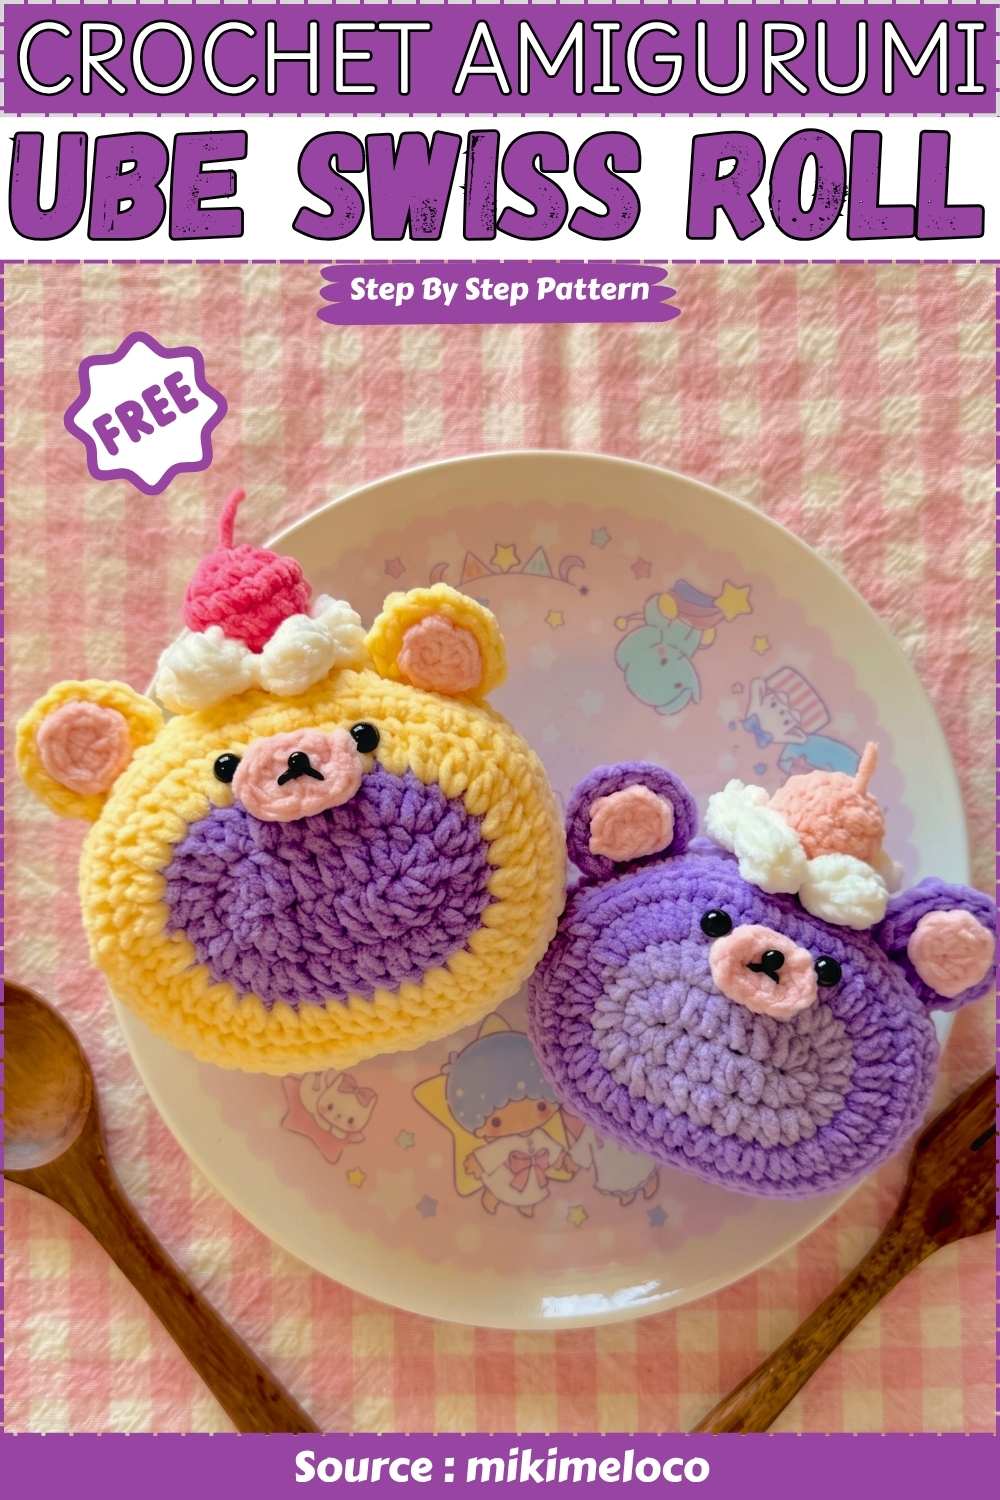
Round like a slice of cake set on its side, this plush wraps a soft outer sponge around a purple swirl in the middle. The face sits right on the spiral, with a small muzzle, stitched nose and two shiny black eyes. Rounded ears sit up top, and a little whipped cream swirl with a cherry rests beside them. You work it in a few separate pieces, the body, the ears, the muzzle and the cream topping, then sew them together. Nothing here goes beyond basic shaping and attaching, so it stays friendly for anyone who has finished a simple ball or head before.
Materials and Tools
- Ube purple yarn for the cake panels
- Cream or white yarn for the inner roll sections and the cream topping
- Red yarn for the cherry
- Pink or matching yarn for the nose detail
- Crochet hook suitable for your yarn weight
- Fiberfill stuffing
- Yarn needle
- Scissors
The pattern does not specify a yarn weight. A DK or light worsted on a 3.5 mm to 4.0 mm hook gives an approximate finished size of 4 to 5 inches across, estimated from experience with similar oval panel constructions. Time is approximately 2 to 3 hours including assembly. Both figures are estimates, not measurements from the pattern.
Abbreviations Used
- sc: single crochet
- dc: double crochet
- inc: increase, two sc into one stitch
- BLO: back loop only
- Stitch counts in brackets at the end of each round where given
Pieces List
- Cake front panel: 1 piece, worked as an oval with spiral colour layers
- Cake back panel: 1 piece, identical construction to the front panel
- Ears outer layer: 2 pieces
- Ears inner layer: 2 pieces
- Nose: 1 small oval piece
- Cream topping: 1 puff stitch circle
- Cherry: 1 piece, lightly stuffed
Nine pieces total before assembly. The front and back panels are the most complex and should be worked first.
Safety Eye and Face Note
This pattern uses a crocheted nose rather than safety eyes. No safety eye hardware appears in the construction. If you want to add embroidered or safety eyes to the front panel for a kawaii face, insert safety eyes into the panel before round 5 closes the back loop section. For any plush going to a child under three, embroider all face details with yarn only and skip any hardware.
The Pattern
The front and back panels use a mix of joined rounds and back-loop-only rows rather than a continuous spiral. Read each step carefully. All other pieces use continuous rounds.
Cake Front Panel
- Round 1: chain 8. In the third chain from hook work 3 dc, then 1 dc in each of the next 4 chains, then 6 dc in the last chain. Turn to work along the opposite side of the foundation chain. Work 1 dc in each of the next 4 stitches, then 3 dc in the final stitch. Slip stitch to join. Checkpoint: a flat oval shape, wider at both ends from the clustered dc and straight along the sides
- Round 2: chain 2. Work 3 dc increases at the first curve, 4 dc along the straight section, 6 dc increases at the opposite curve, 4 dc along the other straight section, 3 dc increases at the returning curve. Slip stitch to join. Checkpoint: the oval is noticeably wider and rounder at both ends, expanding toward the full cake panel shape. See Pattern Note 1 for count guidance
- Round 3: change colour. Work 6 dc increases at the first end, 4 dc straight, 12 dc increases across the widest curve, 4 dc straight, 6 dc increases at the other end. Slip stitch to join. Checkpoint: the oval has grown again and the colour change reads as the cream layer of the swiss roll cross section
- Round 4: 1 sc in each stitch around. Join and work through back loop
- Round 5: 1 dc in each back loop. Checkpoint: the panel now has depth from the back loop dc round, sitting slightly cupped rather than completely flat
- Rounds 6 to 7: 1 dc in each stitch

Cake Back Panel
- Repeat rounds 1 to 4 of the front panel sequence in the same colour order to create a matching back panel. See Pattern Note 3. Checkpoint: two matching oval panels, one for the front and one for the back, with matching colour arrangements
Ears Outer Layer, Make Two
- Round 1: magic ring with 8 sc [8]
- Round 2: work 6 increases. See Pattern Note 4. Checkpoint: a small disc. Count your stitches after this round
- Fasten off leaving a long tail for sewing
Ears Inner Layer, Make Two
- Round 1: magic ring with 6 sc [6]. Checkpoint: a very small disc, noticeably smaller than the outer ear piece
- Fasten off leaving a long tail for sewing

Nose
- Chain 4
- Work sc and increases to form a small oval shape. See Pattern Note 5. Checkpoint: a small flat oval with two sc sides and rounded ends, sized to sit between the eyes on the front panel
- Fasten off leaving a long tail
Cream Topping
- Round 1: magic ring with 6 sc [6]
- Round 2: 6 increases [12]. Checkpoint: a flat circle slightly smaller than the top of the finished plush
- Round 3: chain 3, work 4 incomplete dc in the same stitch, yarn over and pull through all loops to form a puff, then repeat the puff pattern evenly around. See Pattern Note 6. Checkpoint: a ring of raised puff stitches around the outer edge of the circle, reading as cream topping squirted around the top
- Fasten off leaving a long tail
If magic rings and invisible decreases sound like another language, start with the video tutorial below, it makes everything click!
Cherry
- Round 1: magic ring with 6 sc [6]
- Round 2: 6 increases [12]. Checkpoint: a flat red circle at its widest point
- Rounds 3 to 4: 12 sc [12]. Checkpoint: the cherry has taken on a domed shape, the sides now standing upright
- Round 5: work 6 decreases through front loops only [6]. Checkpoint: the cherry closes into a small red ball. Stuff lightly before closing completely
- Stuff lightly
- Fasten off and close

Assembly
Pin everything before sewing. The cream topping placement affects the whole top composition and the cherry sits on top of that, so getting the topping centred first saves repositioning everything twice.
- Sew the front and back cake panels together around the full perimeter, leaving one short end open for stuffing. Pin and check that the colour sections on the front align with the corresponding position on the back before sewing.
- Stuff the plush to your preferred firmness through the open end before closing completely.
- Attach ears to both sides of the front panel if using them, pinning first to check placement.
- Sew the nose to the centre lower front of the panel.
- Sew the cream topping flat against the top centre of the plush, working around its full perimeter so no edge lifts.
- Sew the cherry on top of the cream topping at the very centre.
Stuffing Guide
- Main plush body: moderate. Too firm and the oval shape bulges at the seam; too soft and the plush loses its clear cross-section shape. Add stuffing in small amounts and check the outline from the side after each addition.
- Cherry: lightly, as the pattern instructs. A small amount of stuffing gives the cherry its dome without making it too heavy for the cream topping to hold upright.
- All other pieces: no stuffing.

Overstuffing the main body shows as puckering along the seam where the front and back panels are joined, especially at the shorter ends of the oval.
Troubleshooting
- The two oval panels are coming out different sizes. The oval foundation is sensitive to tension. Work both panels in the same session with the same hook grip, or match your tension by counting stitches after every round on both panels simultaneously rather than completing one before starting the other.
- The cream topping puff stitches are not staying raised. The puffs are worked into a 12-stitch base round. If the base stitches are worked too loosely the puffs spread sideways rather than standing up. Try tightening the base round only and re-working the puff round.
- The cherry keeps falling off the cream topping. The cherry is small and light but sits on a textured surface. Sew through the cherry base and into the puff round below it, taking the needle down into the cream topping disc fabric rather than just anchoring to the puff tops. Two or three stitches through both layers holds permanently.
- The colour change in round 3 of the front panel is visible as a ridge. A full-round colour change in dc always leaves a visible join line. To minimise it, pull the first dc of the new colour firmly and weave in the old colour tail along the inside of that round rather than just a few stitches.
- The back loop round 5 is pulling the panel into a cup shape I cannot flatten. The BLO dc round intentionally gives the panel some dimension so the stuffed plush has thickness at the seam. Do not try to block it flat; it is correct.
- The nose oval is too large for the front panel. The nose chain-4 base can be reduced to chain 3 for a smaller version. Add fewer increases if it is still reading large at your gauge.

Yarn Substitution and Size Scaling
Any smooth yarn works well here since the oval panel construction relies on the stitch structure to hold its shape rather than the yarn texture. Avoid very fuzzy or bouclé yarn for the panels where the dc stitch lines define the spiral colour sections. The cherry in particular benefits from a smooth red yarn that reads clearly as a distinct round element.
To scale up, use a heavier yarn and larger hook with all stitch counts unchanged. The oval will grow in proportion.
FAQ
- Can I make this without the ears and nose to keep it simpler? Yes. The ears and nose are add-on kawaii details rather than structural elements. The plush reads clearly as a swiss roll even without them. Skip the inner and outer ear pieces entirely and leave the nose off if you want a faster, cleaner food plush look.
- What is the puff stitch in the cream topping? A puff is several incomplete dc worked into the same stitch, all gathered through at once. Chain 3, insert the hook, pull up a loop four times without finishing each dc, then yarn over and pull through all the loops on the hook. It makes a raised puffy cluster. It looks more complicated than it is and becomes intuitive after the first two or three.
- My oval panels are not the same size as each other. Work them one immediately after the other using the same ball of yarn and the same hook. Measuring tension across two separate sessions is the most common source of panel size difference. If they are already made and slightly different, wet block both to the same dimensions before seaming.
- How do I keep the stuffing from showing through the seam? Use a whip stitch worked through the outermost edge stitches of both panels, keeping each stitch close to the next with no gaps. Add stuffing in very small amounts so the seam never has to stretch to accommodate a sudden large piece.
- The cherry is coming out too large. The cherry reaches 12 stitches at round 2 and stays there through rounds 3 and 4 before the front loop decreases in round 5. If it is reading large against your finished plush, try using a finer yarn or smaller hook for the cherry only while keeping your main yarn for the panels.