
Crochet Scooby Doo Pattern Free - Fluffy Chenille Scooby Doo Amigurumi
Saturday morning cartoon nostalgia makes a fluffy crochet Scooby Doo amigurumi a thoughtful gift for parents who grew up watching. Car seats make room for the plush Scooby Doo crochet pup, and its chenille fur cushions sleepy heads on drives.
By Halloween night, the Crochet Plushies Scooby Doo sits beside the candy bowl with its nose aimed at the snacks. Families hosting a cartoon movie night prop one on the couch arm. Party hosts running a costume mystery game can hide the Crochet Plushies Scooby Doo as the last clue.
Crochet Scooby Doo
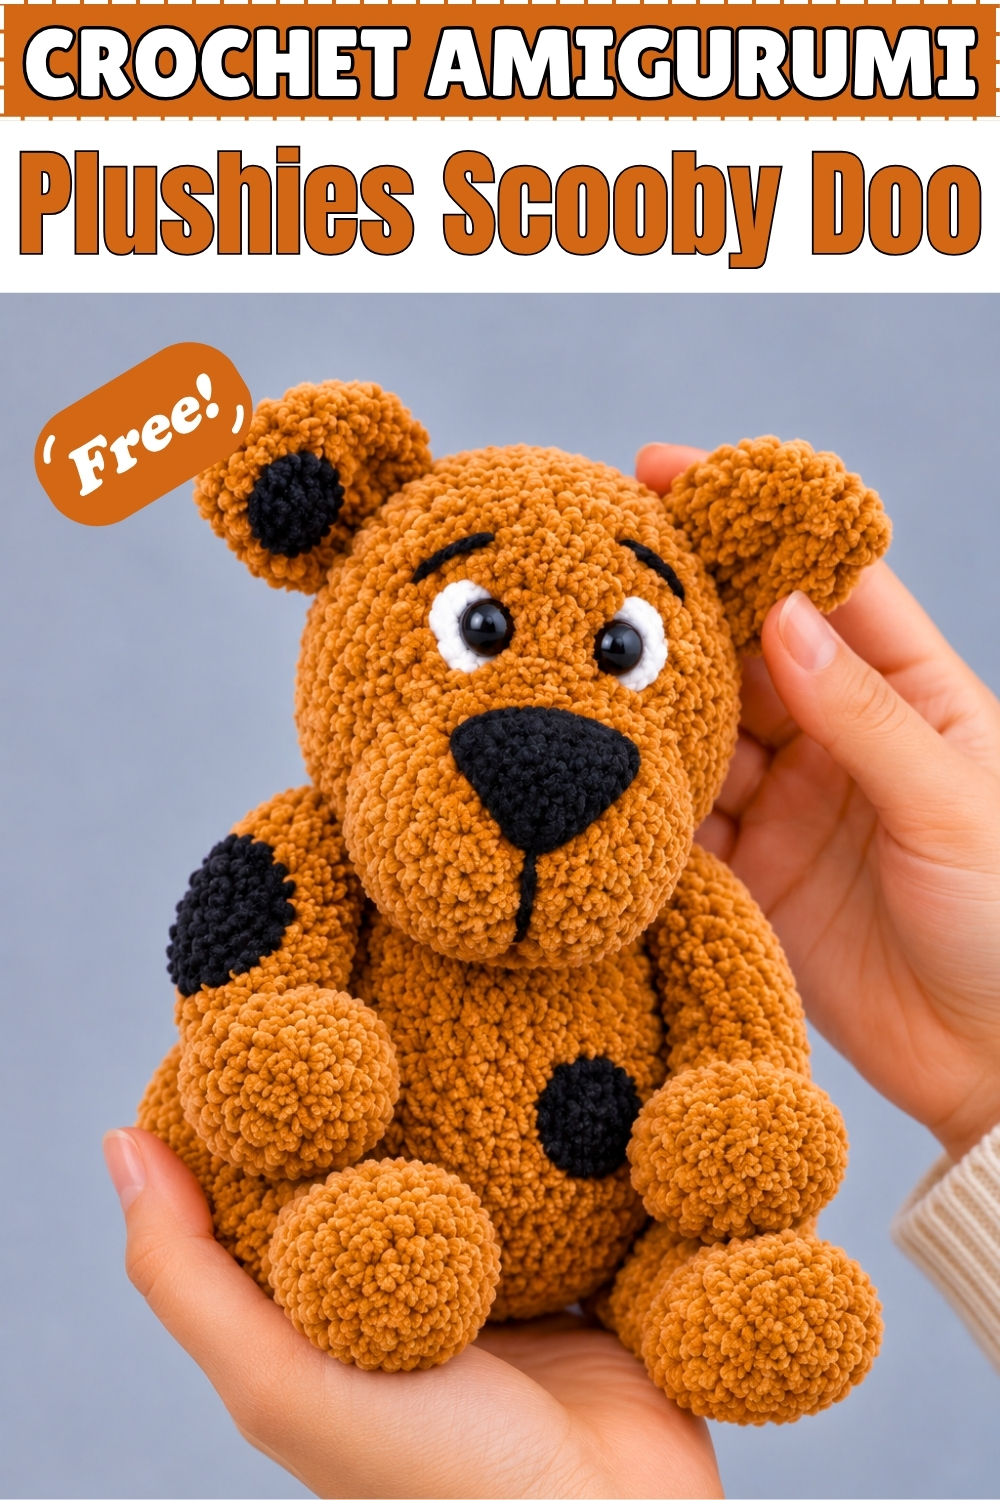
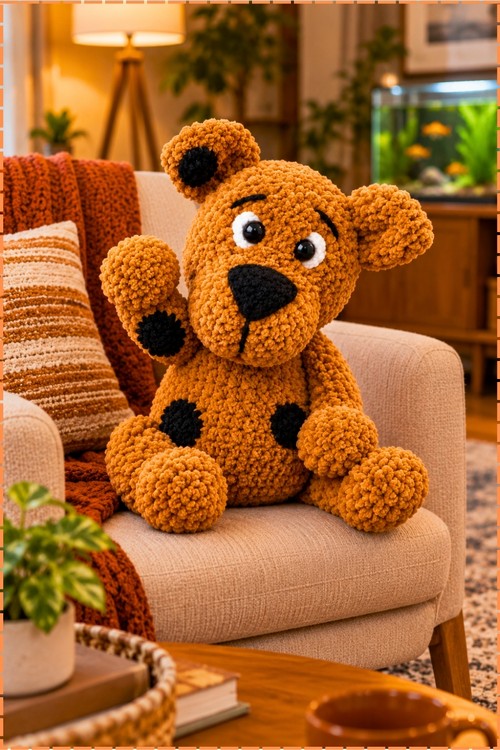
Separate leg tubes with stuffed ball paws hold this pup in a steady sitting pose. As a result, he rests on a shelf without any wire or support. I worked mine in a fluffy chenille yarn in a warm ginger tan. The yarn hides the stitches and gives him a soft, teddy texture. Round black patches sit on one shoulder, his tummy, and one ear. His raised eyebrows and white eye rims bring out that famous nervous look. Every piece of this crochet Scooby Doo plushie works up in simple single crochet rounds and rows. Sewing takes longer than the crochet itself, in my experience.
Materials and Tools
- Fluffy chenille or teddy style yarn (such as Premier Little Bunny) in a ginger tan or caramel shade for the head, muzzle, ears, body, legs, paws, and optional tail
- Fluffy black chenille yarn for the nose and the round spots
- Black acrylic yarn for the eyebrows and the mouth line
- White acrylic or chenille yarn for the eye rims
- Blue yarn for the collar (optional, not on my version)
- Gold or yellow yarn for the dog tag (optional, not on my version)
- 5.5 mm crochet hook
- Safety eyes, around 16 mm
- Stitch marker
- Tapestry needle
- Polyester fiberfill stuffing
- Scissors
Difficulty and Time
This is an easy to intermediate project. The crochet itself is basic, but there are a lot of pieces to sew and chenille can be hard to count. In my experience it takes one long weekend, roughly six to eight hours including assembly. Mine finished at a comfortable two hand hug size when seated; your size will depend on the yarn you pick.
Technique Notes
The pattern uses US terms. Abbreviations: sc means single crochet, sts means stitches, ch means chain, and "reduce" means a single crochet decrease (work two stitches together into one).
Count by feel, not sight. Chenille hides stitches almost completely, so run a finger along the top of the round to find each V. A contrasting stitch marker moved up every round saves a lot of frogging, and you should move it on every single round of the head and body.
Work under both loops with a firm, steady tension. Chenille stretches, and loose stitches let the stuffing show through. If your fabric looks gappy, go down half a hook size rather than pulling tighter on each stitch.
Leave long tails on every piece. You'll sew a lot, and chenille tails snap if you tug too hard, so pull the sewing yarn through gently and use plain black or tan acrylic for sewing if the chenille keeps breaking.
Stuff in small pieces. Fiberfill clumps in a fluffy shell and shows as lumps, so tease it apart and add it little by little.
Pin everything before sewing. The face and the spots are what make him read as Scooby, so check placement from the front at arm's length before you commit.
Crochet Scooby Doo Plushie Pattern
Head (Ginger Tan, Starts from the Back of the Head)
- Round 1: Make a magic ring (or chain 4 and join into the first stitch to form a loop) and work 8 single crochet (sc) into the centre (8 sts), pulling the ring tight because chenille slips loose easily.
- Round 2: Work 2 sc in every stitch around (16 sts).
- Round 3: [2 sc in the first stitch, 1 sc in the next] repeat all the way around.
- Round 4: [2 sc in the first stitch, 2 sc] repeat all the way around.
- Round 5: [2 sc in the first stitch, 3 sc] repeat all the way around.
- Round 6: [2 sc in the first stitch, 4 sc] repeat all the way around, which is the last increase round, and the piece should look like a wide, slightly cupped disc.
- Rounds 7 to 12: Work 1 sc in every stitch around for 6 rounds, and the sides will curve down into a deep bowl that forms the back and top of his head.
- Round 13: [Reduce 2 stitches into 1, 5 sc] repeat around.
- Round 14: [Reduce, 4 sc] repeat around.
- Round 15: [Reduce, 3 sc] repeat around.
- Round 16: [Reduce, 2 sc] repeat around, and stop here while the opening is still large enough for the eyes and stuffing.
- Insert the safety eyes on the front of the head before closing, setting them close together just above where the muzzle will sit; on mine they sit around the middle height of the face with only a small gap between them.
- Embroider a white rim around each eye with white yarn, making it a little wider on the outer side, since that white edge is what gives mine the wide, worried expression.
- Embroider a short arched black eyebrow above each eye with black acrylic yarn, angling them slightly upward toward the centre.
- Stuff the head firmly, then continue reducing with [Reduce, 1 sc] around, pull the opening closed, and tie off once the muzzle is attached and the stuffing is in.
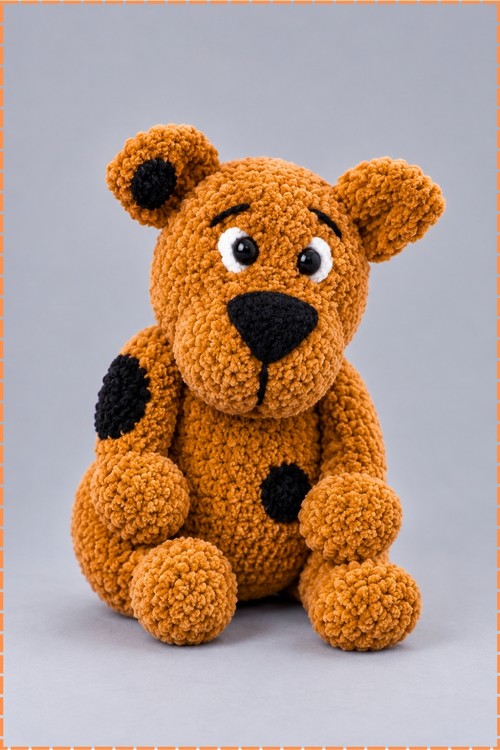
Muzzle (Ginger Tan)
- Round 1: Make a magic ring with 8 sc (8 sts).
- Round 2: Work 2 sc in every stitch around (16 sts).
- Round 3: [2 sc in the first stitch, 1 sc] repeat around.
- Round 4: [2 sc in the first stitch, 2 sc] repeat around.
- Round 5: [2 sc in the first stitch, 3 sc] repeat around.
- Rounds 6 to 8: Work 1 sc in every stitch around for 3 rounds, and the muzzle should look like a shallow, open cup.
- Make the nose as a separate black piece, since mine uses a raised nose in fluffy black yarn instead of an embroidered one: chain as wide as you want the top of the nose, work rows of sc, and reduce at both ends of each row until it narrows to a rounded point.
- Sew the nose onto the top front of the muzzle with the point facing down; on mine it covers most of the upper muzzle.
- Embroider a single black line with black acrylic yarn from the point of the nose straight down the centre of the muzzle, with a small curve at the bottom for the mouth; the extra smile lines from the original pattern are optional and not on mine.
- Stuff the muzzle lightly and sew it onto the lower front of the head, shaping the cheeks and chin as you go; on mine the muzzle fills the lower half of the face and the chin rests on top of the body.
Ears (Make 4 Pieces, Ginger Tan)
- Chain 7.
- Row 1: Skip the first chain from the hook and work 6 sc across.
- Rows 2 to 3: Chain 1, turn, and work 6 sc across for 2 rows.
- Row 4: Reduce the first 2 stitches into 1, then work 4 sc across.
- Row 5: Chain 1, turn, reduce the first 2 stitches, then work 3 sc across.
- Row 6: Reduce the first 2 stitches, then work 2 sc across.
- Row 7: Chain 1, turn, and work 3 sc across without reducing.
- Row 8: Reduce the first 2 stitches into 1 and pull the yarn all the way through to fasten off.
- Repeat to make 4 pieces in total.
- Place two matching pieces back to back and whipstitch around the edges with a long tail, then repeat for the second ear, because the doubled layer keeps the ears from collapsing in the soft yarn.
- Sew the ears to the upper sides of the head; on mine they stick out to the sides with a slight forward fold, and the fluffy yarn rounds off the tapered tips.
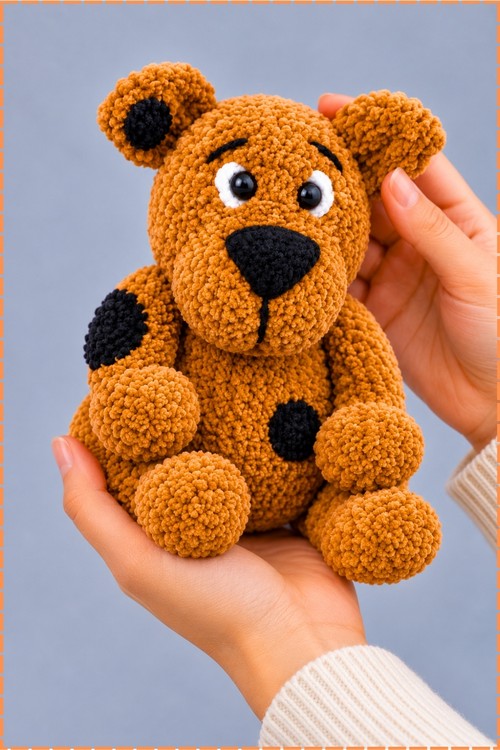
Body (Ginger Tan)
- Round 1: Make a magic ring with 8 sc (8 sts).
- Round 2: Work 2 sc in every stitch around (16 sts).
- Rounds 3 to 7: Keep increasing in the standard way, adding one more sc between increases each round, until the final increase round has 6 sc between increases, and the base should be a flat disc for him to sit on.
- Rounds 8 to 17: Work 1 sc in every stitch around for 10 rounds to build the base and torso.
- Rounds 18 to 21: Work the reduction rounds of [Reduce, 6 sc], then [Reduce, 5 sc], then [Reduce, 4 sc] to taper the body slightly toward the waist.
- Rounds 22 to 26: Work 1 sc in every stitch around for 5 rounds.
- Stuff the body firmly, especially the base, so he sits upright without tipping backward.
- Work a small half circle flap at the top neck opening to bridge the gap between head and body.
- Sew the head securely to the body over the flap; on mine the head sits low and forward with no visible neck, which helps the sitting pose.
Legs and Paws (Ginger Tan)
- Leg tubes: Chain 16.
- Rows 1 to 11: Work 11 rows of 15 sc.
- Fold each rectangle lengthwise, hot dog style, and whipstitch the long seam closed, leaving tails at both ends for joining to the body and paws.
- Make 2 or 4 leg tubes depending on your setup; mine uses 2 tubes for the front legs, and the back paws sit straight at the front base of the body.
- Paws (Make 4) Round 1: Make a magic ring with 8 sc (8 sts).
- Paws Round 2: Work 2 sc in every stitch around (16 sts).
- Paws Rounds 3 to 6: Work 1 sc in every stitch around for 4 rounds.
- Paws Round 7: [Reduce, 1 sc] repeat around.
- Stuff each paw lightly, sew it closed, and attach it to the bottom of a leg tube; on mine the paws come out as plump, round balls.
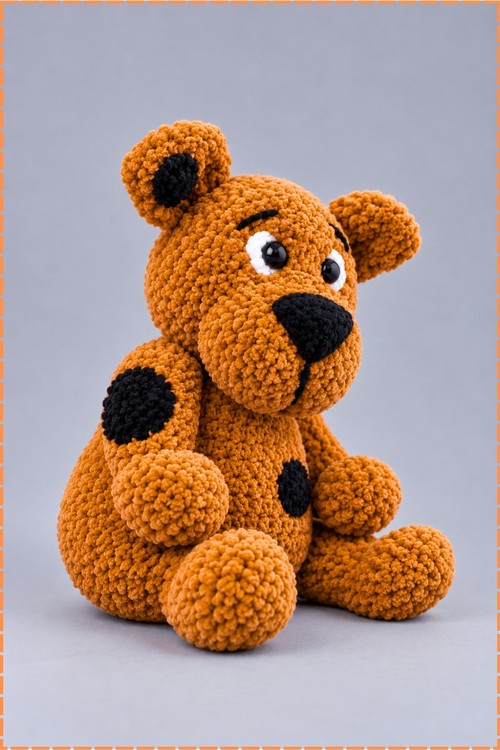
- Sew the front legs to the shoulders so they hang down the sides and the paws rest at his lap.
- Sew the two back paws to the lower front of the body, side by side and pointing forward, so he looks seated with his feet out in front.
Tail (Optional, Ginger Tan)
- Chain 16.
- Rows 1 to 6: Work 6 rows of 15 sc.
- Fold lengthwise, whipstitch the seam closed, and attach it securely to the lower back of the body; my front photo doesn't show a tail, so add it if you want the full look from behind.
Spots and Details (Fluffy Black)
- Back spot (optional, not visible on my front photo): Chain 10 with fluffy black yarn.
- Work 9 sc along the chain, put several stitches into the end chains, and keep working around both sides of the chain to build an oval over about 3 to 4 rounds.
- Fasten off with a long tail and sew the oval onto his back.
- Round spots on my version: start with a magic ring in fluffy black yarn and work flat increase rounds until the circle reaches your preferred size, then fasten off with a long tail.
- Sew one round spot over the shoulder of one front leg, one on the lower front of the body slightly off centre, and one on the front of one ear, matching the placement on mine.
- Shoulder spots from the original pattern are small embroidered black triangles; mine replaces them with the round crocheted patches, so keep the triangles as an option.
Collar and Dog Tag (Optional)
- Collar: Chain 32 with blue yarn, adjusting the length to fit your plush's neck.
- Skip the first chain and work a row of sc across, then repeat for 3 rows in total (31 sts per row).
- Wrap the collar around the neck and stitch the ends together permanently.
- Dog tag: Chain 5 with gold or yellow yarn.
- Work 4 rows of 4 sc, or shape a small diamond or square.
- Sew the tag onto the front of the collar over the seam to hide it; my version has no collar because his head sits so low on the body, so skip this if you copy that pose.
Yarn Substitution
Any bulky chenille or velvet yarn works if it suits a 5.5 mm hook. Plush velvet gives a smoother surface, while teddy or bouclé style yarn looks shaggier like mine. Regular worsted acrylic also works with a smaller hook, but the plush will come out smaller and every stitch will show, so the spots and nose look sharper and more cartoon like. Keep the black spot yarn the same weight as the body yarn so the patches sit flush.
Customization Ideas
Add the blue collar and gold tag if you want the classic look, and sew the head a little higher so the collar has room to show. A tiny crocheted bone or a mini Scooby Snack biscuit stitched into one paw adds a fun detail. For a baby gift, embroider the eyes with black yarn instead of using safety eyes.
Frequently Asked Questions
Why can't I see my stitches in chenille yarn? Chenille hides the stitch tops. Count by feeling for each V with your finger, keep a marker in every round, and work in good light.
Can I skip the collar? Yes. Mine doesn't have one. Sewing the head low onto the body hides the neck, so the plush looks complete without it.
My ears won't stay up. What can I do? Make sure each ear is two pieces whipstitched together. If they still flop, sew a few stitches through the base of each ear into the head to anchor them at the angle you want.